How To Polish Car Paint: Genius & Effortless
Learn how to polish car paint effortlessly! This guide breaks down the simple steps to restore your car’s shine, remove imperfections, and protect it, even if you’re a beginner. Get a showroom finish without the hassle.
Is the shine on your car looking a little dull? Do you see tiny scratches or swirl marks that bother you? You’re not alone! Many car owners want that deep, glossy finish, but the idea of polishing can seem complicated. You might think it requires special tools or advanced skills. But what if I told you it’s actually quite straightforward and you can achieve amazing results yourself? With the right approach, polishing your car paint can be a rewarding and surprisingly effortless process. We’ll walk through everything you need to know, step by step, to bring back that stunning car shine you love.
Why Polish Your Car Paint?
Polishing your car’s paint isn’t just about making it look good. It’s a crucial part of car care that offers several benefits:
- Restores Gloss and Shine: Over time, exposure to sunlight, pollution, bird droppings, and everyday wear can dull your car’s clear coat. Polishing carefully removes these top layers of imperfection to reveal a smoother, brighter surface underneath, restoring that showroom shine.
- Removes Surface Imperfections: Polishing is a fantastic way to tackle minor issues like light scratches, swirl marks (those circular scratches from improper washing), oxidation, and water spots. It gently buffs away the damaged areas.
- Prepares for Protection: A polished surface is smooth and clean, making it the perfect canvas for waxes, sealants, or ceramic coatings. These protective layers will bond better and last longer on a freshly polished surface, offering better defense against the elements.
- Increases Vehicle Value: A well-maintained and shiny car is always more attractive to potential buyers and generally commands a higher resale value.
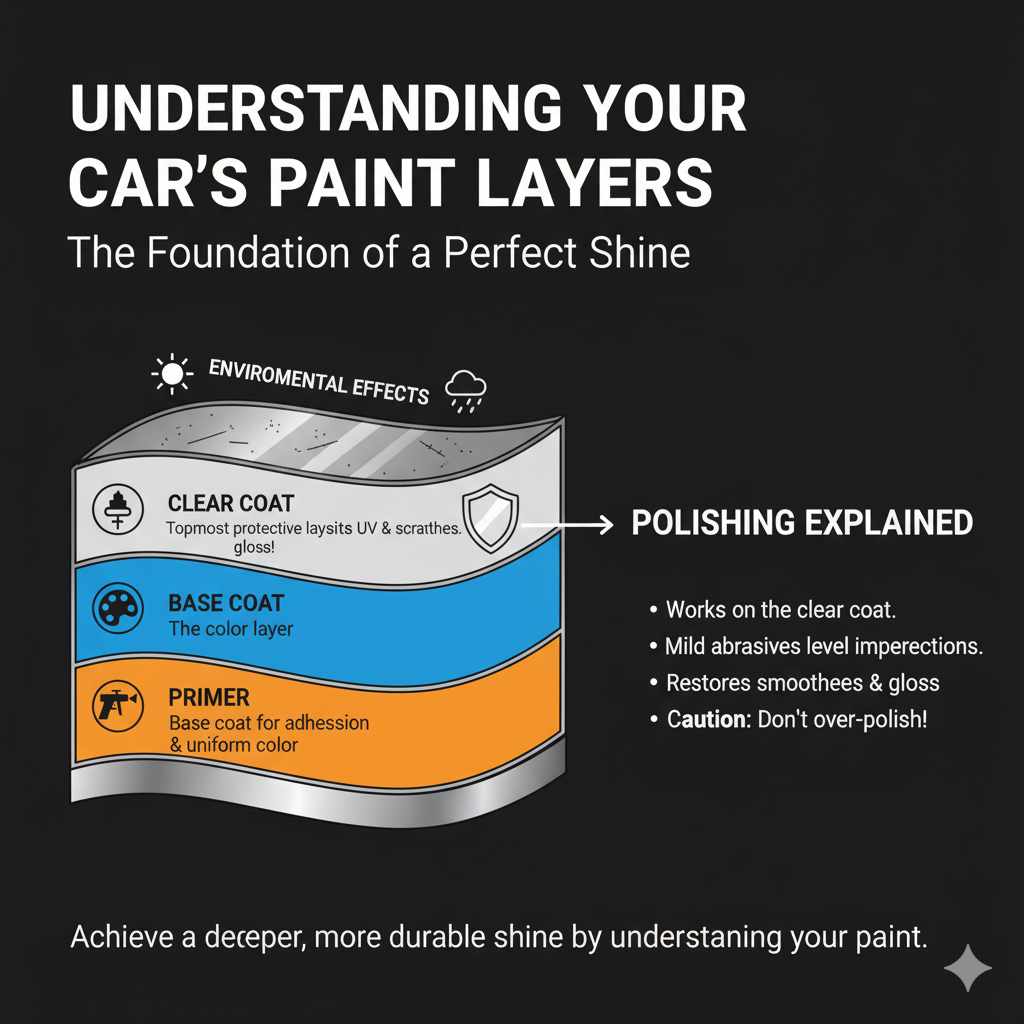
Understanding Your Car’s Paint Layers
Before we dive into polishing, it helps to know a little about your car’s paint. Modern car paint typically consists of several layers:
- Primer: The base layer that adheres to the metal body panels and provides a uniform color for the next coat.
- Base Coat: This is the color layer of your car.
- Clear Coat: The topmost layer, which is transparent and provides protection against UV rays, scratches, and environmental damage. It’s also the layer that provides the glossy finish.
When you polish your car, you are almost exclusively working on this clear coat. Polishes contain very mild abrasives that gently level out the clear coat, removing minor imperfections and restoring smoothness. It’s important not to over-polish, as this can thin the clear coat too much, which can lead to future problems.
Essential Tools and Supplies
Gathering the right tools makes the job much easier and more effective. Here’s what you’ll need for a beginner-friendly polish job:
- Car Wash Soap and Buckets: Before polishing, your car must be thoroughly washed and dried. Use a pH-neutral car wash soap. The two-bucket method (one for soapy water, one for rinsing your wash mitt) is highly recommended to prevent transferring dirt back onto the car and causing more scratches. Learn more about the two-bucket method here.
- Microfiber Wash Mitt: Gentle on paint and effective at lifting dirt.
- Drying Towels: High-quality, plush microfiber drying towels are essential to absorb water without scratching.
- Clay Bar or Clay Mitt: To remove bonded contaminants (like embedded dirt, tree sap, or industrial fallout) that washing alone won’t remove.
- Rubbing Alcohol or Panel Wipe: To clean the surface thoroughly before polishing, removing any oils or residues that could get in the way. A 15% isopropyl alcohol and 85% distilled water solution is often used.
- Car Polish: For beginners, a “one-step” polish or a mild finishing polish is a great choice. These are less aggressive and designed to remove light defects and add shine. Avoid “compounds” unless you’re dealing with very deep scratches, as they are much more abrasive.
- Applicator Pads: Foam or microfiber applicator pads are used to apply the polish to the paint.
- Microfiber Towels (for buffing): You’ll need several clean, high-pile microfiber towels to gently buff off the polish residue.
- Gloves and Eye Protection: For safety.
- Optional: A polisher (dual-action polisher is beginner-friendly) if you want to speed up the process and achieve better results, though hand polishing is perfectly achievable.
Having good quality microfiber towels is key. They are designed to trap dirt and grit away from the paint surface, preventing scratches. You can find excellent microfiber products from reputable automotive detailing suppliers.
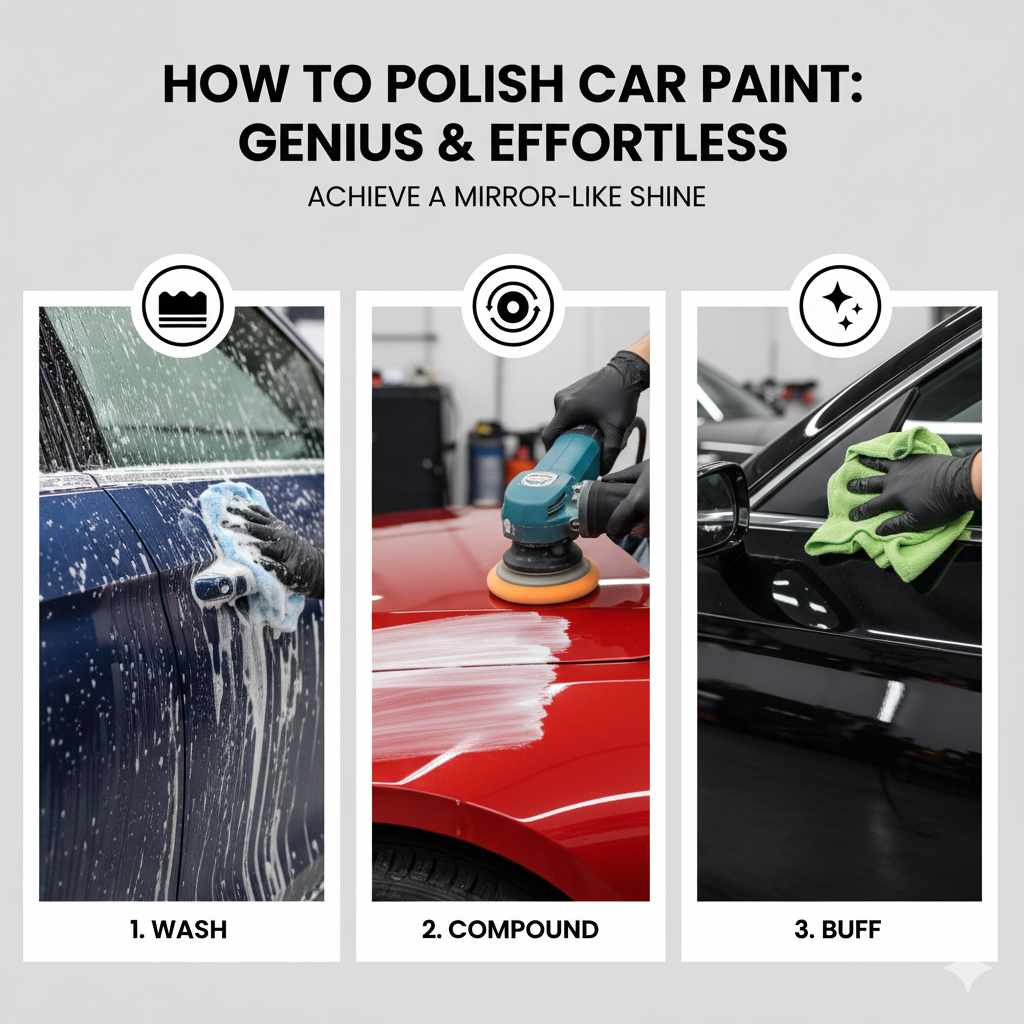
Step-by-Step Guide to Polishing Your Car Paint
Follow these simple steps for a brilliant finish. Remember, patience and working in a cool, shaded area are your allies!
Step 1: Wash and Dry Thoroughly
This is the most critical pre-polishing step. Any dirt or grit left on the surface will act like sandpaper when you start polishing, creating more scratches. Use the two-bucket method and a quality car wash soap. Rinse the car completely.
After washing, dry your car meticulously with soft microfiber drying towels. Ensure you get into door jambs and other crevices where water can hide.
Step 2: Decontaminate the Paint
Even after washing, your paint might have bonded contaminants. You can feel these as a grittiness when you gently run your hand over the dry paint (use a plastic bag or gloved hand to feel it better). Claying removes these.
How to Clay Bar:
- Take a section of the clay bar and knead it until it’s soft.
- Spray a lubricant (like a clay lubricant spray or a diluted car wash soap mixture) onto a small section of the car.
- Gently glide the clay bar back and forth over the lubricated area. You’ll feel it removing the contaminants.
- As the clay picks up dirt, fold it over itself to expose a clean surface.
- Once a section is smooth, wipe dry with a microfiber towel.
- Repeat this process over the entire car.
A clay mitt or towel can be an easier alternative for beginners, working similarly but often faster.
Step 3: Prepare for Polishing
Mask off any trim, rubber seals, or plastic parts with painter’s tape. Polish can stain or dry white on these dark surfaces, and tape helps you achieve clean edges.
Wipe down each section you plan to polish with rubbing alcohol or a panel wipe. This removes any remaining wax, silicone, or oils from lubricants, ensuring the polish can make direct contact with the paint.
Step 4: Apply the Car Polish
Work on one small section at a time (e.g., a hood panel, a fender). Direct sunlight can cause polish to dry too quickly and make buffing difficult.
Hand Application:
- Apply a few pea-sized drops of polish to a foam or microfiber applicator pad.
- Gently spread the polish evenly over the small section of paint in a crosshatch pattern (e.g., horizontal strokes, then vertical).
- Work the polish into the paint with moderate pressure, using overlapping motions. You should see the polish start to become clear or slightly hazy as it works. This typically takes 4-6 passes.
Machine Application (Dual-Action Polisher):
- Apply 3-4 pea-sized drops of polish to your polishing pad.
- Spread the polish over a 2×2 foot section of paint at a very low speed (speed 1 or 2) to initially spread it.
- Increase the polisher speed to a medium setting (speed 3-5 for most DA polishers) and work the polish in a crosshatch pattern with moderate pressure for 4-6 passes.
- Keep the pad flat and avoid excessive pressure.
The general idea is to spread the polish and then work it until it becomes almost clear. This action is what removes the minor defects. Check out this video for a visual guide on machine polishing techniques.
Step 5: Buff Off the Polish Residue
Immediately after working one section, take a clean, plush microfiber towel and gently wipe away the dried polish residue. Use a light touch, and gently flip the towel to a clean side as needed. You should be left with a slick, smooth, and shiny surface. If there’s any streaking, you might need to do a second, lighter pass with your applicator or buff again with a fresh towel.
Step 6: Repeat and Inspect
Move to the next section of your car and repeat steps 4 and 5. Work your way systematically around the entire vehicle. As you complete each panel, step back and inspect your work in good light. You should see a noticeable improvement in gloss and a reduction in imperfections.
Step 7: Apply Protection
Once you’ve polished the entire car, it’s time to protect that beautiful finish. This step is crucial to keep your paint looking great and to prevent it from oxidizing again quickly.
You can use:
- Waxes: Provide a warm glow and good protection for a few weeks to a couple of months.
- Paint Sealants: Often synthetic, they offer longer-lasting protection (3-6 months) and a sharper, more reflective shine.
- Ceramic Coatings: The most durable option, offering protection that can last from a year up to several years, with superior hydrophobic (water-repelling) properties. This is a more advanced application, so research and caution are advised for beginners.
Apply your chosen protection according to its product instructions. Typically, this involves applying a thin, even layer with an applicator pad, letting it haze over (cure), and then buffing it off with a clean microfiber towel. Some people may use a panel wipe again before applying a ceramic coating for optimal bonding.
Hand Polishing vs. Machine Polishing
Here’s a quick look at the pros and cons:
| Method | Pros | Cons |
|---|---|---|
| Hand Polishing | • Most affordable • No power required • Great for beginners • Good for removing light defects • Gentle on paint if done correctly |
• Very labor-intensive and time-consuming • Can be difficult to achieve consistent results • Limited power to remove moderate defects |
| Machine Polishing (DA Polisher) | • Much faster and less tiring • Achieves superior results more consistently • Can remove moderate paint defects effectively • Beginner-friendly and reduced risk of paint damage compared to rotary polishers |
• Higher initial cost for the tool and pads • Requires learning basic machine control • Needs electricity or battery power |
For a truly “effortless” feel, especially on larger vehicles or for more significant paint correction, a dual-action (DA) polisher is recommended. However, for light polishing and shine enhancement, hand polishing can yield fantastic results with dedication.
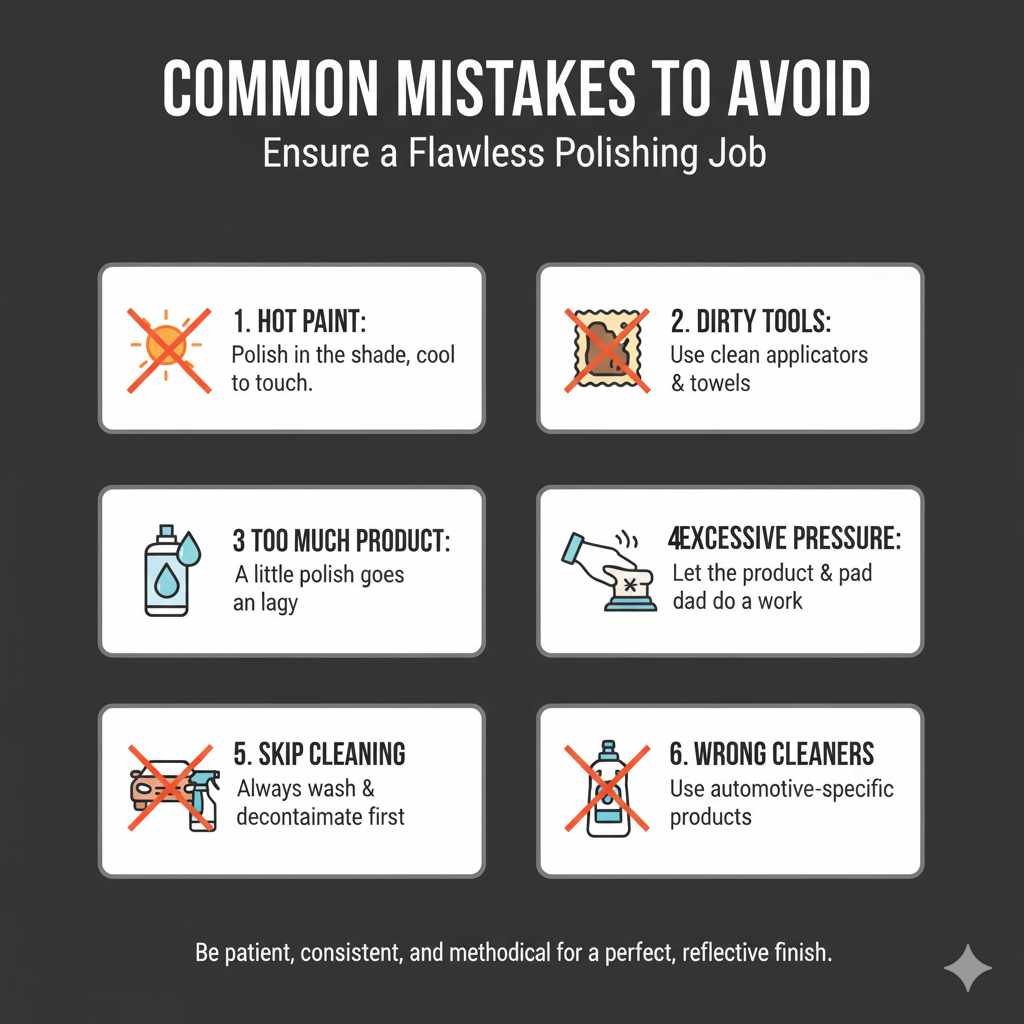
Common Mistakes to Avoid
Even with the best intentions, a few common pitfalls can turn a polishing job from brilliant to problematic. Be mindful of these:
- Polishing in Direct Sunlight or on Hot Paint: This is a big one. The heat causes the polish to dry too fast, making it incredibly difficult to remove and potentially causing marring or hazing. Always work in the shade or early/late in the day, and ensure the paint is cool to the touch.
- Using Dirty Applicators or Towels: As mentioned, this is a recipe for more scratches. Always use clean tools and switch to a clean side or a fresh towel frequently.
- Using Too Much Product: A little polish goes a long way. Using too much makes it messy, hard to work with, and doesn’t improve the outcome.
- Applying Too Much Pressure: Let the polish and your pads do the work. Over-applying pressure can create more heat and potentially damage the paint or the polisher.
- Skipping the Washing and Decontamination Steps: Trying to polish over dirt is like sandpapering your car. Make sure the surface is pristine before you apply a single drop of polish.
- Using Abrasive Household Cleaners: Never use dish soap (it strips wax and can dry out paint) or abrasive household cleaners. Stick to products specifically designed for automotive paint.
- Polishing Too Aggressively When Not Needed: For most owners looking for shine and minor defect removal, a finishing polish is sufficient. Heavy compounds should be reserved for professionals or significant paint restoration.
Remember, consistency is key. If you’re hand polishing, take your time and ensure you cover every section thoroughly and evenly.
FAQ: Your Polishing Questions Answered
Q1: How often should I polish my car?
A1: For most daily drivers, polishing once or twice a year is sufficient. If your car is regularly exposed to harsh elements or you want to maintain a show-car finish, you might polish more often, but always prioritize protection after polishing.
Q2: Can I polish a brand-new car?
A2: Yes! Even new cars can benefit from polishing. They might have minor imperfections from the factory or dealership washing. Polishing prepares the surface perfectly for a long-lasting sealant or ceramic coating, offering crucial protection from day one.
Q3: What if I can’t get a scratch out with polishing?
A3: If a scratch is so deep that you can feel it significantly with your fingernail, it likely goes through the clear coat and may require professional attention (wet sanding, touch-up paint, or repainting). Polishes are designed for minor surface-level defects.
Q4: How do I know if I’m using the right amount of polish?
A4: For hand or machine application, start with just a few pea-sized drops. Spread it evenly before you start working it. As you polish, the product will turn from creamy to a clear or hazy residue. If it dries out and becomes difficult to remove, you may have used too little lubricant or worked it for too long without a proper pad.
Q5: Is it okay to wash my car immediately after polishing?
A5: It’s best to wait at least 24 hours after applying a sealant or wax, and often 48-72 hours for ceramic coatings, before washing the vehicle. This allows the protective layer to cure properly. Always check the specific product instructions.
Q6: What’s the difference between polishing and waxing?
A6: Polishing is a corrective process that removes minor imperfections from the paint’s surface to restore smoothness and shine. Waxing (or sealing) is a protective step that adds a layer of protection and gloss to the polished surface. You polish first, then protect.
Q7: Can I use a household buffer?
A7: While some people might try, household buffers are generally not designed for automotive paint and can be too aggressive or uneven, potentially causing more harm than good. A dedicated dual-action polisher is specifically designed to be safe and effective for car paint.
Conclusion
You’ve now got the knowledge to tackle your car’s paint and bring back that amazing shine! Remember, polishing doesn’t have to be a daunting task. By following these simple, step-by-step instructions, gathering the right tools, and working patiently, you can achieve “genius” and “effortless” results right in your own driveway. It’s about understanding the process, protecting your paintwork, and enjoying the satisfaction of a beautifully polished car.
Don’t forget that regular washing and a good layer of protection after polishing are essential for maintaining that brilliant finish. So, roll up your sleeves, grab your microfiber towels, and get ready to see your car gleam! You’ve got this!