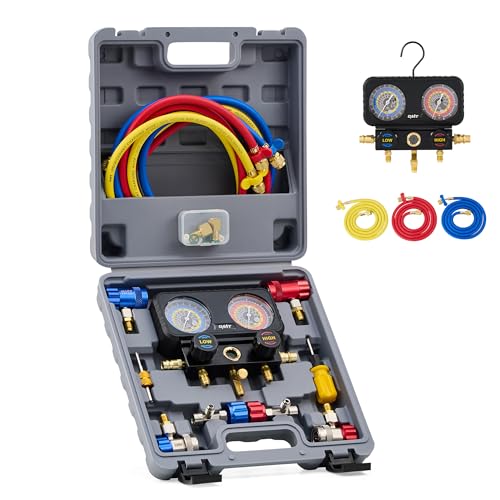
How to Read Car AC Gauges: Manifold Gauge Set Setup & Calibration
A manifold gauge set reads car AC pressure through two hoses — blue for the low side, red for the high side — but the gauges must be zero-calibrated before every use or the PSI numbers will be wrong. Skipping calibration is the most common reason DIYers misdiagnose a healthy AC system as low on refrigerant. This guide covers connecting the hoses, zeroing the gauges, and reading a basic R134a pressure chart.
Quick Answer
Connect the blue hose to the low-side service port and the red hose to the high-side port, then check that both gauges read 0 PSI with the engine off. On a healthy R134a system at 80°F, expect roughly 25–35 PSI on the low side and 150–200 PSI on the high side once the AC has run for several minutes.
What Are Car Air Conditioning Gauges?
Car AC gauges, or manifold gauges, are tools that measure the pressure in your car’s air conditioning system. They tell you if your AC has enough refrigerant to cool your car properly.
A manifold gauge set is a two-hose diagnostic tool that reads refrigerant pressure on the suction (low) and discharge (high) sides of an AC system at the same time. It checks the “health” of the system the way a blood pressure cuff checks a patient — the numbers alone don’t fix anything, but they tell you exactly where to look. Low-side pressure (blue gauge) measures the suction side, while high-side pressure (red gauge) checks the output side. Comparing the two readings to a temperature-based chart tells you if the AC is low on refrigerant, overpressurized, or has a failing part.
Why Reading Gauges Matters
Reading AC gauges saves you from pricey repairs. A quick check can spot problems early, like low refrigerant or a bad compressor. Plus, it’s a useful skill for any car owner — I once saved $200 by diagnosing my own AC with a gauge set instead of paying a shop just to tell me the same thing.
Tools You Need to Read Car AC Gauges
You don’t need a fancy garage to get started. Here’s what you’ll need:
- Manifold gauge set: A device with blue (low-side) and red (high-side) gauges, plus hoses.
- Refrigerant: Usually R134a for cars made before 2014, or R1234yf for most 2014-and-newer models (check the underhood AC sticker — the two are not interchangeable and use different service ports).
- Safety gear: Gloves and safety glasses to stay safe.
- Thermometer: To check vent temperature (optional but handy).
I recommend an Orion Motor Tech (OMT) style manifold gauge set for beginners — affordable, durable, and easy to read once you know what the two dials mean.
Analog vs. Digital Manifold Gauge Sets: Which Should You Buy?
Analog gauges are the cheaper, more common starting point — they need no batteries, tolerate moisture well, and are accurate enough for a basic low/high pressure read. Their downside is parallax error (the needle looks like it’s pointing to a different number depending on your viewing angle) and manual zero-calibration that has to be checked before every use. Digital manifold gauges remove both problems: sensor-based readings, no parallax, and some models calculate superheat and subcooling automatically. The tradeoff is cost — a digital set typically runs 1.5–2x more than an equivalent analog kit — and a screen that’s harder to read in direct sunlight than a physical needle.
| Gauge Type | Accuracy | Typical Cost | Best For |
|---|---|---|---|
| Analog | Good, but needs manual zero-calibration and can suffer parallax error | $30–$70 | Beginners, occasional DIY checks |
| Digital | High — sensor-based, no parallax, often auto-calculates superheat | $70–$190 | Frequent use, more precise diagnostics |
Table 1: Recommended Tools for Reading Car AC Gauges
| Tool | Purpose | Approx. Cost | Where to Buy |
|---|---|---|---|
| Manifold Gauge Set | Measures AC pressure | $40-$100 | AutoZone, Amazon |
| R134a or R1234yf Refrigerant | Refills AC system | $10-$20 | Walmart, O’Reilly |
| Safety Glasses | Protects eyes | $5-$15 | Home Depot |

Best Manifold Gauge Set Pick
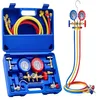
OMT 3-Way AC Manifold Gauge Set (R12/R134a/R502/R22)
A basic analog 3-way gauge set with 5ft hoses — the same style referenced in this guide’s tools section.
- Best for: First-time DIYers checking pressure on an R134a system
- Why we picked it: Clear analog dials, color-coded hoses, and a low price for occasional use
- Main drawback: Needs manual zero-calibration before every use, and does not support R1234yf systems
Compare more AC gauge tools
 Option 1 Elitech Digital Manifold Gauge Kit
|
 Option 2 Vansky UV Dye Leak Detector
|
 Option 3 A/C Pro Vent Thermometer
|
As an Amazon Associate we earn from qualifying purchases.
How to Calibrate and Zero Your Gauges Before Every Use
Skip this step and every reading that follows is off by whatever your gauges were reading before you started — a $200 misdiagnosis waiting to happen. Do this before connecting any hoses to the car.
- Disconnect the hoses: Zero-calibration only works with the manifold isolated from any pressure source, so remove both hoses first.
- Open both valves: Open the low-side and high-side valves on the manifold so the gauges are exposed to open air (atmospheric pressure).
- Find the calibration screw: Look for a small access hole or cover on the gauge face — most analog gauges have one.
- Adjust to zero: Using a small screwdriver, turn the calibration screw until the needle sits exactly on 0 PSI.
- Repeat for both gauges: Zero the low-side (blue) and high-side (red) gauges separately — they don’t share a calibration point.
Digital gauges skip this manual step entirely, which is one of the reasons they’re worth the extra cost if you’re checking AC pressure often (see the comparison table above).
How to Read Car Air Conditioning Gauges: Step-by-Step Guide
Ready to dive in? Here’s a simple guide to reading your car’s AC gauges. I’ve used this method on my own Toyota Corolla, and it’s straightforward once you know what the numbers mean.
- Set Up the Gauges: Connect the blue hose to the low-side port and the red hose to the high-side port on your car’s AC system. These ports are usually under the hood.
- Check Static Pressure: With the car off, check both gauges. They should read the same (around 70-100 PSI, depending on temperature).
- Start the Car: Turn on the engine and set the AC to max cool, high fan. Let it run for 5 minutes.
- Read the Gauges: Low-side (blue) should be 25-35 PSI for R134a at 80°F. High-side (red) should be 150-200 PSI at 80°F.
- Compare Readings: Use a pressure chart (see Table 2) to check if readings are normal for the current ambient temperature.
- Diagnose Issues: Low or high readings can point to problems like low refrigerant or a bad compressor.
Table 2: Normal R134a Pressure Ranges at Common Temperatures
| Ambient Temp (°F) | Low-Side Pressure (PSI) | High-Side Pressure (PSI) |
|---|---|---|
| 70 | 20-30 | 135-155 |
| 80 | 25-35 | 150-200 |
| 90 | 35-40 | 200-225 |
These ranges are for a basic first-pass read. For a full ambient-temperature diagnostic chart plus a breakdown of what every high/low combination means, see our complete AC gauge pressure chart and fault diagnosis guide.
Benefits of Reading Car AC Gauges
Learning how to read car air conditioning gauges is a genuinely useful skill. Here’s why:
- Save Money: Spot issues early and avoid costly repairs.
- Stay Cool: Fix your AC to keep your car comfortable in summer.
- Learn New Skills: Work on your car with confidence instead of guessing.
The downside? It takes a little practice to get confident. My first attempt was a flop — I overfilled the system and had to recover the excess before starting over. Be patient, and you’ll get it.
Common Mistakes to Avoid
- Opening the High-Side Valve: Never open the red valve while the AC is running. It can cause injury or damage.
- Ignoring Temperature: Pressure readings depend on outside temperature. Check a chart first.
- Overfilling Refrigerant: Too much refrigerant can harm your compressor. Go slow and check often.
- Using R134a Gauges on an R1234yf System: The two refrigerants use different service port sizes and aren’t gauge-compatible — check the underhood sticker before connecting anything.
My Top Tips for Reading AC Gauges
After tinkering with a few different cars, I’ve picked up a few tricks:
- Check Gauges at Zero First: Before connecting, ensure gauges read 0 PSI. See the calibration steps above if they don’t.
- Work in the Shade: Hot sunlight can mess with pressure readings. Park in a garage or shaded spot.
- Use a Thermometer: Check vent temps (aim for 40-50°F) to confirm your AC is cooling right.
“Once, I forgot to check static pressure first and wasted an hour chasing a false reading. Always start with the car off to get a baseline before you touch the AC switch.”
Table 3: Troubleshooting Common AC Gauge Readings
| Low-Side PSI | High-Side PSI | Possible Issue | Fix |
|---|---|---|---|
| Below 20 | Below 100 | Low refrigerant | Add refrigerant slowly |
| Above 50 | Above 250 | Overpressurized | Recover excess refrigerant |
| 30-40 | 100-150 | Compressor issue | Check compressor clutch |
Safety Tips for Working with AC Gauges
Safety first! AC systems use high-pressure refrigerant, so take care:
- Wear gloves and safety glasses to protect yourself.
- Never vent refrigerant into the air — it’s illegal under federal law and harms the environment.
- Work in a well-ventilated area to avoid breathing refrigerant fumes.
📊 Knowingly venting refrigerant instead of recovering it can carry a civil penalty of up to $44,539 per day per violation under EPA Section 608 of the Clean Air Act — Source: EPA.gov, Section 608 Regulatory Updates, 2026
I once got a face full of refrigerant mist while disconnecting a hose too fast — yuck. Trust me, safety gear is worth it.
Alternative Ways to Check Your Car’s AC
If gauges feel intimidating, try these options:
- Check Vent Temps: Use a thermometer to see if your AC blows cold (40-50°F is ideal). See our car AC temperature chart for readings by outside temp.
- Look for Leaks: Use a UV dye kit to spot refrigerant leaks (see Option 2 above).
- Visit a Pro: If you’re unsure, a mechanic can diagnose issues for $50-$100.
Gauges are the most accurate method, though. They give you hard numbers to work with, unlike guessing from warm air. If your gauge readings point to low refrigerant and you’d rather not use a full recovery machine, our guide on removing refrigerant from a car AC without a recovery machine covers both R134a and R1234yf systems.

Conclusion
Reading car air conditioning gauges isn’t as tough as it seems once the gauges are calibrated. Connect the hoses, zero the gauges, check static pressure, then run the AC and compare readings to a chart. Avoid common mistakes like overfilling or mismatching R134a and R1234yf equipment, and always put safety first. For a deeper diagnostic chart covering every possible reading combination, see our full AC gauge pressure chart and fault diagnosis guide.
Frequently Asked Questions
What Do Car AC Gauges Measure?
Car AC gauges measure the pressure of refrigerant in the system. The blue gauge shows low-side pressure (suction), and the red gauge shows high-side pressure (output). Comparing both readings against a temperature chart helps diagnose issues like low refrigerant or compressor problems.
What Are Normal AC Gauge Readings?
For R134a at 80°F, low-side pressure should read roughly 25-35 PSI, and high-side pressure should read roughly 150-200 PSI. These numbers shift with ambient temperature and refrigerant type — R1234yf systems run different pressures entirely.
Why Are My Gauge Readings the Same?
If both gauges show the same pressure with the car off, that’s normal — it’s called static pressure. If they’re still the same once the AC is running, the compressor likely isn’t engaging. Check the compressor clutch or the AC-related fuses.
Can I Use Gauges Without Adding Refrigerant?
Yes. Gauges can check pressure without you adding anything to the system. They’re a diagnostic tool first — connecting them and reading the pressure won’t change the refrigerant charge on their own.
What If My Low-Side Pressure Is Too High?
High low-side pressure, above roughly 50 PSI, usually points to too much refrigerant in the system or a failing compressor. Have the excess refrigerant recovered by a professional, or have a mechanic check the compressor if the overcharge doesn’t explain it.
How Do I Know If My AC Needs Refrigerant?
If the low-side gauge reads below 20 PSI and the high-side reads below 100 PSI, the AC is likely low on refrigerant. Add the correct type — R134a or R1234yf, matched to your car’s underhood sticker — slowly while monitoring both gauges.
Are Digital Gauges Better Than Analog?
Digital gauges are more precise, skip manual zero-calibration, and are easier to read at a glance. Analog gauges are cheaper, need no batteries, and work fine for occasional DIY checks once you’ve zeroed them correctly. Choose based on how often you’ll use the set and your budget.
Products related to this article
Sponsored / affiliate links. As an Amazon Associate I earn from qualifying purchases. I may earn additional commission from eligible campaigns.