How To Recharge Refrigerant In A Car Yourself (Easy Steps)
This guide will walk you through the whole process. We’ll cover what refrigerant is, why it gets low, and exactly how to add more. You’ll learn how to stay safe and avoid common mistakes.
By the end, you’ll have the confidence to tackle this yourself and save some money too.
Recharging car refrigerant yourself is possible with the right tools and knowledge. It involves checking system pressure, adding the correct type and amount of refrigerant, and ensuring the system is sealed. This guide provides easy steps for a DIY approach to car AC repair.
Understanding Your Car’s AC System
Your car’s air conditioning, or AC, is a clever system. It uses a special fluid to move heat. This fluid is the refrigerant.
Think of it like the blood of your AC system. It cycles through different parts, changing from a gas to a liquid and back again.
This changing process is key. When it’s a liquid, it absorbs heat from inside your car. Then, it turns into a gas and moves to the outside.
There, it releases the heat. This cycle cools the air that blows into your car. It’s a continuous loop of cooling.
The system has several main parts. There’s the compressor, which pumps the refrigerant. The condenser sits in front of your car’s radiator.
It cools the hot refrigerant gas. The expansion valve or orifice tube controls the flow. Finally, the evaporator, inside your car, absorbs heat.
Why Does Refrigerant Get Low?
Refrigerant doesn’t just disappear on its own. It’s a closed system. This means the refrigerant should stay inside.
The most common reason it gets low is a leak. Tiny leaks can happen over time in the hoses, seals, or connections.
Even the best systems can develop small leaks. Over many years, this slow loss can be enough to stop your AC from working well. You might notice it’s not as cold as it used to be.
Or it might blow warm air sometimes.
Other issues can also affect refrigerant levels. A faulty component could be the cause. But for most drivers, a slow leak is the main culprit when the AC stops cooling.
It’s important to know the type of refrigerant your car uses. Newer cars often use R-134a. Older cars might use R-12, which is no longer available to the public.
What You’ll Need for a DIY Recharge
Gathering the right supplies is the first step. You don’t need a lot of fancy tools for a basic recharge. But having the correct items makes the job easier and safer.
Safety first is always the motto here.
You’ll need a can of the right refrigerant. Make sure it’s the correct type for your car. Usually, this is R-134a for cars made after 1994.
Check your owner’s manual or look for a sticker under the hood. Many cans come with a built-in gauge and hose.
This kit is very handy. It connects directly to your car’s AC system. The gauge tells you the pressure.
This is crucial for not overfilling. Overfilling can damage your AC system. It’s like giving someone too much to drink; it’s not good.
You might also want a pair of gloves and eye protection. Refrigerant can cause frostbite if it touches your skin. It can also damage your eyes.
A clean rag is also good to have for wiping up any spills.
Choosing the Right Refrigerant
This is super important. Using the wrong type of refrigerant can cause serious damage. It might also make your AC work worse.
Most cars from the mid-1990s onward use R-134a. You can find this at auto parts stores. It’s in a standard can you connect to your AC.
Some older cars use R-12. This is a different chemical. It’s also called Freon.
You can’t buy R-12 easily anymore. If your car uses R-12, you’ll likely need a professional to convert your system. They can switch it to R-134a.
This is a common upgrade.
Look for a sticker under your hood. It usually says “R-134a” if that’s what your car uses. Your car’s owner’s manual is also a great source of information.
It will tell you the exact type of refrigerant needed. Always double-check before you buy anything.
Step-by-Step: How to Recharge Refrigerant
Let’s get this done! It’s a process that’s easier if you follow it step-by-step. Take your time.
Don’t rush. This will help you avoid mistakes.
First, find the low-pressure service port. This is a small cap on one of the AC lines. It’s usually a metal pipe.
The cap might say “L” or have a blue or black color. It’s often near the front of the engine.
Make sure your car’s engine is OFF. Safety first! Connect the hose from your refrigerant can to this low-pressure port.
Screw it on snugly. Don’t overtighten it. Just make it firm so no air can get in.
Now, start your car’s engine. Turn your AC on to its coldest setting. Set the fan to its highest speed.
You need the system running to get a good pressure reading. This is when the system is actively trying to cool.
Look at the gauge on your refrigerant can. It will show you the pressure. You want to see a reading in the green zone.
The exact numbers can vary. But most kits show a range. If the needle is in the red, your system might be overfilled or have another issue.
Stop immediately.
If the pressure is too low (in the blue or white area), you can start adding refrigerant. Gently press the trigger on the can. Do this in short bursts.
Watch the gauge closely. You don’t want the pressure to go too high.
Add a little at a time. Wait a few seconds. Then check the gauge again.
You’re aiming for the middle of the green range. This usually means the system is properly filled. Don’t just dump the whole can in.
Once the gauge shows the correct pressure, release the trigger. Turn off your car’s engine. Disconnect the hose from the service port.
Screw the cap back on tightly. Now, start your car again. Turn on the AC and see if it’s blowing cold air!
Quick Refrigerant Recharge Checklist
1. Park Car: Engine off.
2. Locate Port: Find the low-pressure service port (often marked ‘L’).
3. Connect Hose: Attach the refrigerant can hose securely.
4. Start Engine: Turn on the car. Set AC to MAX COLD, fan HIGH.
5. Check Gauge: Read pressure. It should be in the green zone.
6. Add Refrigerant: If low, add in short bursts, watching the gauge.
7. Reach Target: Stop when the gauge hits the proper range.
8. Disconnect & Cap: Turn off the engine. Remove the hose.
Replace the cap.
9. Test AC: Start the car. Turn on AC.
Feel for cold air.
When is it Just Low Refrigerant?
Most of the time, if your AC isn’t blowing cold, it’s because the refrigerant is low. This is especially true if your car is older. Think 5-10 years or more.
Small leaks are common as seals wear out.
You might notice the air isn’t as cold as it used to be. Or it might start cold but then get warm. This is a classic sign.
The system has a little refrigerant left, but not enough to do the job well.
It’s like a water bottle. If it’s only half full, you can’t quench a big thirst. Your AC needs a full charge to work its best.
Low refrigerant means the system can’t move heat effectively. It struggles to make that cold air.
When to Worry (and Call a Pro)
While DIY is great, it’s not always the answer. If your AC system has a major leak, just adding refrigerant won’t solve the problem. It will just leak out again quickly.
You might hear hissing sounds. Or you might smell a strange odor.
If the pressure gauge on your recharge kit reads extremely low, or won’t build any pressure, there might be no refrigerant left. This could mean a large leak. Or the compressor might not be working.
These are bigger issues.
Also, if your AC blows hot air no matter what you do, even after trying a recharge, it’s time for a mechanic. There could be a blockage. Or a sensor might have failed.
Sometimes, the compressor itself is bad. These need expert diagnosis.
Normal vs. Concerning AC Performance
Normal:
- Cold air blows consistently.
- System cycles on and off as expected.
- No strange noises or smells.
Concerning:
- Air is not cold, or only slightly cool.
- AC blows warm air sometimes.
- Hissing or grinding noises from the AC.
- A sweet or chemical smell when AC is on.
- AC only works when driving at high speeds.
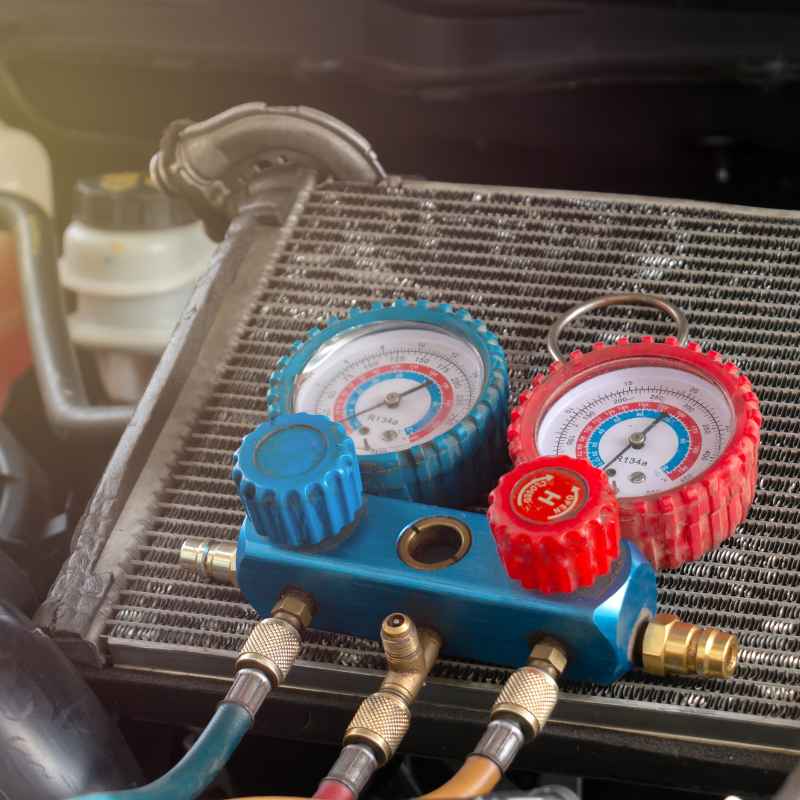
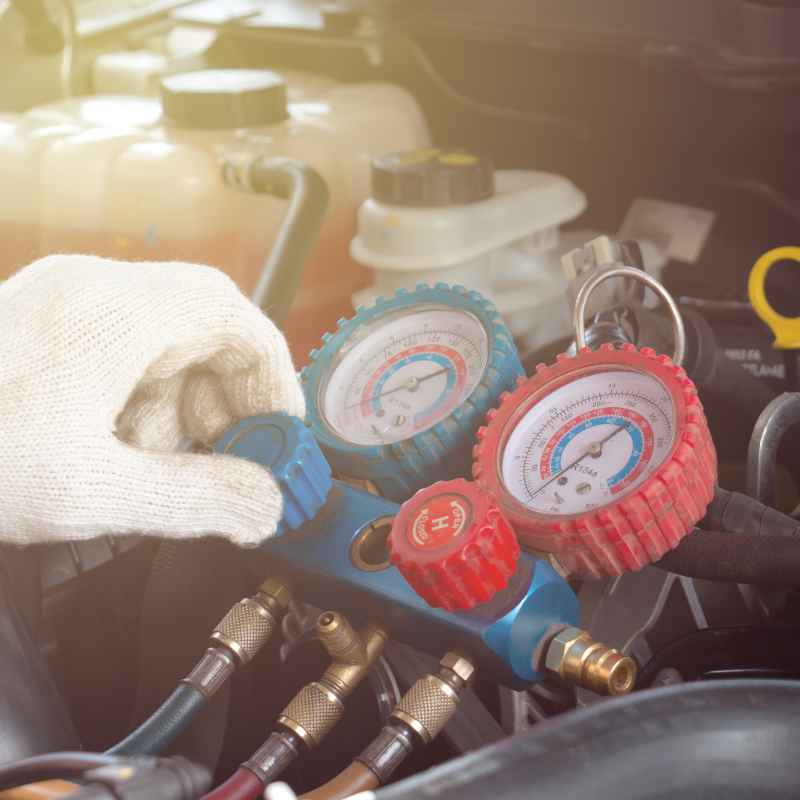
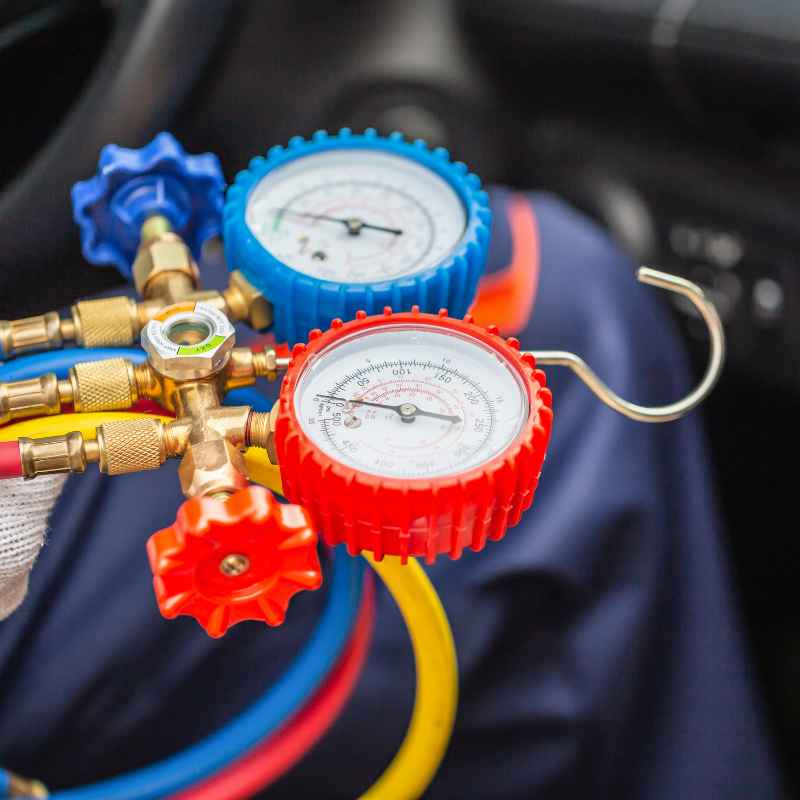
What Does the Gauge Really Mean?
That little gauge on the recharge kit is your best friend. It tells you the pressure inside your AC system. But it’s specifically the pressure in the low-pressure side.
This is where you connect the hose.
When the engine is OFF, the pressure is usually higher. That’s why you need the engine running. With the engine running, the AC system is working.
Refrigerant is flowing and changing state. This is when the low-pressure side should be in a specific range.
For R-134a systems, when the engine is running and the AC is on MAX COLD, the low-side pressure is typically between 25-45 PSI (pounds per square inch). This range can shift slightly depending on the outside temperature. Warmer days mean slightly higher pressure.
If the gauge reads below 25 PSI, your system is likely low on refrigerant. If it reads above 45 PSI, it might be overfilled or have a blockage. Some kits have a color-coded zone for this.
Green is usually good. Red is bad. Blue can mean too low.
Understanding this gauge helps you avoid overcharging. Overcharging is bad. It can damage the compressor and other parts.
It can also make your AC work less efficiently. Always aim for the middle of the recommended range.
Can You Overcharge Your AC?
Yes, you absolutely can overcharge your car’s AC system. This is a common mistake for DIYers. They want to make sure it’s full, so they add too much.
But too much refrigerant is just as bad, sometimes worse, than too little.
When you overcharge, you put too much pressure on the system. The compressor has to work much harder. This uses more gas from your car.
It can also cause parts to overheat and fail. You might hear the compressor cycling on and off rapidly.
The signs of overcharging can include:
- AC blows cool, but not very cold.
- Compressor kicks on and off quickly.
- The system makes strange noises.
- The high-pressure side of the system gets too high. (You can’t see this with a DIY kit).
If you think you’ve overcharged, you’ll need to have a small amount of refrigerant professionally released. Or, if you’re very careful and know what you’re doing, you might be able to release a tiny bit yourself. But it’s risky.
It’s often better to call a pro if you suspect overcharging.
Signs of Overcharged AC System
Compressor Short Cycling: The AC compressor turns on and off very rapidly, like every few seconds. This is a major sign.
Reduced Cooling: Ironically, overcharging can make cooling worse because the system can’t manage the pressure effectively.
System Overheating: Components can overheat due to the excessive pressure and strain.
Strange Noises: You might hear humming, buzzing, or knocking sounds.
Frozen Evaporator: In extreme cases, ice can form on the evaporator inside your car.
Dealing with Leaks
A slow leak is why most people need to recharge. Refrigerant needs to be added every year or two. If this sounds like you, you might want to try a recharge kit that includes a leak sealer.
These products promise to seal small leaks as they add refrigerant.
These sealants can work for tiny pinhole leaks in rubber hoses or O-rings. They are a good option for DIYers. They help keep the refrigerant in the system longer.
This means you won’t have to recharge as often.
However, they are not a magic fix. They won’t seal large leaks. If you have a visible leak, or a fast leak, you’ll need a professional.
Mechanics have special tools to find and fix leaks.
If you choose a sealant kit, follow the instructions exactly. Some require you to run the AC for a certain time after adding the product. Others are a one-step process.
Always check the can to make sure it’s compatible with your car’s system.
How to Find Leaks (DIY Level)
Finding small leaks yourself can be tricky. The most common method is using a UV dye. This dye is added to the AC system with the refrigerant.
You then use a special UV light to look for glowing spots on the AC components.
The dye will escape through any leak. When you shine the UV light on the engine bay, the dye will glow brightly. This shows you exactly where the leak is.
You can buy kits that include both the dye and a UV flashlight.
Another simple check is to look for oily residue. Refrigerant oil circulates with the refrigerant. If there’s a leak, you’ll often see a greasy or oily spot where the refrigerant has escaped.
This is usually on or near a hose connection or seal.
Listen for hissing sounds. Sometimes, you can hear refrigerant escaping, especially if it’s a faster leak. This is more common on humid days, as the escaping gas can sometimes cause condensation.
It’s a faint hissing sound.
Leak Detection Methods
UV Dye: Add UV dye to the system. Use a UV light to find glowing leaks in the engine bay.
Visual Inspection: Look for oily residue on AC lines, connections, and seals. Leaks often leave a greasy mark.
Soapy Water: Spray soapy water on AC connections. If bubbles form, you have a leak.
Listening: Carefully listen for any hissing sounds coming from the AC components when the engine is running.
Safety First, Always!
Working with refrigerant requires care. It’s a chemical under pressure. Here are the most important safety tips:
- Wear Eye Protection: Always wear safety glasses. Refrigerant can spray out unexpectedly and cause serious eye injury.
- Wear Gloves: Use thick gloves, like work gloves or specialized AC gloves. Refrigerant can cause frostbite on your skin.
- Ventilation: Work in a well-ventilated area. Never do this in a closed garage.
- Engine OFF: Always turn off the engine before connecting or disconnecting the refrigerant can.
- Correct Refrigerant: Use only the correct type of refrigerant for your car.
- Don’t Overfill: Follow the gauge and recommended pressure levels.
- Avoid Open Flames: Refrigerant is not flammable, but it can break down into toxic chemicals when exposed to high heat or open flames.
If you get refrigerant on your skin, wash it off immediately with cool water. If it gets in your eyes, flush them with water for at least 15 minutes and see a doctor. These chemicals are not something to take lightly.
Alternative AC Coolants (Are They Safe?)
You might see other products advertised for car ACs. Some are called “stop leak” or “AC boosters.” Many of these contain sealants. Some also claim to make the air colder without adding refrigerant.
Be very careful with these.
Some of these products can be harmful. They might contain chemicals that damage your AC system. Or they might not be compatible with R-134a.
Always check the label to see what’s inside. Look for products approved for automotive AC systems.
The safest bet is usually a standard R-134a recharge kit. These are designed for your car’s AC. They contain the correct refrigerant and often a bit of oil.
Some have leak sealers, which can be helpful.
I remember a time when a friend used a “super boost” product. He swore it would make his AC arctic cold. After using it, his AC started making a loud grinding noise.
It turned out the stuff he used had particles that clogged the system. He ended up needing a very expensive repair. It’s just not worth the risk.
AC Booster vs. Standard Recharge
Standard Recharge Kit: Contains R-134a refrigerant and often oil. Designed to replenish lost refrigerant. Safest for DIY use.
Recharge Kit with Leak Sealer: Adds R-134a and a chemical to seal small leaks. Good for systems with slow, minor leaks.
“AC Boosters” or “Super Coolants”: Often contain additives that claim to improve cooling. Can be risky. May damage seals, clog lines, or be incompatible with your system.
Use with extreme caution or avoid.
Conversion Kits: For older R-12 systems, these kits help convert the system to use R-134a. Usually requires replacing a high-pressure service valve.
Real-World Scenarios
Let’s imagine a few situations. This might help you understand when a DIY recharge is a good idea.
Scenario 1: The Gradual Warm-Up
You’ve had your car for 7 years. Every summer, the AC is great. But this year, it’s not as cold.
It takes longer to cool the car down. You check the dashboard display. It says it’s set to 70 degrees, but it feels more like 80.
This is a perfect case for a DIY recharge. Your system likely has a small leak. The refrigerant has slowly escaped.
A standard R-134a recharge kit with a gauge will fix this. You’ll add refrigerant until the gauge shows the proper pressure. Your AC should feel much colder again.
Scenario 2: The Sudden Stop
You were driving home. Your AC was blowing nice and cold. Then, suddenly, it just stopped.
Now it only blows warm air. There was no gradual decline. It went from cold to hot in minutes.
This might be more than just low refrigerant. It could be a sudden, larger leak. Or it could be an electrical issue.
Maybe the compressor clutch failed. In this case, just adding refrigerant might not work. You should get a professional opinion.
A DIY recharge might not solve this problem and could even cause more issues if the system is not working correctly.
Scenario 3: The Strange Noise
Your AC has been working fine. But lately, you’ve been hearing a faint hissing sound from under the hood when the AC is on. Then, you notice the air isn’t as cold.
The hissing sound is a clear sign of a leak. You can try a recharge kit with a leak sealer. This might stop the leak and keep the refrigerant in the system.
If the hissing continues or gets louder, you might need to find the exact leak and have it repaired professionally.
What This Means for Your Car
If your car’s AC isn’t blowing cold air, it means the system isn’t moving heat out of your cabin. This can make driving uncomfortable, especially in hot weather. It can also make your car feel less valuable.
A simple recharge can often bring back that cool comfort. It’s a practical fix that many drivers can do themselves. This can save you money compared to a shop visit.
A typical shop visit for an AC recharge could cost anywhere from $100 to $300 or more.
However, it’s crucial to understand the limits. A DIY recharge is for systems that are low on refrigerant due to small, slow leaks. It’s not a fix for major mechanical failures or large leaks.
When to Get Professional Help
Here are signs that you should definitely call a mechanic:
- Your AC has stopped working suddenly and completely.
- You hear loud grinding, squealing, or knocking noises from the AC system.
- You smell a strong chemical or burning odor.
- The AC blows warm air even after trying a DIY recharge.
- You suspect a major leak (e.g., refrigerant all gone very quickly).
- Your car is older and uses R-12 refrigerant.
- You feel uncomfortable or unsure about any step of the DIY process.
Professionals have specialized tools. They can accurately diagnose the problem. They can also recover old refrigerant safely.
This is important for the environment. They can also repair leaks with precision.
Quick Tips for AC Care
Keeping your AC system in good shape can prevent issues. Here are some simple tips:
- Run Your AC Regularly: Even in winter, run your AC for a few minutes every week. This keeps the seals lubricated and prevents them from drying out.
- Check for Leaks: Occasionally look under your car for any oily spots or puddles. This could indicate a leak.
- Keep it Clean: Ensure the front of your car (where the condenser sits) is free of debris. Leaves and dirt can block airflow.
- Don’t Overfill: Always use the gauge. Too much refrigerant is harmful.
- Use Quality Products: Stick to reputable brands of refrigerant and recharge kits.
Taking good care of your AC system can help it last longer. It can also prevent those frustrating moments when the air suddenly stops being cold.
Frequent Questions About Car AC Recharge
How often do I need to recharge my car’s AC?
Ideally, you shouldn’t need to recharge often. A healthy AC system is sealed. If you find yourself recharging every year or two, you likely have a slow leak.
It’s best to find and fix that leak to prevent future issues and environmental harm.
Can I mix different types of refrigerant?
No, absolutely not. Mixing refrigerants like R-134a and R-12 will create a chemical reaction. This reaction can damage your entire AC system. Always use the exact type recommended for your car.
What does PSI mean on the AC gauge?
PSI stands for Pounds per Square Inch. It’s a measure of pressure. The gauge on your AC recharge kit shows the pressure in the low-pressure side of your AC system.
This tells you if you have enough refrigerant. It’s a critical safety reading.
Is it safe to recharge my AC in humid weather?
Yes, it’s often easier to recharge in warmer, more humid weather. The AC system works harder. This means the pressure readings are more stable and easier to read.
Just ensure you follow all safety steps. Work in shade if possible.
How long does it take to recharge a car’s AC?
A typical DIY recharge, including connecting the hose, checking pressure, and adding refrigerant, takes about 15-30 minutes. If you’re troubleshooting or looking for leaks, it might take longer. Always take your time.
Can I use an “AC Pro” or similar product?
Products like AC Pro are popular DIY recharge kits. They are generally safe and effective for most R-134a systems with low refrigerant. They usually include a gauge and sealant.
Just be sure to read and follow their specific instructions carefully. Always ensure it’s the correct product for your car.
What if my AC still doesn’t blow cold after recharging?
If you’ve recharged and the air is still not cold, several things could be wrong. Your car might have a larger leak than the product could seal. The compressor might not be engaging.
There could be an electrical issue, or a blockage in the system. At this point, it’s best to consult a qualified mechanic.
Conclusion
Recharging your car’s refrigerant can seem daunting. But with the right tools and a clear understanding, it’s a very doable DIY task. It empowers you to take care of your car.
You can fix a common problem and enjoy cool air again.
Remember to always prioritize safety. Use the correct refrigerant. And pay close attention to the pressure gauge.
If you encounter serious issues, don’t hesitate to call a professional. Happy cooling!