
How To Repair Rock Chips In Car Paint Like A Professional
Rock chips in your car’s paint can feel like tiny daggers to your heart. You wash your car, you polish it, and then BAM! A little white dot or a scratch appears, mocking your efforts.
It’s a super common problem, especially if you drive on highways or gravel roads. It feels like you can’t escape them. But don’t despair!
Fixing these little blemishes isn’t as hard as you might think. With the right steps and a bit of patience, you can make those chips almost disappear. We’ll walk through how to tackle them like a pro.
Understanding how to fix rock chips means protecting your car’s value and its look. These small damages can spread if left untreated, leading to rust. This guide breaks down the process step-by-step, making it simple for anyone to follow. You’ll learn what tools you need and how to apply them.
What Are Rock Chips and Why Do They Happen?
A rock chip is exactly what it sounds like. It’s a tiny piece of damage to your car’s paint. It happens when small objects, like pebbles or gravel, fly up from the road.
They hit your car with force. This force can break the paint layer. Sometimes, it goes all the way down to the metal.
Other times, it just chips off a tiny bit of clear coat or color. This often looks like a small white dot or a starburst pattern.
These little impacts are most common on the front of your car. Think about the hood, the front bumper, and the fenders. The windshield is also a prime spot.
But they can happen anywhere. Even your side panels can get them from tires kicking up debris. It’s a constant battle against the road.
Why is this so common? Cars are always on the move. Roads aren’t always clean.
Trucks and other vehicles can kick up stones. Tires spin and grab small objects. Then, these objects are launched forward.
The faster you go, the more force there is. That makes highway speeds a big culprit. Also, driving on unpaved roads or near construction zones increases the risk.
My First Rock Chip Nightmare
I remember the first time I saw a really noticeable rock chip. I had just bought my car, a sleek black sedan. I was so proud of it.
I drove it everywhere with extra care. One day, I was on my way home from a weekend trip. I had driven through a bit of construction.
When I got home, I parked under a streetlight. I looked at my hood. There it was.
A tiny, stark white circle. It felt like a huge scar. I tried to ignore it.
But every time I looked at my car, my eyes went straight to it. I felt so frustrated. I knew it was small, but it bothered me a lot.
I thought about getting it fixed professionally, but it seemed like a lot of money for such a small issue. That’s when I started researching how to fix it myself.
Assessing the Damage: What Kind of Chip Is It?
Before you grab any tools, it’s smart to look closely. Not all chips are the same. Knowing the type helps you pick the right repair method.
This is super important. You don’t want to make things worse. Think of it like going to the doctor.
They need to know what’s wrong before they can help.
Chip Types to Look For
Surface Scratches: These are light. They only affect the clear coat. You can often feel them with your fingernail, but they don’t go through the color layer.
These are the easiest to fix.
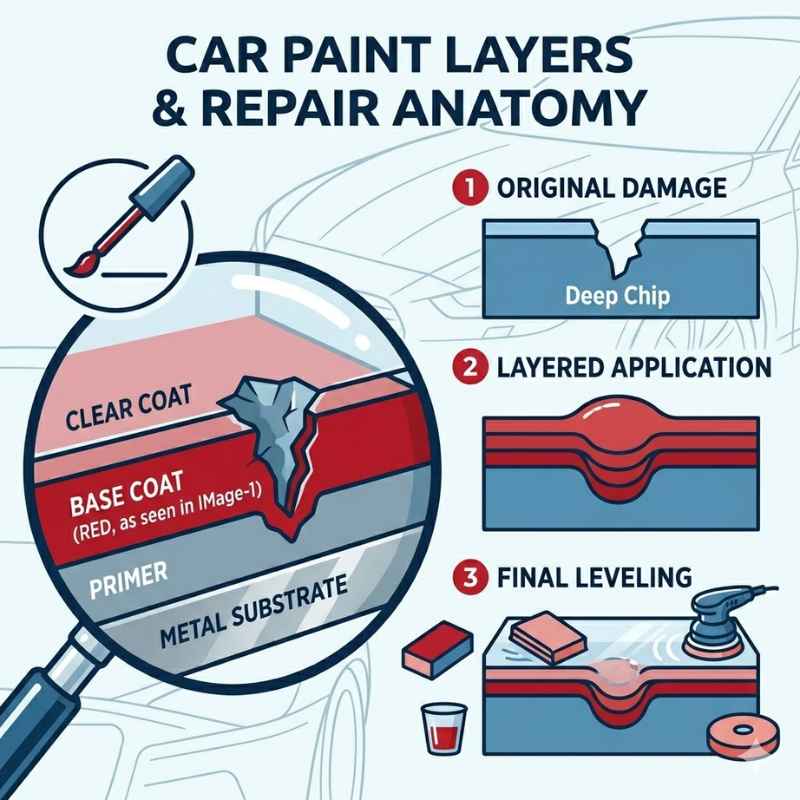
Simple Chips: These go through the clear coat and the color coat. They often look like small dots or tiny craters. The metal or primer layer might be exposed.
These need more attention.
Deep Chips or Cracks: These are more serious. They might go down to the metal. They could also look like a “bullseye” or a starburst.
These are harder to fix perfectly. They might need professional help.
When you check, use good light. A flashlight can help. Look at the edges of the chip.
Are they smooth or jagged? Is there any rust starting? Rust is a big red flag.
It means you need to act fast. Rust can spread quickly. It will ruin your paint job.
If you see rust, it’s a more complex repair. You might need to remove the rust first. This takes extra steps.
Gathering Your Tools and Supplies
Okay, so you’ve checked your chips. You know what you’re dealing with. Now it’s time to get ready.
Having the right stuff makes the job much easier. It also leads to a better result. You can buy chip repair kits at most auto parts stores.
Some online retailers also have them. It’s good to buy a kit that matches your car’s paint color. Many kits come with a code that you can use to find your exact shade.
Your Repair Kit Checklist
- Touch-Up Paint: This is the most important part. Make sure it matches your car’s color code.
- Clear Coat Pen/Bottle: This goes over the color paint. It protects it and makes it shiny.
- Primer (Optional but Recommended): For deeper chips, primer helps the paint stick better.
- Applicator Tools: These can be small brushes, pens, or even toothpicks.
- Rubbing Alcohol or Wax & Grease Remover: For cleaning the area.
- Fine-Grit Sandpaper (1500-2000 grit): For smoothing.
- Polishing Compound: To blend the new paint.
- Microfiber Towels: For cleaning and wiping.
- Gloves: To keep your hands clean.
- Masking Tape: To protect surrounding paint.
Finding your car’s paint code is usually simple. Look for a sticker on your car doorjamb, in the engine bay, or in the glove box. If you can’t find it, your car dealership can help.
They can look it up with your VIN. Having the exact color is key. Even a slight mismatch will be noticeable.
It’s worth the effort to get it right.
Step-by-Step: The Repair Process
Let’s get to work. This is where you bring your car back to life. Follow these steps carefully.
Patience is your best friend here. Don’t rush. A little extra time now saves you headaches later.
Think of it as giving your car a spa treatment.
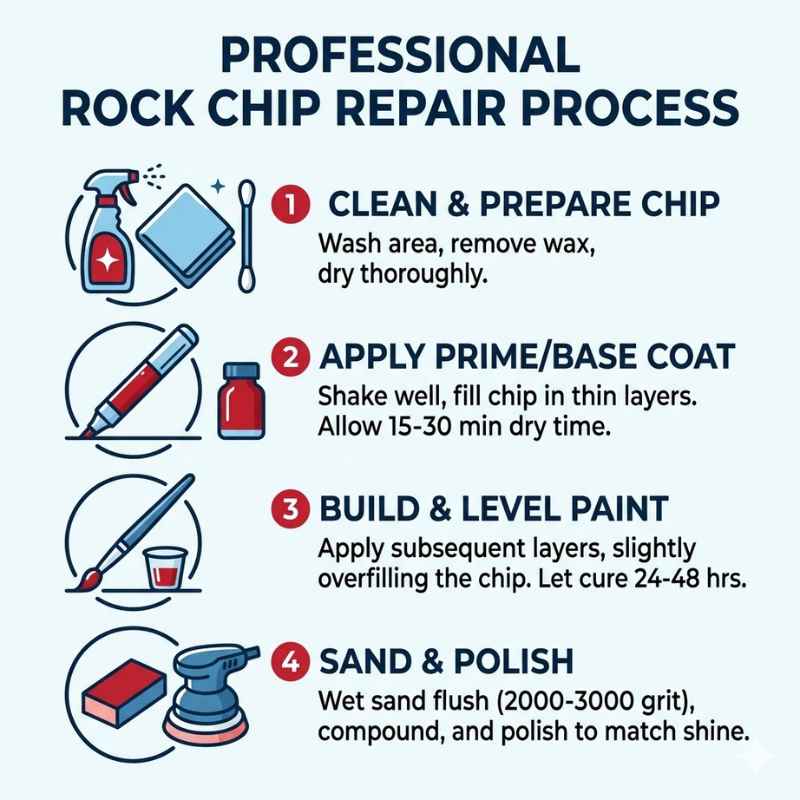
Step 1: Clean the Area
This is a crucial first step. You need a perfectly clean surface. Any dirt or wax will prevent the new paint from sticking.
Use rubbing alcohol or a dedicated wax and grease remover. Dab it onto a clean microfiber towel. Gently wipe the chipped area.
Make sure to clean around it too. Let it dry completely. Good lighting helps here.
You want to see if any tiny debris is still in the chip.
Step 2: Prepare the Paint
If your touch-up paint has settled, you need to mix it. Shake the bottle well for about a minute. If you’re using a pen, you might need to depress the tip to get the paint flowing.
Don’t shake the clear coat. You just need to stir it gently. For deeper chips, you might need to apply primer first.
Follow the kit’s instructions for this. Let the primer dry fully.
Step 3: Apply the Color Coat
This is the main event. For small chips, use a very fine brush or a toothpick. For larger chips, a pen applicator might work.
Load a tiny amount of paint onto your tool. You want just enough to fill the chip. Don’t glob it on.
Try to apply it neatly. Aim to fill the chip itself. Try not to get too much paint on the surrounding good paint.
It’s better to do a few thin coats than one thick one. Let each coat dry completely. This could take 30 minutes to an hour, depending on the paint and conditions.
If the chip is deep, you might see the paint sink a bit as it dries. That’s normal. You’ll likely need two or three thin coats to build up the color.
Be patient. Let each layer settle before adding the next. You want the new paint to be level with the old paint.
It takes practice to get this right.
Step 4: Apply the Clear Coat
Once the color coat is dry and level, it’s time for the clear coat. This protects the color and adds shine. Use the clear coat applicator.
Apply a thin, even layer over the repaired chip. Again, try not to get too much on the surrounding paint. The clear coat will also help level things out.
It might take a couple of thin layers to get the shine back. Let the clear coat dry completely. This can take several hours, or even overnight.
Step 5: Level and Polish
After the clear coat has dried and hardened, you might have a slight bump. This is where fine-grit sandpaper comes in. You can get very fine sandpaper, like 1500 or 2000 grit.
Wet the sandpaper and the area slightly. Very gently, sand the raised area. You’re not trying to remove much paint.
You’re just trying to level the repair. Be extremely careful not to sand through the new paint or into the old paint.
Once it’s smooth, clean the area again. Now, use a polishing compound. Apply a small amount to a microfiber cloth.
Gently rub the repaired spot. This will bring back the shine and help blend the new paint with the old. You might need to do this a couple of times.
Buff it until it matches the surrounding paint.
When You Need More Than Just a Touch-Up
Sometimes, a simple touch-up kit isn’t enough. I learned this the hard way on a chip that was near an edge. The paint flaked off a bit.
It was more than just a dot. It looked jagged. My initial attempt didn’t hide it well.
It looked like I had tried to fix it, but didn’t quite succeed. That’s when I realized some damage needs a different approach.
Signs You Might Need Professional Help
- Deep Rust: If the chip has gone down to the metal and there’s visible rust, it’s best to see a pro. They can remove rust properly and prevent future problems.
- Large or Deep Gouges: If the paint is missing in a large area or the metal is deeply scratched, DIY might not give a perfect finish.
- Complex Patterns: Starburst chips or damage with multiple cracks can be hard to fill seamlessly.
- Location: Chips on complex curves or body lines can be trickier to repair at home.
- Lack of Confidence: If you’re really worried about making it worse, a professional detailer or body shop is the safest bet.
For these situations, a professional detailer or body shop is your best option. They have specialized tools and expertise. They can often color-match your paint perfectly.
They can also fix more significant damage. The cost is higher, but the result is usually much better for severe issues. Think of it as an investment in your car’s appearance.
Preventing Future Rock Chips
Once you’ve fixed those chips, you want to keep them from coming back, right? Prevention is always better than cure. While you can’t avoid every single stone, you can reduce your chances.
Smart Driving Habits
Maintain Distance: This is the biggest one. Keep a good distance from the car in front of you. This gives you more time to react if they kick up debris.
Aim for at least two car lengths.
Avoid Following Trucks: Big trucks, especially dump trucks, often carry loose materials. They are notorious for kicking up rocks. Try to change lanes if you can.
Be Careful on Gravel: If you must drive on gravel roads, go slowly. This reduces the speed at which your tires can pick up and throw stones.
Watch Out for Construction Zones: These areas are often full of loose gravel and debris. Slow down and increase your following distance.
Consider Paint Protection Film (PPF): For ultimate protection, especially on the front of your car, PPF is a clear, durable film applied by professionals. It’s a great investment if you want to keep your car looking flawless.
Ceramic Coatings: While not as protective as PPF against direct impact, a good ceramic coating can add an extra layer of hardness to your clear coat. This can help minor scratches and light chips heal better.
I’ve found that simply being more aware of the road conditions makes a huge difference. If I see a patch of gravel or a truck ahead, I make a conscious effort to adjust my driving. It takes a little extra focus, but it’s worth it for the peace of mind.
Common Questions About Rock Chip Repair
How long does it take to repair a rock chip?
Repairing a single rock chip can take anywhere from 30 minutes to a few hours. This includes cleaning, applying paint, and letting it dry. If you need multiple coats or clear coat, it will take longer.
The total drying time for the clear coat can be up to 24 hours. Then you might need to polish it.
Can I fix rock chips in freezing weather?
It’s best to avoid repairing rock chips in freezing temperatures. Most touch-up paints and clear coats need a certain temperature range to dry and cure properly. Extreme cold can affect the finish and adhesion.
Try to wait for a warmer day, ideally above 50°F (10°C).
What if the chip is rusty?
If you see rust in the chip, you must remove it before applying any paint. You can use a rust remover product or very fine steel wool. Gently clean the rust away.
Then, you might need to apply a rust converter. After that, you can proceed with primer, color, and clear coat. For significant rust, professional help is advised.
Will touch-up paint make the chip completely disappear?
For very small, simple chips, a good touch-up job can make the chip almost invisible. You might not be able to see it unless you look very closely. For deeper or larger chips, it can significantly improve the appearance.
However, achieving a perfectly seamless finish like the factory paint can be very difficult with DIY methods.
How many coats of paint do I need?
It depends on the depth of the chip and the paint. For a simple chip, one or two thin coats of color might be enough. For deeper chips, you might need three or more thin coats.
Always let each coat dry fully before applying the next. The goal is to build up the paint level with the surrounding surface.
Can I use nail polish instead of touch-up paint?
While nail polish might seem like a quick fix, it’s generally not recommended for car paint. Car paint has specific properties for durability and color matching. Nail polish won’t match your car’s color accurately.
It also won’t adhere or last as well. It might even damage your car’s paint over time. Stick to products made for automotive use.
Final Thoughts on Chip Repair
Tackling rock chips might seem daunting at first. But with this guide, you’re well on your way. Remember to take your time.
Cleanliness is key. And don’t be afraid to practice on an inconspicuous spot if you can. Even if your repair isn’t factory-perfect, it’s a massive improvement.
It protects your car from further damage and keeps it looking sharp. Enjoy your smoother, chip-free ride!