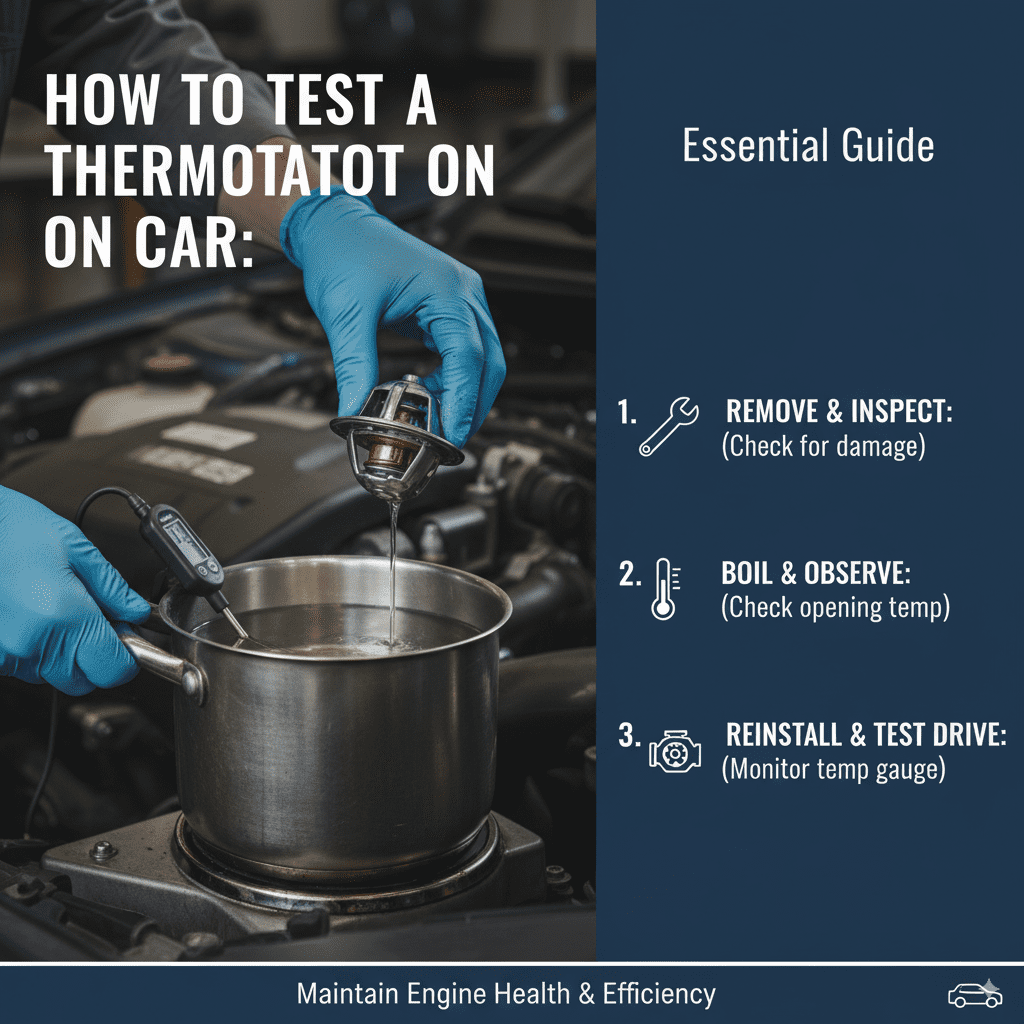
How To Test a Thermostat on a Car: Essential Guide
Testing your car’s thermostat is a straightforward DIY task to diagnose engine overheating or poor heating. By visually inspecting, checking coolant flow, and monitoring temperature with a thermometer, you can determine if a faulty thermostat is the culprit. This guide provides simple steps to help you test it safely and effectively, saving you a trip to the mechanic.
Is your car’s temperature gauge acting strangely? Does the engine overheat, or does the heater blow cold air even on a chilly day? These are common signs that your car’s thermostat might be the problem. While it sounds technical, testing your car’s thermostat is something many car owners can tackle with a little patience and guidance. Don’t worry if you’re new to car maintenance; this guide will walk you through each step in a clear and easy-to-understand way. We’ll help you figure out if your thermostat is working properly or if it’s time for a replacement. Let’s get your car’s cooling system back in tip-top shape!
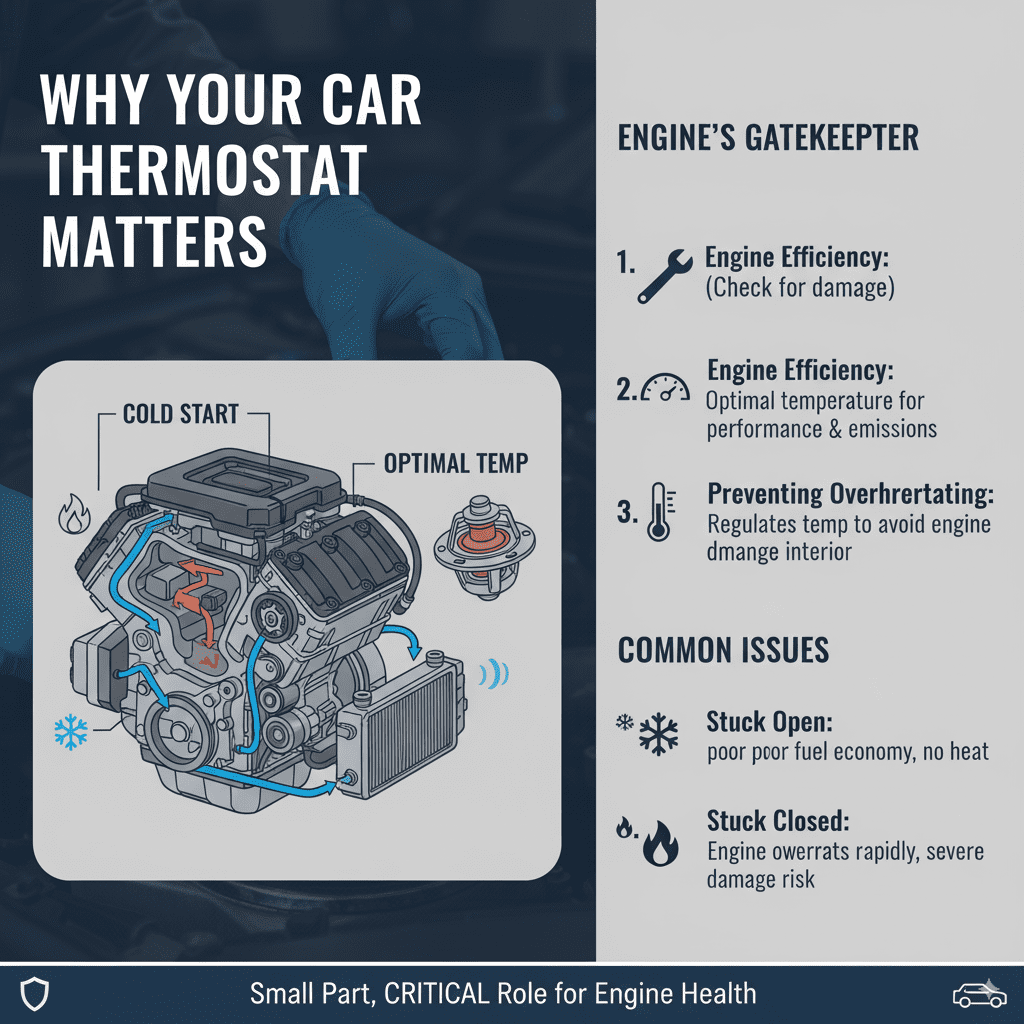
Why Your Car Thermostat Matters
The thermostat in your car is a small but mighty component that plays a crucial role in regulating your engine’s temperature. Think of it as a gatekeeper for your coolant. When your engine is cold, the thermostat stays closed, preventing coolant from flowing to the radiator. This helps your engine warm up quickly to its optimal operating temperature. Once the engine reaches that sweet spot, the thermostat opens, allowing coolant to circulate through the radiator, where it’s cooled down.
This continuous cycle is vital for several reasons:
- Engine Efficiency: Engines run most efficiently and produce fewer emissions when they are at their designed operating temperature.
- Preventing Overheating: By controlling coolant flow, the thermostat prevents the engine from getting too hot, which can cause serious damage.
- Cabin Comfort: The hot coolant circulating through the heater core is what provides heat to your car’s cabin. A faulty thermostat can impact this.
When a thermostat malfunctions, it can either stick open or stick closed. If it sticks open, your engine may never reach its proper operating temperature, leading to poor fuel economy and insufficient cabin heat. If it sticks closed, coolant won’t flow to the radiator, causing the engine to overheat rapidly, which can lead to severe damage.
Common Symptoms of a Bad Thermostat
Recognizing the signs of a failing thermostat can save your engine from costly repairs. Here are the most common symptoms to watch out for:
- Engine Overheating: This is the most obvious sign. If your temperature gauge climbs into the red zone, a stuck-closed thermostat is a likely culprit.
- Poor Heater Performance: If your heater is blowing lukewarm or cold air, especially when the engine should be warm, the thermostat might be stuck open, preventing the coolant from getting hot enough.
- Temperature Gauge Fluctuations: If the temperature gauge rapidly rises and falls, or stays at an unnaturally low level, it could indicate a thermostat that’s not opening or closing correctly.
- Coolant Leaks: While not a direct symptom of thermostat failure itself, a leaking thermostat gasket can cause coolant loss and lead to increased engine temperature.
- “Check Engine” Light: Modern cars have sensors that can detect abnormal engine operating temperatures. A faulty thermostat can trigger the “Check Engine” light. You might be able to check the specific code with an OBD-II scanner.
Tools & Materials You’ll Need
Before you start testing your car’s thermostat, gather these essential tools and materials. Having everything ready will make the process smoother and safer.
- Safety Glasses: Always protect your eyes from debris or hot fluids.
- Gloves: Keep your hands clean and protected from hot engine components.
- Wrench Set or Socket Set: You’ll likely need these to remove the thermostat housing.
- Pliers: For hose clamps if necessary.
- Drain Pan: To catch any spilled coolant.
- Bucket or Large Container: To collect drained coolant.
- Rags or Shop Towels: For cleaning up spills.
- Gasket scraper (optional): To clean old gasket material.
- New Thermostat Gasket (if replacing): It’s often best practice to replace the gasket when you’re working on the thermostat.
- New Thermostat (if needed): If your test confirms it’s faulty.
- Coolant/Antifreeze: You may need to top up or replace coolant if you drain a significant amount. Refer to your owner’s manual for the correct type.
- Thermometer (optional for in-car test): An infrared thermometer can be helpful for temperature readings.
- Kettle or Pot: For the water bath test.
- String or Wire: To suspend the thermostat in the water bath.
Important Safety Precautions
Working on your car involves some risks, especially when dealing with hot engine and coolant. Always prioritize safety:
- Let the Engine Cool Down: Never work on a hot engine. Allow it to cool completely, which can take several hours. Hot coolant can cause severe burns.
- Wear Safety Gear: Always wear safety glasses and gloves. Coolant is toxic, and engine components can be sharp.
- Disconnect the Battery: For added safety, consider disconnecting the negative battery terminal before starting any work.
- Work in a Well-Ventilated Area: Engine components and fluids can release fumes.
- Know Your Coolant: Engine coolant is poisonous. Keep it away from children and pets. Dispose of old coolant properly according to local regulations. You can often take it to an auto parts store or recycling center. The Environmental Protection Agency (EPA) provides guidelines on responsible disposal of hazardous materials.
How to Test a Thermostat on a Car: Step-by-Step Guide
There are a couple of ways you can test your car’s thermostat. The most reliable methods involve either removing the thermostat and testing it outside the engine, or observing its behavior while the engine is running. For beginners, the water bath test outside the engine is often the easiest and safest.
Method 1: The Water Bath Test (Off the Car)
This is the most straightforward way to test the thermostat’s ability to open and close at the correct temperature. It requires removing the thermostat from the engine.
Step 1: Locate and Remove the Thermostat
The thermostat is usually located at the end of the upper radiator hose, where it connects to the engine. It will be housed in a metal or plastic housing, often held in place by bolts or screws.
- Allow the engine to cool completely.
- Place a drain pan underneath the thermostat housing to catch any residual coolant.
- Identify the thermostat housing. It’s typically a metal or plastic part where the upper radiator hose meets the engine block.
- Loosen the clamps on the upper radiator hose if it directly connects to the housing.
- Remove the bolts or screws holding the thermostat housing in place. Be prepared for a small amount of coolant to spill out.
- Carefully remove the housing. You may need to gently pry it loose.
- Note the orientation of the thermostat as you remove it. Newer thermostats have a jiggle valve (a small metal ball or spring) that should typically be positioned at the highest point when installed.
- Remove the thermostat.
Step 2: Perform the Water Bath Test
Now that the thermostat is out, you can test its functionality.
- Boil water in a kettle or pot.
- Fill a bucket or bowl with water and place the thermostat in it.
- Suspend the thermostat in the water using string or wire so it doesn’t touch the bottom.
- Gently place a thermometer into the water, ensuring it doesn’t touch the thermostat.
- Pour hot (not boiling) water into the bucket until the thermostat is submerged.
- Observe the thermostat and thermometer.
Step 3: Analyze the Results
The key is to see if the thermostat opens at the temperature specified on its body (or in your car’s manual, if not marked).
- Check the temperature rating marked on the thermostat. It’s usually printed on the body.
- In cool water (below its opening temperature), the thermostat should be closed. The valve should be shut tight.
- As the water heats up, watch the thermostat. When the water reaches the thermostat’s rated temperature, the valve should begin to open.
- At full operating temperature, the thermostat should be mostly or fully open.
What good looks like: The thermostat opens smoothly as the water reaches its rated temperature. It should open to allow plenty of passage for water.
What bad looks like:
- The thermostat doesn’t open at all, even in hot water.
- It opens only partially.
- It opens at too high or too low a temperature compared to its rating.
- It opens and closes erratically.
Step 4: Reinstall or Replace
If your thermostat passed the test, you can reinstall it. If it failed, you’ll need to replace it with a new one.
- Clean the thermostat housing mating surfaces of any old gasket material. A gasket scraper can be helpful here.
- Install the new or tested thermostat in the correct orientation (ensure the jiggle valve is at the highest practicable point if present).
- Apply a new gasket or use sealant if recommended by the manufacturer.
- Reattach the thermostat housing and tighten the bolts evenly.
- Reattach the radiator hose and secure the clamps.
- Refill the cooling system with the correct type and amount of coolant. Run the engine and check for leaks.
Method 2: In-Car Temperature Check
This method involves observing the engine and coolant temperatures while the engine is running. It can give clues but is less definitive than the water bath test unless you have good temperature monitoring tools.
Step 1: Prepare the Engine
- Ensure the engine is completely cold.
- Locate the thermostat housing where the upper radiator hose connects to the engine.
- Gather your tools: safety glasses, gloves, perhaps an infrared thermometer.
Step 2: Start the Engine and Monitor Temperatures
- Start the engine and let it idle.
- Monitor the engine temperature gauge on your dashboard.
- Feel the upper radiator hose. Initially, it should be cool or slightly warm.
- Observe how long it takes for the engine temperature to rise.
Step 3: Check for Coolant Circulation
This is the critical part where you look for signs that the thermostat is opening.
- Once the dashboard temperature gauge reaches its normal operating range (or slightly above the halfway point), the thermostat should be opening.
- Carefully feel the upper radiator hose again. It should now become significantly warmer as hot coolant flows through it to the radiator.
- If you have an infrared thermometer: Point it at the thermostat housing and the radiator hose near it. As the engine warms up, you should see the temperature in that area rise. When the engine temperature gauge hits the normal spot, the hose temperature should also jump up as the thermostat opens. You can also compare the temperature of the upper hose to the lower radiator hose; the upper hose should be hotter than the lower hose when the engine is at operating temperature.
Step 4: Analyze the Results
- If the engine temperature gauge stays low, and the upper radiator hose remains cool even after the engine has been running for a while, the thermostat is likely stuck open.
- If the engine starts to overheat (temperature gauge climbs rapidly into the red), and the upper radiator hose stays relatively cool, the thermostat is likely stuck closed, preventing coolant flow to the radiator.
- If the upper radiator hose gets hot, and the temperature gauge is normal, the thermostat is likely functioning correctly.
A note on modern cars: Some vehicles have complex cooling systems, and the thermostat might be electronically controlled. In these cases, simple visual checks might not be enough, and diagnostic tools could be necessary.
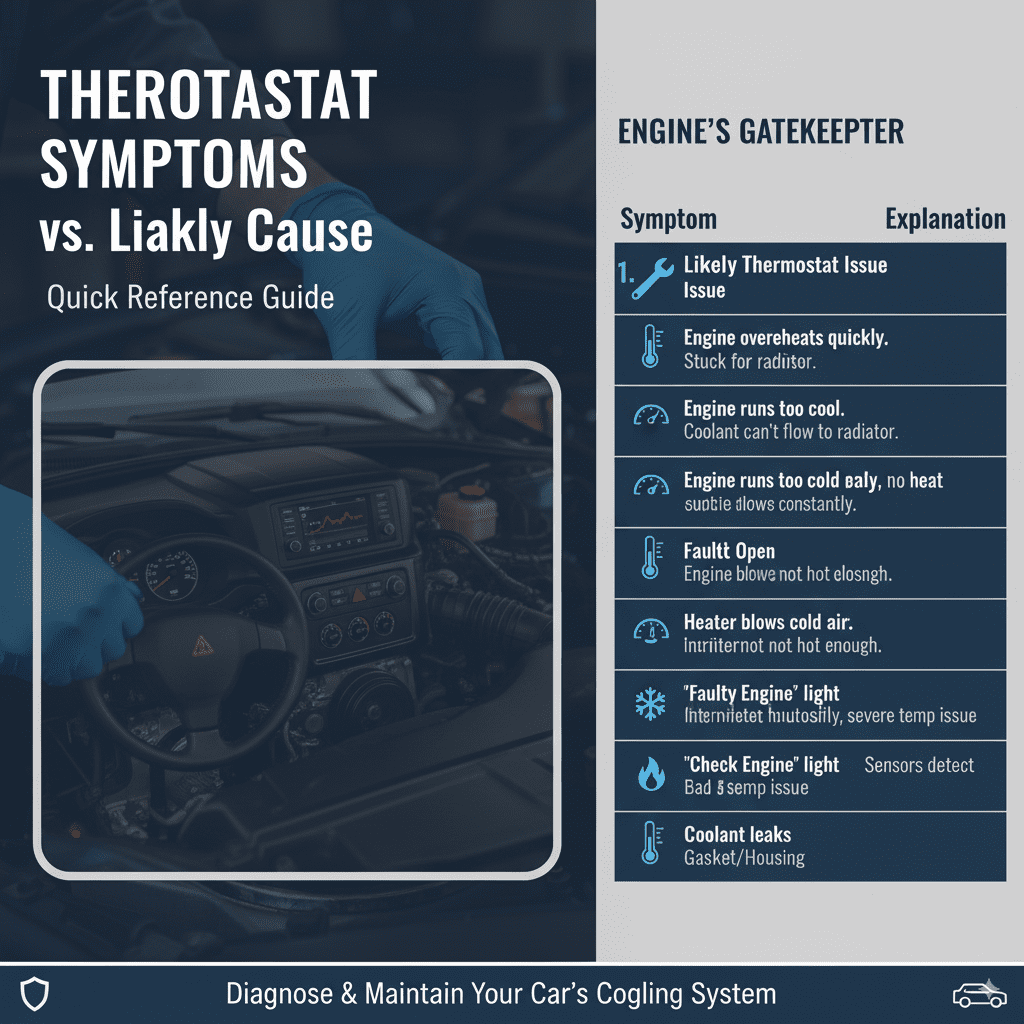
Table: Thermostat Symptoms vs. Likely Cause
Here’s a quick reference to help you connect symptoms to potential thermostat issues:
| Symptom | Likely Thermostat Issue | Explanation |
|---|---|---|
| Engine overheats quickly. | Stuck Closed | Coolant cannot flow to the radiator to be cooled. |
| Engine runs too cool, poor fuel economy. | Stuck Open | Coolant flows to the radiator constantly, preventing the engine from reaching optimal temperature. |
| Heater blows cold air. | Stuck Open (or partially open) | Engine isn’t getting hot enough for the heater core to generate heat. |
| Temperature gauge fluctuates wildly. | Faulty Thermostat (opening/closing intermittently) | The thermostat is not opening or closing reliably at the correct temperatures. |
| “Check Engine” light is on. | Could be Faulty Thermostat | Sensors detect the engine operating outside its normal temperature range. |
| Coolant leaks around the housing. | Bad Gasket or Housing | While not the thermostat element itself, a leaky seal necessitates addressing the thermostat housing. |
Replacing the Thermostat: When and How
If your testing reveals a faulty thermostat, replacement is usually the next step. Fortunately, it’s a common and relatively inexpensive repair that many DIYers can perform.
When to Consider Replacement
- When diagnostic tests (like the water bath test) confirm the thermostat is not functioning correctly.
- As a preventative measure, especially on older vehicles (e.g., at 90,000-100,000 miles or every 5-7 years). Thermostats are known to eventually fail.
- When replacing other cooling system components like the radiator or water pump, it’s often cost-effective to replace the thermostat at the same time, as you’ll already have access to it.
The Replacement Process (Simplified)
The steps for replacement are very similar to removing the thermostat for testing:
- Drain some coolant from the system. You don’t necessarily need to drain the entire system if you’re careful, but having a drain pan ready is essential.
- Locate and remove the thermostat housing as described in Method 1.
- Remove the old thermostat and gasket.
- Clean the housing and engine mating surfaces.
- Install the new thermostat in the correct orientation.
- Install a new gasket.
- Reassemble the thermostat housing and radiator hose.
- Refill the cooling system with the proper coolant mixture.
- Bleed any air from the system. This is crucial for proper cooling. Consult your owner’s manual for bleeding instructions, as procedures vary by vehicle.
- Run the engine and check for leaks. Monitor the temperature gauge.
For a more detailed guide on the replacement process, you can refer to resources like NHTSA’s general guidance on vehicle safety systems, which often touch upon cooling system maintenance.
Frequently Asked Questions (FAQ)
Q1: How do I know if my car’s thermostat is bad?
You’ll likely notice symptoms such as the engine overheating, the heater not working properly, or the temperature gauge acting erratically. Performing the water bath test (off the car) is the most definitive way to check.