Connecting Car Amp: A Step-by-Step Guide for Safe Setup
Setting up a car audio system is a popular project, but figuring out How to Connect an Amp to a Car Battery Properly can seem tricky. Many people find this part confusing because it involves electrical components and safety considerations. Don’t worry if you’re feeling a little unsure! This guide is designed to make the process simple and straightforward. We’ll break down each step so you can get your amp running safely and enjoy your music. Let’s get started and learn how to do it right.
Essential Tools and Materials for Setup
Before you even think about connecting wires, you need to gather your tools and parts. Having everything ready saves time and frustration. It also prevents you from making mistakes that can damage your equipment or, worse, create a dangerous situation. Being organized is key when working with electrical systems. This section covers all the necessary items.
Power Cables and Wiring
The core of your amp’s power setup is the power cable. This heavy-duty wire carries the current from your car battery to your amplifier. The size, or gauge, of the power cable is important. It depends on how much power your amplifier needs. Using too small a wire can cause overheating and potential fire hazards. You’ll also need a ground wire, which is usually the same gauge as your power wire. This wire connects your amp to the car’s chassis, completing the electrical circuit.
- Power Cable: Choose the correct gauge based on your amp’s power rating. Consult your amp’s manual. A general guideline is: 8-gauge for amps under 600 watts, 4-gauge for 600-1200 watts, and 0 or 1-gauge for amps over 1200 watts. Make sure the wire is automotive-grade for durability.
- Ground Wire: The ground wire is equally important. Ensure it matches the power cable gauge.
- Remote Wire: This smaller wire turns the amp on and off. It connects to your car’s stereo system or a switched power source. Usually, a 18-gauge wire is sufficient.
- Speaker Wires: These connect the amp to your speakers. The gauge depends on the speakers’ power and the distance from the amp.
- Wire Connectors and Terminals: You’ll need crimp-on connectors like ring terminals and spade connectors to connect the wires securely. Make sure the connectors are the correct size for your wire gauge.
Protective Components
Safety is the first priority. To protect your amp and your car’s electrical system, you’ll need fuses and a fuse holder. A fuse acts like a circuit breaker, protecting the amplifier and your car from damage if there’s a surge or short circuit. This is an essential component. These components add an extra layer of protection to your electrical system.
- Inline Fuse Holder: This holds the fuse and is installed in the power cable, as close to the battery as possible.
- Fuse: The fuse rating must match your amplifier’s specifications. Check the amp’s manual for the correct amperage.
- Fuses for the Amplifier: Many amplifiers have internal fuses, and you might need extra fuses for these as well.
- Wire Loom or Tubing: This protects wires from abrasion and damage, especially when running them through the car.
Tools and Accessories
You can’t do the job without the right tools. From cutting and crimping wires to securing connections, having the right equipment ensures a neat and safe installation. It also makes the process much easier. Without the right tools, you might damage wires or create loose connections.
- Wire Strippers/Crimpers: These tools are essential for preparing wires and attaching connectors. Combination tools often offer both functions.
- Screwdrivers and Wrenches: You’ll need these to secure connections and mount the amplifier. A screwdriver set and a wrench set will be helpful.
- Multimeter: This tool measures voltage and resistance. It’s helpful for troubleshooting and ensuring proper connections.
- Cable Ties or Tape: These are useful for securing wires and keeping the installation tidy.
- Drill (Optional): If you need to run wires through the firewall, you might need a drill and drill bits.
Preparing Your Vehicle for Amp Installation
Before you begin the actual wiring, you need to prepare your car. This involves disconnecting the battery, planning the wire routing, and choosing the amp’s mounting location. Proper preparation is essential for a safe and successful installation. It prevents short circuits and makes the installation process much easier.
Disconnecting the Car Battery
Safety first! Disconnecting the battery prevents any accidental shorts while you’re working. Make sure you disconnect the negative (-) terminal first, followed by the positive (+) terminal. This order minimizes the risk of sparks if your wrench accidentally touches any metal components. Always disconnect the negative battery cable when working on your car’s electrical system.
- Locate the Battery: Usually, the battery is under the hood, but in some cars, it might be in the trunk or under a seat.
- Find the Terminals: Identify the positive (+) and negative (-) terminals.
- Disconnect the Negative Terminal: Use a wrench to loosen the nut or clamp securing the negative terminal cable. Remove the cable from the terminal.
- Disconnect the Positive Terminal: After the negative is disconnected, loosen and remove the positive terminal cable.
- Safety Reminder: Ensure the disconnected battery cables don’t touch any metal parts of the car while you’re working.
Routing the Power Cable
The power cable needs to run from the battery to the amplifier. Planning the path is critical to avoid damage to the wire and ensure the installation is neat. Consider the shortest and safest route. This will minimize the amount of wire you need to buy and reduce the chance of interference. Carefully route the cable to prevent it from being pinched or cut.
- Choose a Route: Determine the path the power cable will take from the battery to the amp’s location. Avoid areas with moving parts, heat sources, or sharp edges.
- Passing Through the Firewall: If you need to pass the cable through the firewall, locate an existing grommet or drill a new hole. Be careful not to damage any other wires or components.
- Using Grommets: If you drill a new hole, use a rubber grommet to protect the cable from chafing against the metal edge.
- Securing the Cable: Use cable ties or tape to secure the power cable along its path. Avoid any sharp bends or kinks in the wire.
Choosing the Amplifier’s Mounting Location
The location of your amplifier matters. You want a place that’s protected from the elements and easy to access for adjustments and maintenance. The location should also provide good airflow to prevent overheating. It also needs to be a flat, sturdy surface. These steps ensure your amp performs its best and lasts a long time.
- Consider Location: Popular locations include under a seat, in the trunk, or behind a panel. Make sure the area has adequate ventilation.
- Ensure Protection: Choose a location that is protected from water and other hazards.
- Mounting the Amp: Use screws or bolts to securely mount the amplifier. Ensure the screws are the correct length and don’t penetrate any components or wiring on the other side.
- Accessibility: The amp location should be easily accessible for adjustments and troubleshooting.
Steps to Connect an Amp to a Car Battery Properly
Once you’ve prepped your car, you’re ready to connect the amp. This process involves connecting the power, ground, remote, and speaker wires. Follow these steps carefully to ensure a safe and successful installation. Each connection must be secure and properly insulated to protect against electrical hazards.
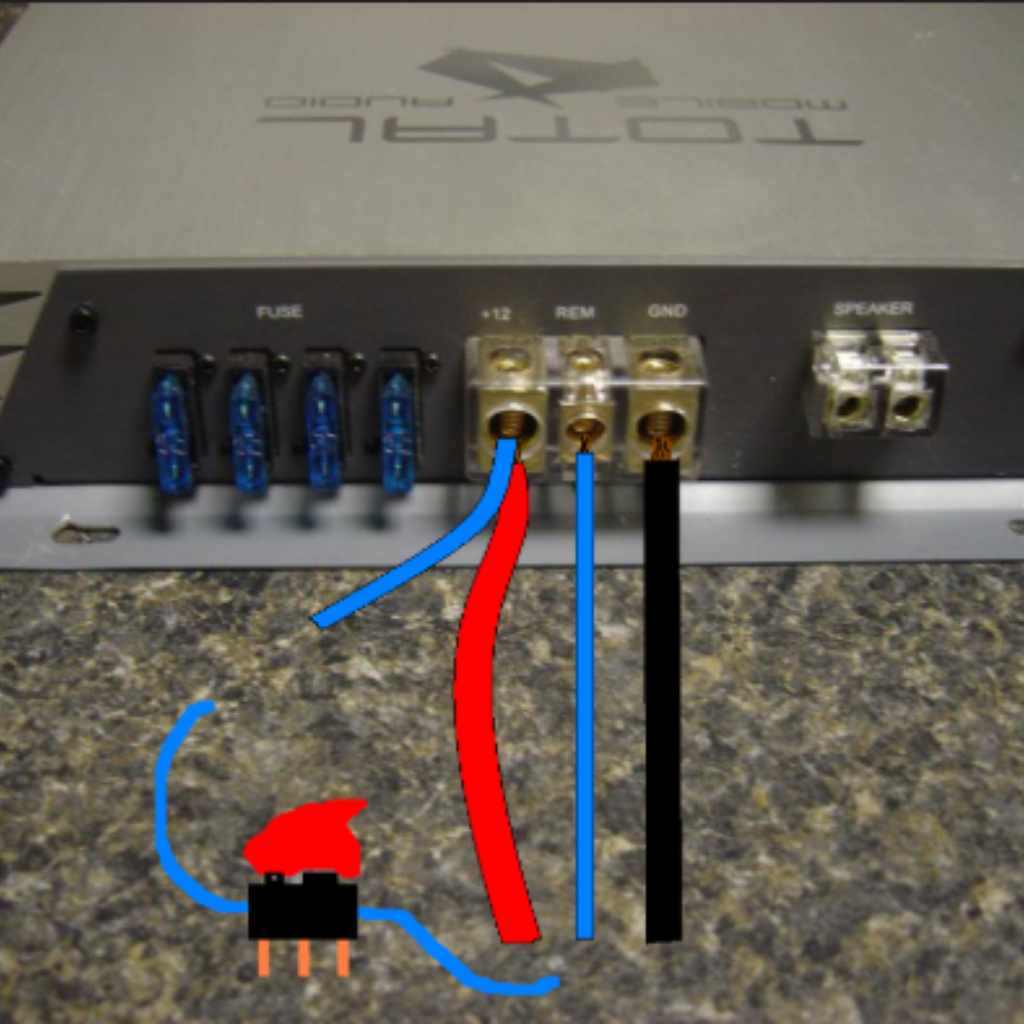
Connecting the Power Wire
This is the most critical connection. It provides power to the amplifier. Make sure the inline fuse holder is as close to the battery as possible to protect the system. Carefully follow each step to ensure a reliable and safe power connection to your amplifier. This step is about providing a safe and reliable power source.
- Connect the Fuse Holder: Attach the inline fuse holder to the positive (+) battery terminal. Place the fuse as close to the battery as possible, usually within 12 inches.
- Attach the Power Wire: Connect the power wire to the fuse holder’s input side using a ring terminal. Crimp the ring terminal securely.
- Route the Power Wire: Run the power wire from the fuse holder along the path you planned earlier.
- Connect the Power Wire to the Amp: At the amplifier end, attach the power wire to the amp’s positive (+) terminal using a ring or spade terminal.
- Install the Fuse: Once all connections are made, install the correct fuse in the fuse holder.
Establishing the Ground Connection
A good ground connection is essential for the amplifier to work correctly and safely. A poor ground connection can cause noise or even damage the amplifier. The ground wire needs to make a direct connection to the car’s chassis. Follow these guidelines for a reliable ground connection. This will ensure your amp functions correctly.
- Find a Ground Point: Locate a suitable ground point on the car’s chassis. This should be a bare metal surface, free of paint, rust, and corrosion. Good ground points include bolts under the rear seat or in the trunk.
- Prepare the Ground Point: Clean the chosen ground point with sandpaper or a wire brush to remove any paint or rust.
- Connect the Ground Wire: Attach the ground wire to the amp’s ground terminal using a ring terminal.
- Secure the Ground Wire: Connect the other end of the ground wire to the prepared ground point using a ring terminal and a screw or bolt. Ensure the connection is tight and secure.
- Test the Ground: Use a multimeter to measure resistance between the ground terminal on the amp and the negative (-) battery terminal. The resistance should be very low (close to 0 ohms).
Connecting the Remote Wire
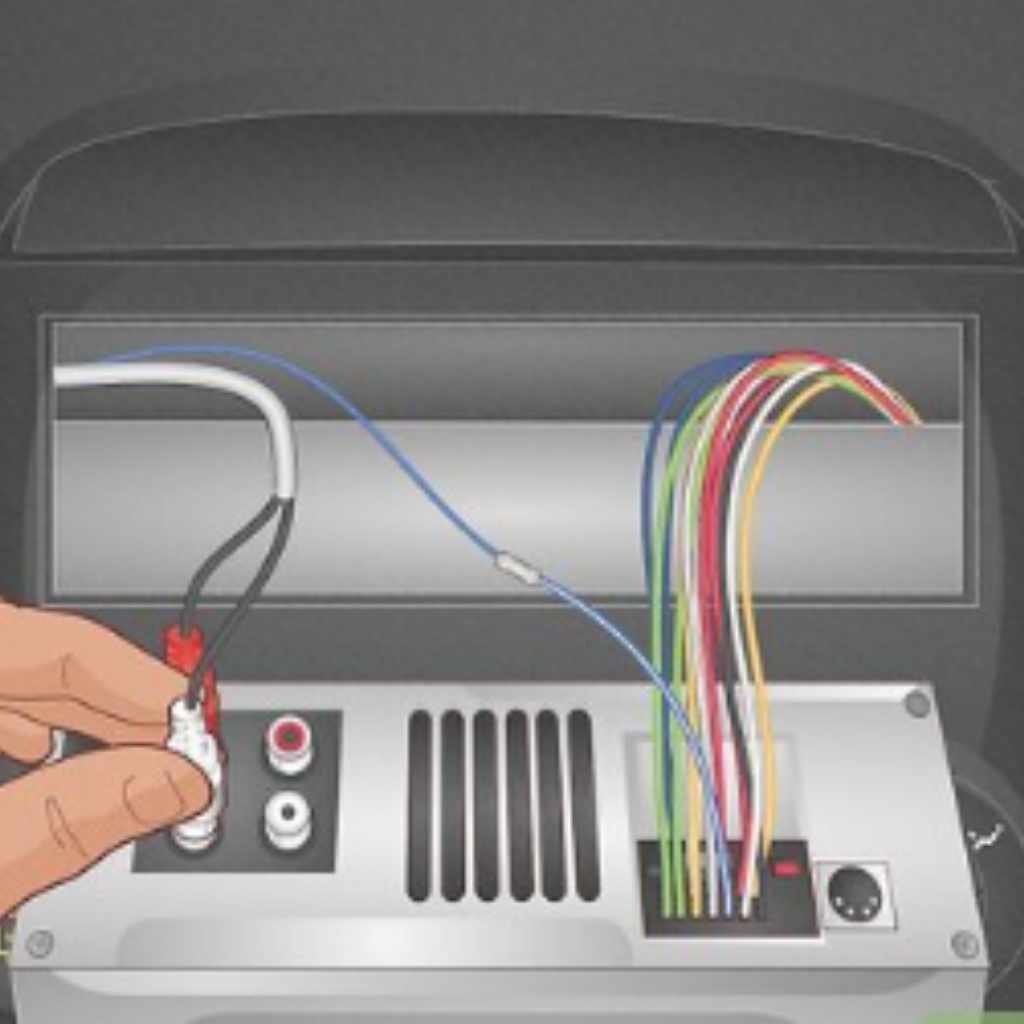
The remote wire turns the amplifier on and off. It connects to the car’s stereo system or a switched power source. The remote wire signals the amp to power up when the car’s ignition is turned on and to shut down when the ignition is turned off. The remote wire’s primary role is to control the amplifier’s power.
- Identify the Remote Wire: Locate the remote wire on your car stereo. It’s usually a blue wire, often labeled “remote” or “remote turn-on.” Consult your car stereo’s manual if needed.
- Connect to the Stereo: Connect the remote wire from the amplifier to the remote output wire of your car stereo. Use a crimp connector to join the wires securely.
- Alternative Remote Source: If your stereo doesn’t have a remote output, you can connect the remote wire to a switched power source, such as the fuse box. Make sure the source only provides power when the ignition is on.
- Connecting the Remote to the Amp: At the amplifier, connect the remote wire to the amp’s “remote” or “remote in” terminal.
- Test: Turn on your car’s stereo to ensure the amplifier powers on and off correctly.
Hooking Up the Speaker Wires
Speaker wires connect the amplifier to your speakers, transmitting the audio signal. Pay careful attention to polarity. This means connecting the positive (+) terminal of the amp to the positive (+) terminal of the speaker, and the negative (-) terminal of the amp to the negative (-) terminal of the speaker. Incorrect polarity can negatively affect sound quality. Here is how to make these connections.
- Run Speaker Wires: Run speaker wires from the amplifier to the speakers. Route the wires neatly. Avoid sharp bends, pinch points and heat sources.
- Identify Speaker Terminals: Identify the positive (+) and negative (-) terminals on both the amplifier and the speakers. These terminals are usually marked with a “+” and “-“.
- Connect Speaker Wires to the Amp: Connect the speaker wires to the appropriate speaker terminals on the amplifier. Make sure the wires are securely attached.
- Connect Speaker Wires to the Speakers: Connect the other ends of the speaker wires to the positive (+) and negative (-) terminals on the speakers. Pay close attention to polarity.
- Testing: Turn on your car stereo and test the speakers. Verify that they are producing sound and that the sound quality is good.
Troubleshooting Common Amp Problems
Even with careful installation, problems can sometimes arise. Troubleshooting involves identifying and fixing issues. Understanding common problems and how to address them can save time and frustration. If you run into problems, it’s important to identify the issue to prevent more serious damage.
Amp Not Turning On
If your amplifier isn’t turning on, it can be frustrating. This problem is often caused by a simple issue. There are several things to check to determine the root cause. This section will walk you through common reasons and provide possible solutions. It may save you a trip to a repair shop.
- Check the Power Connection: Make sure the power wire is securely connected to the positive (+) battery terminal, the inline fuse holder, and the amplifier’s power terminal. Use a multimeter to verify that there is voltage at the amp’s power terminal.
- Check the Ground Connection: Ensure that the ground wire is securely connected to the amplifier and to a clean, bare metal ground point on the car’s chassis. Test the ground connection with a multimeter to measure resistance.
- Check the Remote Wire: Verify that the remote wire is connected to a working remote output on the car stereo and to the amplifier’s remote terminal. Confirm that the remote wire receives 12V when the stereo is on.
- Check the Fuses: Inspect all fuses, including the inline fuse, the amplifier’s internal fuses, and any fuses in your car’s fuse box that might be related to the stereo system.
- Amplifier Protection Mode: Many amplifiers have protection circuits that shut down the amp if there is an issue. Check your amplifier’s manual to see if it has indicators for protection mode.
Sound Quality Issues
Poor sound quality can ruin your listening experience. It’s often due to connection issues or incorrect settings. The following tips can help you identify and correct common issues. Understanding the cause can improve the clarity of your audio.
- Check the Speaker Wires: Verify that the speaker wires are securely connected to both the amplifier and the speakers. Ensure the polarity is correct (+ to +, – to -).
- Adjust Gain Settings: Set the amplifier’s gain (input level) correctly. If the gain is set too high, the sound will be distorted. If it is too low, the volume will be insufficient.
- Check for Noise: Noise can come from various sources. Make sure the RCA cables are in good condition. Route the RCA cables away from power cables. The ground connection can also be a source of noise.
- Verify the Crossover Settings: If your amplifier has a built-in crossover, make sure the settings are correct for your speakers. Adjust the crossover frequencies to improve the audio quality.
- Speaker Issues: Check your speakers for any damage. Make sure the speakers are working properly and are the correct impedance for your amplifier.
Distortion and Overheating
Distortion and overheating can damage your amplifier. These problems often indicate the amplifier is being pushed beyond its limits. Overheating can cause the amp to shut down to prevent permanent damage. Identifying and resolving these issues is crucial for maintaining your system.
- Check the Gain Settings: High gain settings can cause distortion. Lower the gain settings and see if the problem improves.
- Check Speaker Impedance: Ensure that the speakers’ impedance (ohms) matches the amplifier’s specifications. Using the wrong impedance can cause distortion and damage the amp.
- Ventilation: Make sure the amplifier has good ventilation. The amplifier will overheat if it is enclosed or in a place without airflow.
- Low Voltage: Low voltage can also cause distortion. Use a multimeter to measure the voltage at the amplifier’s power terminal while the amp is playing.
- Speaker Damage: Damage to speakers can also result in distortion. Inspect the speakers for damage.
Frequently Asked Questions
Question: Can I use the car’s existing wiring for the amplifier?
Answer: It’s usually not a good idea. The existing wiring is often not the correct gauge to handle the extra current. You should always use new, appropriately sized wiring to avoid potential fire hazards and ensure proper amp performance.
Question: What’s the best way to run wires through the firewall?
Answer: The safest method is to use an existing grommet if possible. If you need to drill a new hole, use a rubber grommet to protect the wires from chafing. Ensure you choose a spot where you won’t damage any other wires or components.
Question: How can I tell if my ground connection is good?
Answer: A good ground connection is clean and solid. It needs to make a direct connection to bare metal. You can test the ground connection with a multimeter to measure the resistance between the amplifier’s ground terminal and the negative (-) battery terminal. The resistance should be very low (close to 0 ohms).
Question: What size fuse should I use for my amplifier?
Answer: The fuse size depends on your amplifier’s power rating. It should match the specifications listed in your amplifier’s manual. As a general rule, add up the fuse ratings of all the amplifier’s internal fuses to determine the size of the inline fuse.
Question: What if my amp keeps going into protection mode?
Answer: Protection mode often indicates a problem, such as a short circuit, overheating, or low voltage. Check all the connections, including power, ground, and speaker wires. Make sure the amplifier has adequate ventilation, and that your car’s electrical system is in good condition.
Final Thoughts
Successfully setting up your car amp is a rewarding project that elevates your audio experience. Learning How to Connect an Amp to a Car Battery Properly allows you to enjoy great music. Proper installation hinges on correct wiring, safety precautions, and thorough testing. By following each step carefully, you can avoid common pitfalls and ensure a reliable setup. Remember to disconnect the battery, choose the right gauge wires, and double-check all connections. If you run into problems, don’t be afraid to troubleshoot the system. With a little patience and attention, you can get it working. Your effort pays off in better sound.