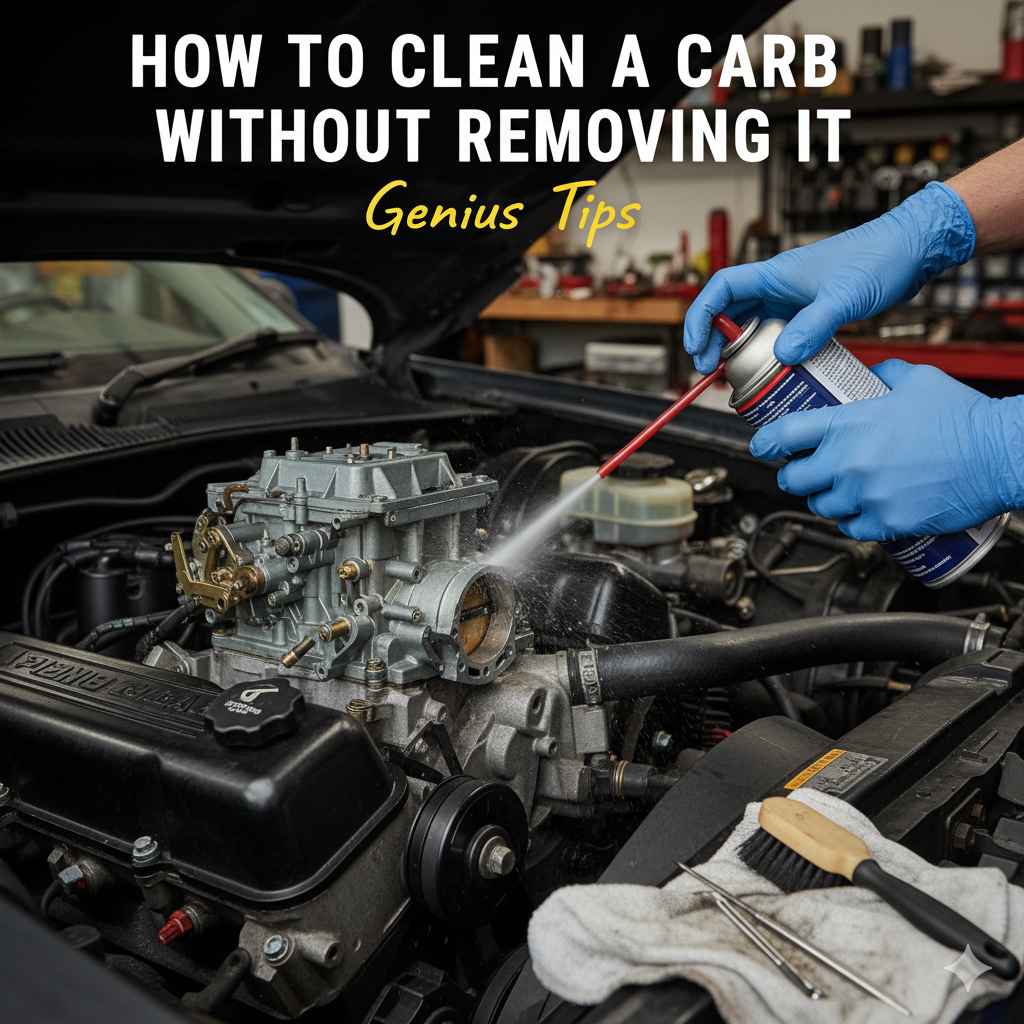
How To Clean A Carb Without Removing It: Genius Tips
Yes, you can often clean a car’s carburetor without the hassle of removing it! This guide offers simple, step-by-step tips and expert advice to help you clear common clogs, improve engine performance, and save money by tackling this common issue at home.
Is your car sputtering, hesitating, or just not running as smoothly as it used to? A dirty carburetor could be the culprit. For many car owners, the thought of working on their engine can seem intimidating, especially when it comes to components like the carburetor. But what if I told you that you might be able to fix many common carburetor issues without taking it off your engine? It’s not only possible, but it can save you time and a good chunk of money on mechanic fees!
In this guide, I’ll walk you through simple, effective methods to clean your carburetor without removing it. We’ll cover the signs of a dirty carb, the tools you’ll need, and the straightforward steps to get your engine running like new again. You’ll gain the confidence to tackle this common car problem yourself. Let’s get your car purring again!
Why Your Carburetor Needs a Clean
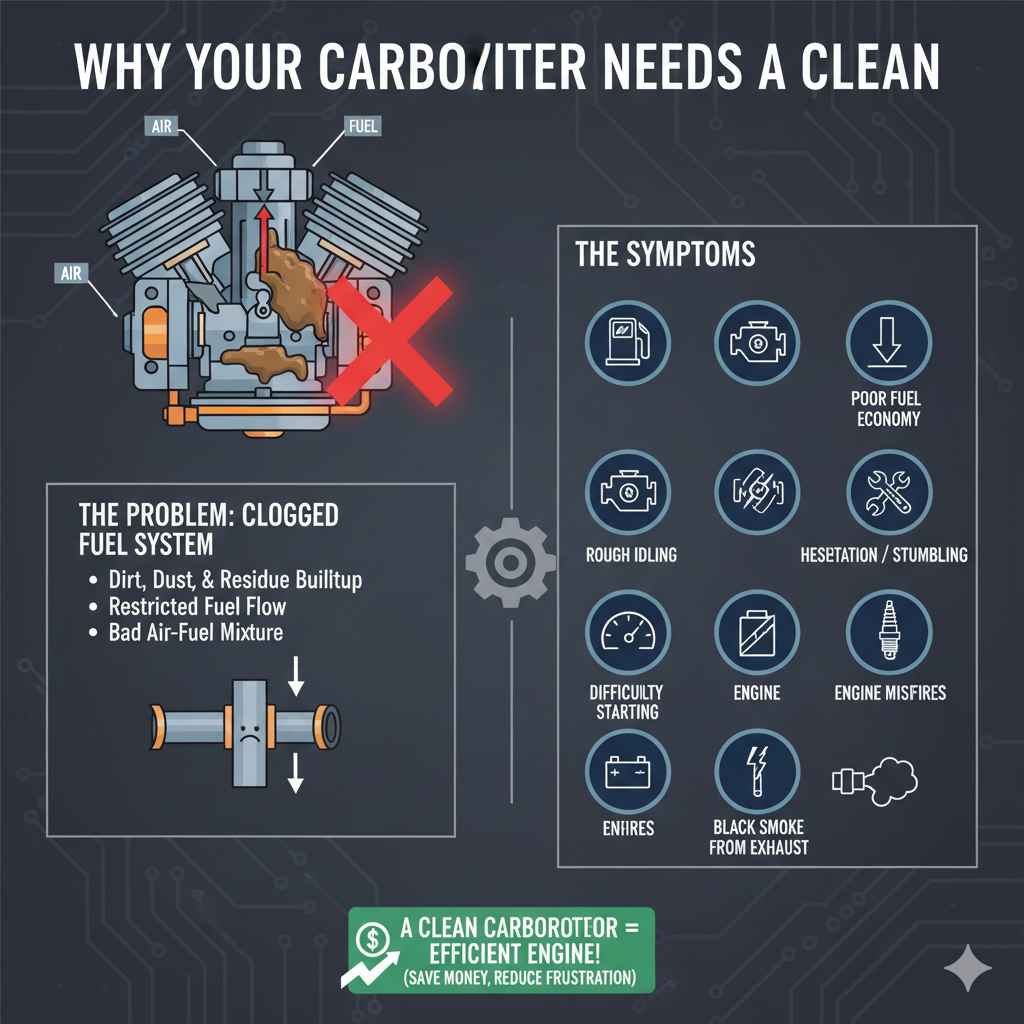
The carburetor is a crucial part of your engine’s fuel system. Its job is to mix air and fuel in the right ratio so your engine can run efficiently. Over time, dirt, dust, old fuel residue, and other gunk can build up inside the carburetor’s tiny passages and jets. This buildup restricts the flow of fuel, leading to a host of problems.
Think of it like a clogged coffee maker – if the water can’t flow through properly, your coffee won’t taste good, and it might not even brew. Similarly, when a carburetor gets clogged:
- Poor Fuel Economy: Your engine might be using more fuel than it should because the air-fuel mixture is off.
- Rough Idling: The engine might shake or stumble when you’re stopped.
- Hesitation or Stumbling: When you press the gas pedal, the car might hesitate or feel like it’s going to stall.
- Difficulty Starting: It can become harder to start the engine, especially when it’s cold.
- Engine Misfires: You might feel jerking or notice the engine cutting out.
- Black Smoke from Exhaust: This can indicate too much fuel is entering the engine (rich mixture).
These symptoms are frustrating, especially when you don’t know what’s causing them. Fortunately, many of these issues can be resolved with a proper cleaning, often without needing to remove the carburetor.
Can You Really Clean a Carburetor Without Removing It?
Yes, for many common and less severe issues, you absolutely can! This method is often referred to as a “canned carb cleaner” or “in-situ” cleaning. It involves using specialized aerosol sprays designed to dissolve Gunk and carb deposits while the carburetor is still mounted on the engine. This is a fantastic option for beginners or for routine maintenance because it’s less labor-intensive.
However, it’s important to be realistic. This method is best for removing varnish and light carbon deposits. If your carburetor is severely gummed up, has mechanical damage, or has deep internal blockages, a full disassembly and cleaning might still be necessary. But for most everyday drivers experiencing mild performance issues, the “no-removal” method is a great first step and often solves the problem.
When to Consider Cleaning Without Removal
This approach is ideal for:
- Preventive Maintenance: Regularly cleaning your carburetor can prevent future problems.
- Mild Performance Issues: If you’re experiencing slight sputtering, rough idling, or minor hesitation.
- Cars that Sit for a While: Old fuel can leave behind gummy deposits, which this method can often tackle.
- Budget-Conscious DIYers: It’s a cost-effective way to handle a common repair.
It’s generally NOT recommended for:
- Severe Clogs: If the engine barely runs or won’t run at all.
- Mechanical Problems: Such as worn-out gaskets, broken springs, or damaged floats.
- Heavy Buildup of Debris: Like rust particles from a deteriorating fuel tank.
Tools and Materials You’ll Need
Gathering the right supplies before you start makes the process much smoother. For cleaning a carburetor without removing it, you won’t need many specialized tools. Here’s what you should have on hand:
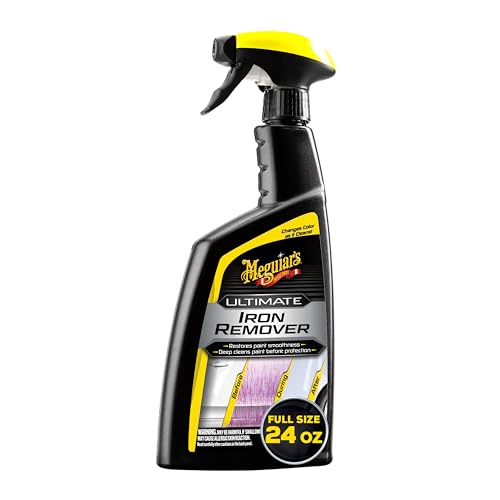
- Carburetor Cleaner Spray: This is the star of the show. Look for a reputable brand that specifically states it’s safe for carburetors and throttle bodies. Many contain solvents to break down varnish, carbon, and gum.
- Safety Glasses: Always protect your eyes! Carb cleaner is caustic and can cause serious injury if it gets in your eyes.
- Gloves: Nitrile or chemical-resistant gloves will protect your skin from the solvents.
- Screwdrivers: A set of flathead and Phillips head screwdrivers might be needed to remove the air cleaner assembly.
- Old Rags or Shop Towels: For wiping up any spills or excess cleaner.
- A Fire Extinguisher: It’s always smart to have one nearby when working with flammable chemicals and engines.
- Owner’s Manual (Optional but Recommended): This can show you where the carburetor is located and how to access it safely.
Tip: Some carburetor cleaners come with a small straw or nozzle that helps direct the spray into tight areas.
Step-by-Step: How to Clean Your Carburetor In Place
Let’s break down how to perform this cleaning. Remember, safety first!
Step 1: Prepare Your Workspace and Vehicle
- Park your vehicle on a level surface in a well-ventilated area, preferably outdoors.
- Ensure the engine is cool to the touch. Working on a hot engine can lead to burns and poses a fire risk when using flammable cleaners.
- Engage the parking brake firmly.
- Open the hood and locate the carburetor. It’s usually found on top of the engine, connected to the air intake system via the air cleaner housing.
Step 2: Access the Carburetor
- You’ll need to expose the carburetor to spray the cleaner into it. This typically means removing the air cleaner assembly.
- Look for bolts, screws, or wing nuts holding the air cleaner cover in place. Carefully remove these and lift off the cover and any associated ducting.
- You might need to disconnect a few vacuum hoses or electrical connectors. If you do, make a note of where they go or take pictures before disconnecting them. This makes reassembly much easier.
Pro Tip: If you’re unsure about removing hoses or parts of the air intake, consult your owner’s manual or a reliable online tutorial specific to your car model.
Step 3: Start the Engine and Apply Cleaner
- With the air cleaner assembly removed, start the engine. You want it to be running for this step so the cleaner gets drawn through the carburetor’s passages.
- Crucially, DO NOT spray the cleaner directly into the carburetor’s main throat at idle for extended periods. This can cause a very rich fuel mixture, potentially choking the engine or even causing it to stall.
- Instead, aim the spray nozzle at the base of the carburetor where the throttle plate is located, or at any visible jets or passages. You can also spray into the venturi (the Venturi is the narrowed passage within the carburetor where air speed increases and pressure drops, drawing fuel through the jets).
- Rev the engine slightly to around 1500-2000 RPM. This helps the engine suck in the cleaner more effectively.
- Apply the cleaner in short, controlled bursts. You should see the engine’s idle speed fluctuate slightly as the cleaner works its magic and dissolves deposits.
- Continue this process for about 30-60 seconds, spraying intermittently and allowing the engine to recover between bursts.
Important: If the engine begins to sputter excessively or stall, ease up on the cleaner or stop spraying altogether and let the engine return to a normal idle.
Step 4: Clean External Areas (Optional but Recommended)
While the engine is running or after you’ve finished spraying into the carburetor, you can also use the cleaner to clean the exterior of the carburetor and the throttle body. This helps remove external grime that can impede performance over time.
- Spray the cleaner onto a rag and wipe down the carburetor’s exterior.
- You can also lightly spray some cleaner on the throttle plate and shaft areas if they appear dirty, then wipe them clean.
Step 5: Reassemble and Test Drive
Once you’ve finished applying the cleaner and cleaning visible external parts:
- Turn off the engine.
- Carefully reattach the air cleaner assembly, reconnecting any hoses or electrical connectors you unplugged. Make sure everything is secure.
- Start the engine again. It might run a little rough for a few moments as any remaining cleaner burns off.
- Take the car for a short drive. Pay attention to how it accelerates, idles, and generally performs. You should hopefully notice an improvement in responsiveness and smoothness.
Alternative & Advanced In-Place Cleaning Tips
While the spray method is the most common, here are a few additional tips and variations for in-place carburetor cleaning:
Using a Different Carburetor Cleaner Formulation
Some mechanics prefer using a “throttle body cleaner” spray, which is often formulated to be slightly more aggressive on Gunk and can be sprayed more liberally into the throttle bore. However, always double-check the product labeling to ensure it’s safe for your specific carburetor type.
Cleaning the Throttle Body
The throttle body is closely related to the carburetor’s function. Even on fuel-injected cars (without a carburetor), cleaning the throttle body is a common DIY task that improves idling and throttle response. For carburetors, cleaning the throttle plate and bore can complement the main carb cleaning and remove sticky carbon deposits that affect airflow.
Spraying into Vacuums Lines (Use with Extreme Caution!)
Some advanced users recommend spraying cleaner into a small vacuum line that directly feeds into the carburetor. This can sometimes introduce the cleaner into more specific internal passages. However, this is riskier for beginners:
- High Risk of Over-Rich Mixture: You could easily flood the engine.
- Potential for Engine Damage: If the cleaner isn’t fully combusted, it can wash oil from cylinder walls or damage catalytic converters.
For beginners, it’s best to stick to spraying into the main carburetor throat or venturi as described in Step 3.
What About Fuel Additives?
You can also use fuel additives designed to clean carburetors and fuel injectors. These are poured directly into your fuel tank and work as you drive. While they are a good option for general fuel system maintenance and can help dissolve minor varnish buildup over time, they are generally less effective for clearing significant clogs compared to aerosol sprays applied directly to the carburetor.
According to the U.S. Department of Energy, maintaining your fuel system, including ensuring proper fuel-air mixture from the carburetor, is key to optimal fuel economy. These additives can be part of a broader maintenance strategy.
When a Full Carburetor Rebuild is Necessary
Even with the best in-place cleaning methods, some issues require more intensive work. You might need to remove and rebuild your carburetor if:
- The engine still runs poorly after cleaning.
- You suspect mechanical wear or damage (e.g., a leaking float needle, worn throttle shafts).
- You find significant rust or debris inside the carburetor.
- The vehicle has been sitting for many years, and the carburetor is heavily gummed up with dried fuel.
A full rebuild involves disassembling the carburetor, cleaning each part thoroughly (often with specialized dips), replacing worn gaskets, seals, and sometimes other internal components, and then reassembling it correctly. This is a more advanced DIY task or one best left to a professional mechanic.
Troubleshooting Common Issues During Cleaning
It’s not uncommon to run into minor snags. Here are a few common problems and how to address them:
Engine Stalls or Runs Very Rough
Cause: Too much cleaner was introduced too quickly, creating an overly rich mixture, or some cleaner didn’t burn off. Possibly a blockage is worse than thought, or the cleaner itself is displacing fuel.
Solution: Immediately stop spraying cleaner. Rev the engine slightly if possible to help it clear out. If it continues to run poorly, turn the engine off, let it sit for a few minutes, and then restart. Ensure all air intake components are reconnected correctly.
No Change in Performance
Cause: The clog is too severe for an in-place cleaning, or the issue lies elsewhere (e.g., ignition problem, fuel pump issue).
Solution: You may need to proceed with a full carburetor rebuild or consult a mechanic to diagnose other potential problems.
New Leaks Appear
Cause: Some cleaners can sometimes degrade old rubber or plastic seals.
Solution: Inspect the carburetor and surrounding areas for leaks. If you find any, you may need to replace the affected seals or gaskets. This might necessitate removing the carburetor.
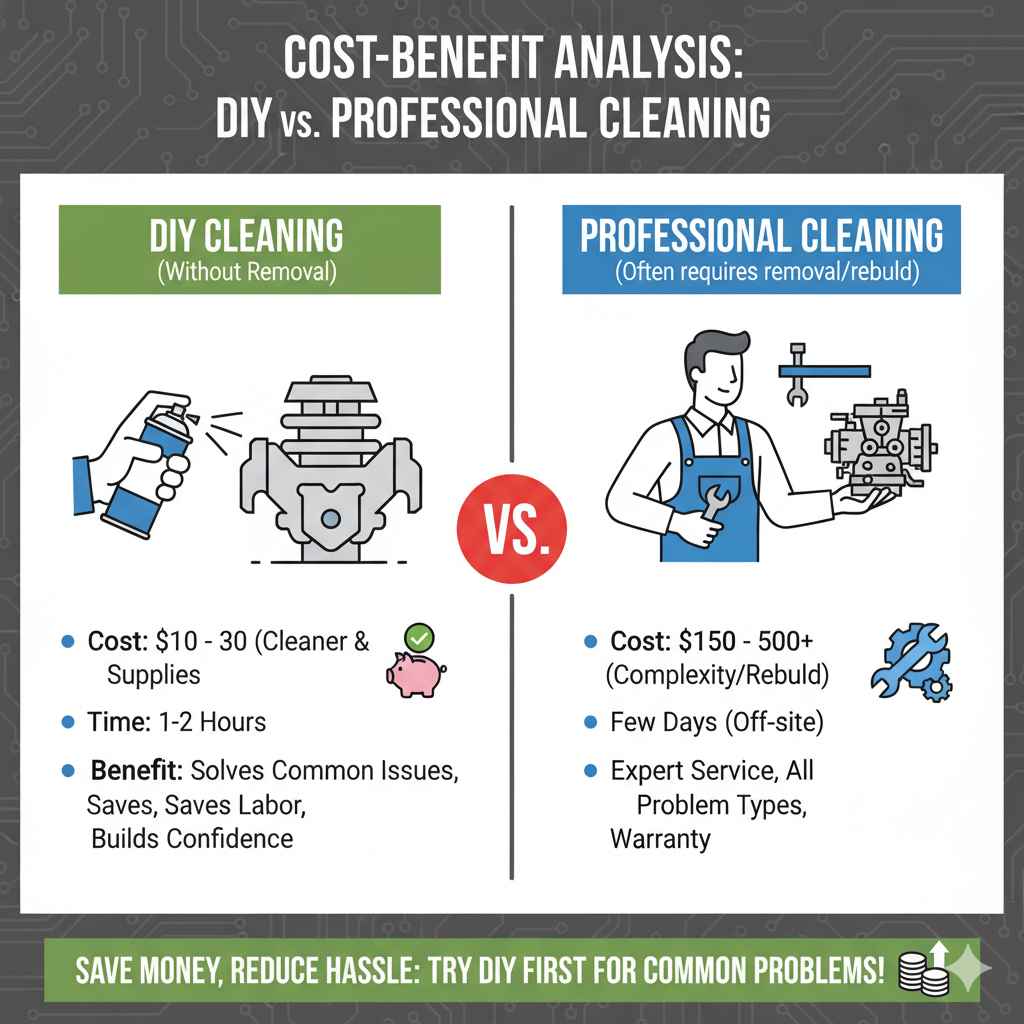
Cost-Benefit Analysis: DIY vs. Professional Cleaning
Let’s look at why this DIY approach makes sense economically:
DIY Cleaning (Without Removal):
- Cost: $10 – $30 for a can of carburetor cleaner and basic safety supplies.
- Time: 1-2 hours.
- Benefit: Solves many common issues, saves significant labor costs, builds confidence.
Professional Carburetor Cleaning (Often requires removal/rebuild):
- Cost: $150 – $500+ depending on the complexity and whether a full rebuild is needed.
- Time: Often a few days if not done on-site.
- Benefit: Performed by experts, handles all types of problems, warranty on work.
As you can see, attempting an in-place cleaning first is a very budget-friendly approach. For many common problems, it can eliminate the need for a much more expensive professional service.
Frequently Asked Questions (FAQ)
Can I use brake cleaner to clean my carburetor?
While brake cleaner is a solvent, it’s generally not recommended for cleaning carburetors. Brake cleaner can be too harsh, potentially damaging rubber seals, O-rings, and some plastic components within the carburetor. Always use a cleaner specifically designed for carburetors.
How often should I clean my carburetor?
For daily drivers, a professional clean might be needed every 30,000-50,000 miles, or if symptoms arise. However, for preventative maintenance using the spray method, doing it annually or every 15,000 miles can be beneficial, especially if your vehicle sits for extended periods or if you use lower-quality fuel.
What’s the difference between cleaning a carburetor and cleaning a throttle body?
Cleaning a carburetor involves disassembling and cleaning its internal passages, jets, and floats to ensure the correct air-fuel mixture. Cleaning a throttle body focuses on removing carbon buildup from the throttle plate and bore, which controls airflow into the engine manifold. While both affect engine performance, their internal mechanisms and cleaning focus are different.
Will cleaning my carburetor improve my car’s mileage?
Yes, most likely! A clean carburetor allows for precise air-fuel mixing. If your carburetor was dirty and causing a rich fuel mixture, cleaning it will help the engine burn fuel more efficiently, which can lead to improved gas mileage.
My car is old and has been sitting. Can this method revive it?
It’s worth a try! Old fuel can turn into a gummy varnish that clogs carb circuits. The aerosol cleaners are designed to dissolve this varnish. If the buildup isn’t too severe or hasn’t caused corrosion, this method can significantly improve (or even restore) function. However, extremely aged vehicles might require a full rebuild.
Is it safe to spray cleaner into a running engine?
Yes, it is generally safe when done correctly and with the right product. You must use a cleaner designed for carburetors and spray it in short bursts while the engine is running at a slightly elevated RPM. This ensures the cleaner is atomized and burned off, rather than pooling and causing issues. Always wear safety gear, especially eye protection.