How to Drain a Car Battery: Essential Guide
Draining a car battery intentionally might seem counterintuitive, but it’s a safe and effective method for testing its health and performance. This guide provides clear, step-by-step instructions for safely draining your battery.
Hey everyone, Md Meraj here! Let’s talk about car batteries. They’re the heart of your car’s electrical system, but sometimes, you need to know if they’re still performing at their best. A common question, and one that might sound a bit strange, is “how to drain a car battery?” While you don’t want to drain it accidentally, intentionally doing so in a controlled way is actually a great way to check its health. Don’t worry, it’s not as complicated or scary as it sounds! I’ll walk you through the entire process, step-by-step, making it easy and safe for you to understand and do yourself. We’ll cover why you might want to do this, what you’ll need, and exactly how to go about it without any confusion.
This article is for anyone who feels a little unsure about their car’s battery or wants to be more hands-on with basic maintenance. We’ll demystify the process so you can tackle it with confidence.
Why Would You Want to Drain a Car Battery?
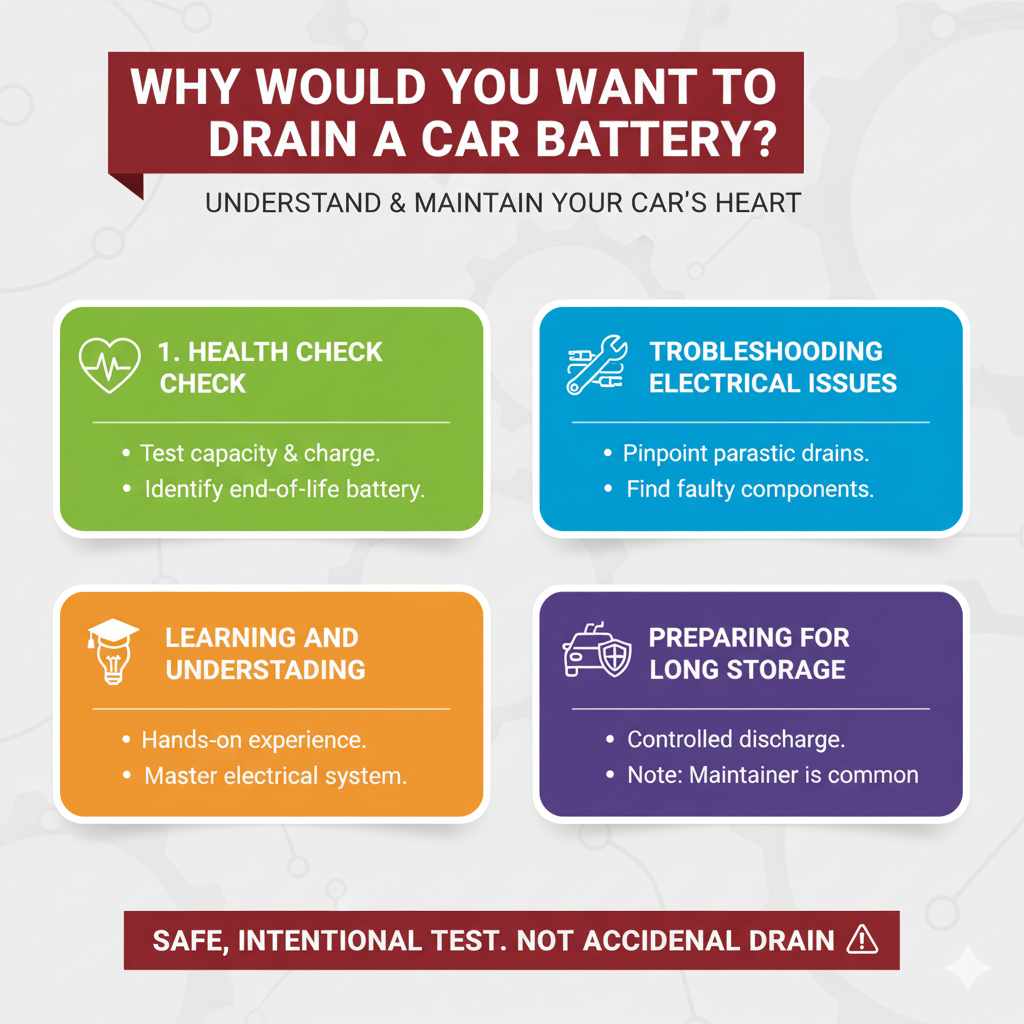
It might sound odd, but there are several good reasons why a beginner might want to learn how to drain a car battery in a controlled manner. It’s not about damaging the battery, but rather about using it to understand its capabilities and identify potential issues before they leave you stranded. Think of it as a stress test for your car’s heart!
- Health Check: The most common reason is to test the battery’s capacity and its ability to hold a charge. A battery that drains too quickly or unevenly under a moderate load might be nearing the end of its life.
- Troubleshooting Electrical Issues: If you suspect an electrical problem in your car, such as a parasitic drain (where something is drawing power when the car is off), intentionally draining the battery can help pinpoint the source of the problem.
- Learning and Understanding: For budding DIY enthusiasts, understanding how various components of a car work is key. Performing this procedure can provide valuable hands-on experience with your car’s electrical system.
- Preparing for Long Storage: Sometimes, before storing a vehicle for an extended period, people might drain the battery to a specific point. However, it’s more common to use a battery maintainer in these cases. This method is more for testing than storage preparation.
It’s important to distinguish between a controlled drain for testing and an accidental drain caused by leaving lights on or a faulty component. We are focusing on a safe, intentional test here.
Understanding Car Batteries: A Quick Primer
Before we get into the “how-to,” let’s quickly touch on what a car battery does. Your car’s battery is a rechargeable energy storage device. Its main job is to provide the electrical power needed to start the engine. When the engine is running, the alternator takes over, powering the car’s systems and recharging the battery. A healthy battery can deliver a lot of current for a short burst to get the starter motor spinning, and it also powers your car’s lights, radio, and other electronics when the engine isn’t running.
Car batteries are typically lead-acid batteries. They contain lead plates submerged in an electrolyte solution (sulfuric acid and water). The chemical reaction between the lead plates and the electrolyte is what generates electricity. Over time, this chemical process can degrade, and the battery’s ability to store and deliver power diminishes.
Understanding this basic function helps explain why testing its capacity through a controlled drain is a useful diagnostic step.
What NOT to Do: Common Battery Draining Pitfalls
It’s crucial to understand that “draining” a car battery doesn’t mean completely emptying it until it’s dead and irreparable. Modern car batteries are sensitive. Completely discharging them can be harmful and shorten their lifespan. A controlled test aims to bring the battery’s voltage down to a specific, safe level to assess its performance.
Here are some common ways car batteries get drained unintentionally, which you should avoid:
- Leaving Lights On: Headlights, interior lights, or hazard lights left on for an extended period are the most frequent culprits.
- Faulty Alternator: If your alternator isn’t charging the battery properly, it will drain even under normal driving conditions.
- Parasitic Drain: This is when a component in your car continues to draw power even after the ignition is off. This is a common issue that requires diagnosis.
- Old or Damaged Battery: As batteries age, their internal components degrade, making them less efficient and prone to losing charge.
- Extreme Temperatures: Very cold or very hot weather can significantly impact a battery’s performance and reduce its charge faster.
Our goal is to avoid these scenarios and perform a controlled test. If your battery has been accidentally drained, you’ll typically need to jump-start your car and then have the battery and charging system tested.
Tools and Materials You’ll Need
Safety first! Before you begin, gather all the necessary tools. This ensures the process is smooth, efficient, and most importantly, safe. You want to be prepared for any situation.
- Safety Glasses: Essential for protecting your eyes from any potential sparks or battery acid.
- Insulated Gloves: To protect your hands from accidental contact with electrical terminals or the battery casing.
- Battery Terminal Cleaner Kit: Useful for ensuring clean connections before and after the test.
- Wrench Set (Metric and SAE): To disconnect and reconnect the battery terminals. Typically, a 10mm or 3/8-inch wrench is common for battery terminals.
- Digital Voltmeter (Multimeter): This is crucial for monitoring the battery’s voltage level throughout the process. Look for one that can measure DC voltage. You can find reliable ones at most auto parts stores.
-
A Suitable Load: This is the key to a controlled drain. You have a few options:
- Headlights: Using your car’s headlights is the simplest method. They draw a significant amount of power and are readily available.
- Resistor Bank/Load Tester: For a more precise test, a dedicated automotive load tester or resistor bank can be used. These are designed for battery testing and provide a consistent, measurable load. You can often rent these from auto parts stores or purchase one. If you’re not comfortable with complex wiring, this might be a job for a professional.
- Power Inverter with a Small Appliance: You could use a power inverter connected to the battery to run a small appliance like a fan or a low-wattage light bulb. This is also a way to create a controlled load.
- Owner’s Manual: Always a good reference for specific vehicle information.
- Shop Rags or Paper Towels: For cleaning up.
- Wire Brush: To clean corrosion from battery terminals.
Ensure your chosen load (like headlights) is accessible and you know how to turn it on and off easily. If you’re using a dedicated load tester, follow its specific instructions carefully.
Step-by-Step Guide: How to Safely Drain a Car Battery for Testing
This guide will focus on using your car’s headlights as the load, as it’s the most accessible method for beginners. Always remember to prioritize safety.
Step 1: Preparation and Safety Checks
Before you do anything, ensure you’re in a safe, well-ventilated area, preferably outdoors or in a garage with the door open. Batteries can release explosive hydrogen gas during charging and discharging, so ventilation is key. Never smoke or have open flames near the battery.
- Put on your safety glasses and insulated gloves.
- Turn off the engine and remove the key from the ignition.
- Ensure all accessories (radio, interior lights, etc.) are turned off.
- Locate your car battery. It’s usually under the hood, but some vehicles have it in the trunk or under a seat. Consult your owner’s manual if you’re unsure.
- Visually inspect the battery. Look for any cracks, leaks, or corrosion on the terminals. If you see significant damage or corrosion, it might be best to have a professional inspect it.
Step 2: Measure the Initial Voltage
Using your digital voltmeter, you’ll get a baseline reading of your battery’s current charge. This is important for comparison later.
- Set your voltmeter to DC voltage (VDC) mode, usually on a scale higher than the expected battery voltage (e.g., 20V).
- Carefully touch the red probe of the voltmeter to the positive (+) terminal of the battery and the black probe to the negative (-) terminal.
- Note down the reading. A fully charged 12-volt car battery should read somewhere between 12.6 volts and 12.8 volts when the engine is off. A reading below 12.4 volts indicates it needs charging.
Step 3: Disconnect the Negative Terminal (Optional but Recommended for Safety)
While not strictly necessary for using headlights as a load, disconnecting the negative terminal adds a layer of safety. It prevents accidental short circuits if your wrench touches the car’s chassis while working near the positive terminal.
- Using the appropriate wrench, loosen the nut on the clamp holding the negative (-) battery cable to the terminal.
- Gently twist and lift the cable off the terminal.
- Tuck the cable away from the battery so it cannot accidentally make contact with the terminal.
Why the negative terminal? Disconnecting the negative cable first and reconnecting it last ensures that if your wrench touches the car’s metal body while you’re working on the positive terminal, no current will flow, preventing sparks. The negative terminal is connected to the car’s chassis, which is grounded.
Step 4: Set Up the Load (Headlights)
Now, you’ll activate the load. For this method, we’ll use the headlights.
- If you disconnected the negative terminal, you’ll need to reconnect it temporarily for the headlights to work. Be extra careful now to avoid accidental shorts.
- Turn on your car’s headlights. Ensure your car’s engine is OFF.
- If you have a separate testing device like a resistanc e load tester, connect it according to its instructions. This will provide a more controlled and specific load.
If you’re using a load tester, it will likely simulate a specific amperage draw for a set period. If you’re using headlights, the draw is less precise but still effective for a basic test, especially if you time it.
Step 5: “Drain” the Battery (Apply the Load)
This is where the actual draining process begins. The goal is to reduce the battery’s voltage to a specific level, typically around 10.5 volts for a lead-acid battery. This takes time, and the duration will vary depending on the battery’s condition and the load applied.
- With the headlights (or load tester) on and the engine off, start monitoring the battery voltage with your voltmeter.
- Keep the voltmeter probes attached to the battery terminals.
- Observe the voltage as it drops. You are aiming to bring the voltage down to approximately 10.5 volts.
- This process can take anywhere from 15 minutes to over an hour, depending on the battery’s capacity and health.
Important Note: Do not let the voltage drop below 10.5 volts. Prolonged discharge below this level can cause permanent damage to the battery.
Step 6: Turn Off the Load and Measure Voltage Again
Once you reach your target voltage (around 10.5V), immediately turn off the headlights or disconnect the load tester.
- Turn off the headlights.
- Let the battery rest for a few minutes (about 5-10 minutes) without any load. This allows the voltage to recover slightly after the drain.
- Measure the voltage again with your digital voltmeter.
A healthy battery will show a recovery in voltage to around 12.4 to 12.6 volts after a short rest. If the voltage stays very low and doesn’t recover significantly, it’s a strong indicator that the battery is weak and may need replacement.
Step 7: Recharge the Battery
After the test, your battery will be partially discharged. It’s crucial to recharge it fully to avoid sulfation (a buildup of lead sulfate crystals that reduces battery capacity) and to ensure it’s ready for use.
- Connect a battery charger to your car battery. Follow the charger’s instructions for proper connection and charging settings.
- Charge the battery until it is fully charged. Most smart chargers will indicate when the charging is complete, typically returning to about 12.6-12.8 volts.
- If you don’t have a charger, you can drive your car for at least 30-60 minutes to allow the alternator to recharge it. However, a dedicated charger is more effective for a full and proper recharge.
Step 8: Reconnect Battery Terminals (If Disconnected)
Once the battery is recharged and you’re done with testing/maintenance:
- If you disconnected the negative terminal earlier, reconnect it now.
- First, attach the positive (+) cable to the positive terminal and tighten the clamp securely.
- Then, attach the negative (-) cable to the negative terminal and tighten its clamp.
- Ensure both connections are snug. Loose connections can cause electrical problems.
- You can use battery terminal protector spray if you have it to prevent future corrosion.
Your battery has now been tested and recharged. If the voltage dropped significantly or did not recover well, it’s time to consider a new battery.
Using a Dedicated Load Tester: A More Professional Approach
While using headlights is a common DIY method, a professional automotive load tester offers a more precise and informative way to test your battery. These devices simulate the high amperage draw needed to start an engine, providing a more accurate assessment of the battery’s cranking power.
Here’s a general overview of how a load tester works:
| Step | Action | Purpose |
|---|---|---|
| 1 | Connect the load tester to the battery terminals (positive to positive, negative to negative). | Establishes electrical connection for the test. |
| 2 | Set the tester for the battery’s Cold Cranking Amps (CCA) rating (found on the battery label). Most testers have a dial or buttons for this. | Configures the tester to draw a load equivalent to starting the engine in cold weather. |
| 3 | Engage the load. This is typically done by pressing a button or turning a knob on the tester. | Simulates the engine cranking, drawing significant amperage from the battery. |
| 4 | Monitor the battery voltage on the tester’s display for the specified duration (usually 10-15 seconds). | Measures the battery’s ability to maintain voltage under heavy load. |
| 5 | Read the results. Most testers indicate if the battery is “Good,” “Weak,” or “Replace” based on voltage drop. | Provides a clear diagnosis of battery health. |
| 6 | Disconnect the load tester. | Ends the test. |
Using a load tester is generally recommended by battery manufacturers and automotive professionals for the most accurate diagnosis. Many auto parts stores offer free battery testing using these devices.
External Resource: For more in-depth information on automotive batteries and testing, the U.S. Department of Energy offers valuable resources on vehicle maintenance and efficiency:
U.S. Department of Energy: Fuel Economy
Interpreting Your Battery Test Results
After performing the drain test and recharging, you need to understand what your readings mean. This is where you’ll determine if your battery is in good shape or if it’s time for a replacement.
Here’s a general guide:
- Initial Voltage: 12.6V – 12.8V (Fully Charged). Anything below 12.4V means it needs charging.
- Voltage During Drain (Target): Aim for around 10.5V. If it drops much faster than expected or goes below 10.5V prematurely, the battery is weak.
-
Voltage After Rest (Post-Drain): This is a key indicator.
- 12.4V or higher: Good. The battery held its charge well and recovered.
- 12.2V – 12.4V: Fair/Marginal. The battery is starting to show its age. It might be okay for now but keep an eye on it.
- Below 12.2V: Poor. The battery is likely weak and may not reliably start your car, especially in cold weather. It’s time to consider replacement.
- Load Tester Results: These are usually printed on the tester display or a printout: “Good,” “Weak,” “Replace.”
Table: Battery Voltage Interpretation Guide
| Voltage Reading (Engine Off, After Rest) | Battery Condition | Recommendation |
|---|---|---|
| 12.6V to 12.8V | Excellent | Fully charged and healthy. |
| 12.4V to 12.59V | Good | Healthy and reliable. |
| 12.2V to 12.39V | Fair / Marginal | Battery shows signs of aging. Monitor closely; consider replacement soon. |
| Below 12.2V | Poor | Battery is weak and likely needs replacement. |
If your battery consistently falls into the “Fair” or “Poor” categories, it’s a good idea to replace it before it fails during an inconvenient time.
When to Seek Professional Help
While learning how to drain a car battery for testing is a great DIY skill, there are situations where it’s best to call in the pros. Don’t hesitate to seek help if:
- You’re Uncomfortable: If at any point you feel unsure or unsafe, stop and call a qualified mechanic or roadside assistance.
- Battery is Damaged: If you notice cracked casing, leaks, or severe corrosion, it’s safer to let a professional handle it.
- Complex Electrical System: Some modern cars have complex electronic systems that might react unexpectedly to voltage changes.
- Load Tester Required for Diagnosis: If you suspect a more serious problem or want a definitive answer, a professional load test is often the most reliable method.
- Car Won’t Start After Test: If you perform the test and your car won’t start afterward, and recharging doesn’t help, it’s time for professional diagnosis.
Remember, your safety and the well-being of your vehicle are the top priorities. There’s no shame in knowing when to enlist expert help.

Frequently Asked Questions (FAQ)
Q1: Is it safe to intentionally drain my car battery?
Yes, performing a controlled drain to test its capacity is generally safe, provided you follow the steps correctly and do not discharge the battery below 10.5 volts. Over-discharging can permanently damage the battery. Using proper safety gear is essential.
Q2: How long should I drain the battery for?
The duration varies greatly depending on the battery’s condition and the load applied. You should drain it until the voltage reaches approximately 10.5 volts, which could take anywhere from 15 minutes to over an hour when using headlights. A professional load tester applies the load for a shorter, specified period (e.g., 10-15 seconds).
Q3: Can this process damage my car’s electronics?
When done correctly, this process should not harm your car’s electronics. The key is to use a voltmeter to monitor voltage and stop the drain at the recommended level (around 10.5V). Avoid letting the voltage drop too low, as this can affect sensitive electronic components. Disconnecting the negative terminal before working on the positive terminal also adds a layer of safety against short circuits.
Q4: What if my battery is completely dead? Can I still test it this way?
If your battery is completely dead (reads 0 volts or very close to it), it might be beyond recovery or testing using this method. A completely discharged battery can suffer from deep sulfation. In such cases, it’s best to attempt charging it with a specialized charger designed for deeply discharged batteries, or, more likely, the battery needs replacement. Always test voltage with a voltmeter first.
Q5: How often should I test my car battery?
It’s a good practice to test your car battery annually, especially before extreme weather seasons (like winter or summer), or if you notice any signs of weakness (slow starting, dim lights). Many auto parts stores offer free battery testing services.
Q6: Why doesn’t my car start after I drained the battery?
If your car doesn’t start after the test and you’ve recharged the battery, it’s likely that the test revealed the battery was already weak and unable to hold sufficient charge. If recharging doesn’t bring the voltage back up to a healthy level, the battery probably needs to be replaced.
Q7: Can I use a power inverter from an auto parts store to drain the battery?
Yes, you can use a power inverter by connecting it to your battery and then plugging in a low-wattage appliance (like a small fan, LED light, or phone charger). This creates a controlled load. Monitor the battery voltage closely with your voltmeter while the appliance is running, and stop the process when the voltage reaches around 10.5V. Be sure to use an inverter that matches your car’s 12V system and is appropriate for the appliance you intend to use.
Conclusion
Learning how to drain a car battery for testing might sound like a task reserved for mechanics, but as you’ve seen, it’s a manageable process for any car owner willing to follow safety guidelines and clear steps. Mastering this skill can give you valuable insights into your battery’s health, helping you avoid unexpected breakdowns and save money on unnecessary replacements.
Remember, the goal isn’t to kill your battery but to perform a safe, controlled stress test. By using your voltmeter to monitor the voltage and ensuring you don’t discharge it too deeply, you can reliably assess its performance. If your test results indicate a weak or failing battery, it’s prudent to replace it proactively. This simple test, performed periodically and especially if you notice any starting issues, can be a lifesaver.
Keep these steps in mind, always prioritize safety, and you’ll be well-equipped to understand and maintain one of your car’s most critical components. Happy motoring!