How to Drain Oil From Car: Proven Essential Learnings
Draining your car’s oil is an essential DIY maintenance task that saves money and keeps your engine healthy. With a few simple tools and this step-by-step guide, you can safely and effectively drain old oil from your vehicle. It’s a manageable process for beginners, ensuring your car runs smoothly with regular upkeep.
Hey there, fellow drivers! Md Meraj here, your friendly guide to making car care feel less like a mystery and more like a simple, satisfying task. We’ve all been there: that little oil light flickers on, or maybe it’s just time for your car’s regular check-up. Thinking about getting that oil changed yourself can feel a bit daunting, especially if you’re new to tinkering with your car. The idea of draining oil might sound messy or complicated, involving things like hot fluids and getting under your car. But guess what?
It’s actually one of the most fundamental and achievable DIY maintenance steps you can take. By learning how to drain your car’s oil, you’re not just saving a trip to the mechanic; you’re getting to know your car better and taking a big step towards keeping it running reliably for years to come. Stick with me, and I’ll walk you through this essential process, one simple step at a time. You’ll be surprised at how manageable it is!
Why Draining Your Car’s Oil is Important
Taking care of your car’s oil is like giving your engine a life-sustaining drink. Over time, engine oil does a super important job: it lubricates all the moving parts inside your engine, preventing them from grinding against each other and wearing out. It also helps to keep your engine clean by picking up dirt and debris, and it even helps to cool down some of the hottest parts. But, just like anything that works hard, oil gets dirty and loses its effectiveness. It breaks down due to heat and friction, and it gets contaminated with bits of metal, soot, and other gunk. If you don’t change it, this old, degraded oil can’t do its job properly. This can lead to increased wear on your engine, reduced performance, and even costly damage down the road. Regular oil changes are one of the simplest and most cost-effective ways to ensure your engine stays healthy and performs at its best.
The Benefits of Performing Your Own Oil Drain
Draining your car’s oil is often the first major step in performing an oil change yourself, and it comes with some great perks:
- Save Money: Labor costs at a shop can really add up. Doing it yourself, especially draining the old oil, cuts down significantly on the total cost of an oil change.
- Know Your Car: Getting under your car and performing routine maintenance helps you understand your vehicle better. You’ll become more familiar with its components and how they work.
- Convenience: You can do it on your own schedule, without needing to book an appointment or wait at a service center.
- Environmental Responsibility: By draining and disposing of your oil properly, you’re ensuring it doesn’t end up in landfills or waterways, which is better for the planet.
- Peace of Mind: There’s a real sense of accomplishment and confidence that comes from successfully maintaining your own vehicle.
Essential Tools and Materials You’ll Need
Before you get started, it’s important to have everything you need readily available. This makes the process smoother and safer. Don’t worry, these are common tools that are relatively inexpensive and can be used for many other car maintenance tasks.
Tools Checklist:
- Wrench or Socket Set: You’ll need a wrench or socket that fits your car’s oil drain plug. This is often a different size than other bolts on your car, so check your owner’s manual or inspect the plug beforehand.
- Oil Filter Wrench: If you’re also changing the filter (which is highly recommended when draining the oil), you’ll need a wrench specifically designed for oil filters.
- Drain Pan: A sturdy pan with a large opening to catch the old oil. Make sure it can hold more than your car’s oil capacity.
- Funnel: A clean funnel is essential for pouring new oil in and can also be handy for pouring old oil into a storage container.
- Gloves: Disposable nitrile or rubber gloves will protect your hands from hot oil and grime.
- Safety Glasses: Essential for protecting your eyes from any splashes.
- Rags or Paper Towels: You’ll need these for wiping up spills and cleaning parts.
- Jack and Jack Stands (if needed): If your car is too low to access the drain plug comfortably, you’ll need to lift it. Never work under a car supported only by a jack. Always use jack stands for safety.
- Wheel Chocks: These go behind your wheels to prevent the car from rolling.
Materials You’ll Need:
- New Engine Oil: Make sure you have the correct type and amount of oil specified in your car’s owner’s manual. Using the wrong oil can harm your engine.
- New Oil Filter: Again, get the one recommended for your car.
- New Drain Plug Gasket/Washer (optional but recommended): Some drain plugs have a crush washer that should be replaced each time to ensure a good seal and prevent leaks.
- Container for Used Oil: An old oil jug or a dedicated container for transporting used oil for recycling.
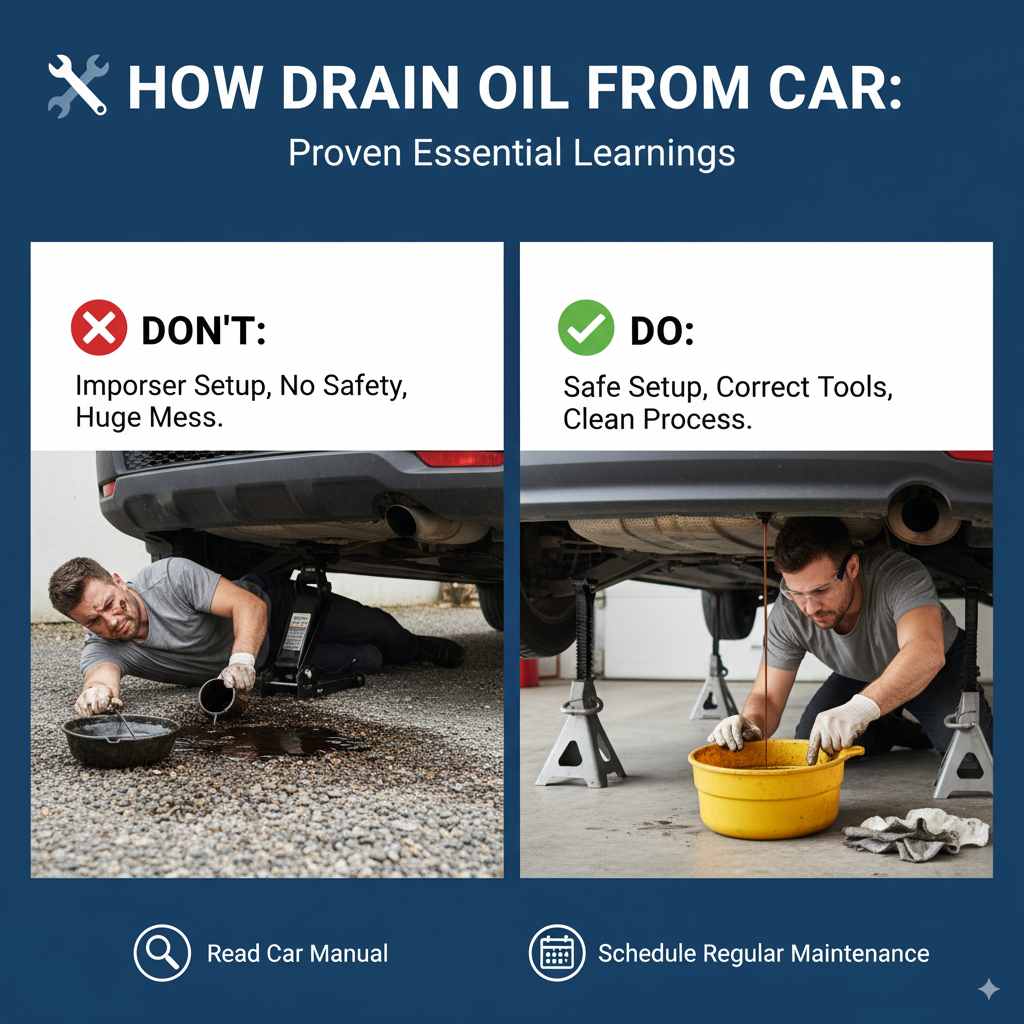
Safety First: Preparing Your Workspace and Vehicle
Safety is the absolute number one priority when working on your car. Oil can be hot, and working under a vehicle carries risks. Let’s make sure you’re prepared to do this safely.
Preparing Your Vehicle:
For most cars, the engine oil should be warm, but not scorching hot, before draining. Warm oil flows more easily. Drive your car for about 5-10 minutes to warm it up, then let it sit for another 10-15 minutes so it’s warm to the touch but not burning. This is a crucial balance.
If your car is low to the ground, you will need to lift it to get enough clearance to work underneath. This is where your jack and jack stands come in.
- Park your car on a flat, level surface.
- Engage the parking brake firmly.
- Place wheel chocks behind the rear wheels.
- Locate the vehicle’s manufacturer-recommended jacking points (check your owner’s manual!).
- Using your jack, lift the front of the vehicle to the desired height.
- Place jack stands securely under the designated support points on the frame.
- Slowly lower the vehicle onto the jack stands. Gently rock the car to ensure it is stable.
- Never place any part of your body under the car until it is securely supported by jack stands.
If you don’t have jack stands or are unsure about lifting your vehicle, many auto parts stores offer oil change services where you can get the oil drained professionally as part of a larger service, or they might offer oil disposal services.
Setting Up Your Workspace:
Make sure the area under your car is clear of debris. Having good lighting is also helpful. Lay down some old newspapers or a tarp underneath where you’ll be working to catch any minor drips that might occur.
Step-by-Step Guide: How to Drain Oil From Car
Alright, let’s get to it! Follow these steps carefully, and you’ll have that old oil out in no time. Remember to have your tools and materials ready!
-
Locate the Oil Drain Plug and Pan:
Carefully slide the drain pan underneath the engine. You’ll need to find the oil pan, which is usually a flat metal pan at the bottom of your engine. On one side of the oil pan, you’ll see a bolt – that’s your oil drain plug. Consult your owner’s manual if you have trouble finding it.
-
Position the Drain Pan:
Once you’ve located the drain plug, position the drain pan directly underneath it. Oil will shoot out with some force initially, so make sure the pan is large enough and positioned to catch everything, not just what drips straight down.
-
Loosen and Remove the Drain Plug:
Put on your gloves and safety glasses. Use the correct size wrench or socket to carefully loosen the drain plug. Turn it counter-clockwise. As it gets close to coming out, it might be a bit tight. Once it’s loose enough to turn by hand, be prepared: the oil will start to drain. Quickly unscrew it the rest of the way with your hand, pulling it away sharply to avoid getting oil on your hand. Try not to drop the plug into the hot oil!
Pro Tip: If the plug is extremely tight, you can try a penetrating lubricant like WD-40 and let it sit for a few minutes. Sometimes a sharp, firm turn with the wrench is all that’s needed.
-
Let the Oil Drain Completely:
Allow all the old oil to drain out. This can take anywhere from 5 to 15 minutes, depending on the temperature of the oil and the size of the oil pan. You’ll know it’s done when the oil is just dripping slowly.
-
Clean and Replace the Drain Plug:
While the last drops are draining, clean the oil drain plug with a rag. If your plug has a crush washer or gasket, it’s a good idea to replace it. These are inexpensive and ensure a good seal. Screw the drain plug back into the oil pan by hand to avoid cross-threading. Once it’s snug, tighten it with your wrench. Do not overtighten! You don’t want to strip the threads in the oil pan, which is a very expensive repair. A good rule of thumb is to tighten it until it’s snug, then give it about a quarter to half a turn more. Again, check your owner’s manual for specific torque recommendations if you have a torque wrench.
-
Lower the Vehicle (if lifted):
If you lifted your car, now is the time to carefully lower it back down onto the ground, ensuring the jack stands are removed and the vehicle is stable.
-
Refill with New Oil:
Locate your oil fill cap (usually marked with an oil can symbol). Remove it and insert your clean funnel. Pour in the correct amount and type of new oil as specified in your owner’s manual. It’s often a good idea to add about half a quart less than the total capacity, then check the dipstick and add more as needed.
-
Check the Oil Level:
Once you’ve added the oil, replace the fill cap. Start the engine and let it run for about 30 seconds to a minute to circulate the new oil. Then, shut off the engine and wait a few minutes for the oil to settle. Pull out the dipstick, wipe it clean, reinsert it fully, pull it out again, and check the oil level. It should be between the “MIN” and “MAX” marks. Add more oil slowly if needed, rechecking the dipstick after each addition until it’s at the proper level.
Important Considerations and Common Issues
Even with the best preparation, sometimes things don’t go exactly as planned. Here are some common issues and important points to keep in mind for a successful oil drain:
Oil Drain Plug Types and Gaskets
There are a few variations in oil drain plugs, and the gasket or washer is key to preventing leaks. Most modern cars use a drain plug with a metal crush washer, which is designed to deform slightly to create a seal. These are usually single-use and should be replaced with every oil change.
Some manufacturers might use a rubber gasket or even a plug with an integrated O-ring. Always refer to your owner’s manual or a trusted online auto parts resource to confirm what type of plug and gasket/washer your vehicle uses. Purchasing a new drain plug gasket when you buy your oil and filter is a smart move.
Stripped Drain Plugs and Oil Pans
This is the dreaded scenario! Overtightening or cross-threading the drain plug can damage the threads in the oil pan. If this happens, the plug won’t seal properly, and you’ll have an oil leak.
What to do if you suspect threads are stripped:
- Stop tightening immediately.
- Try to back the plug out carefully.
- Inspect the plug threads and the threads in the oil pan.
- If they are clearly damaged, immediate repair is needed. This might involve using a thread repair kit (like a Heli-Coil or Time-Sert) or, in severe cases, replacing the entire oil pan.
This is a more advanced repair. If you’re not comfortable with it, it’s time to call a professional mechanic. Prevention is key: always thread the plug in by hand first to ensure it’s going in straight.
Leaking Drain Plug: What to Do?
If you’ve finished the oil change and notice a leak around the drain plug, don’t panic. First, recheck that the plug is adequately tightened (without overtightening). If it still leaks, it might be due to a worn-out crush washer or a slightly damaged drain plug or oil pan thread. Sometimes, simply replacing the drain plug gasket will resolve the issue. If not, you may need to consider an oil pan thread repair kit.
Proper Disposal of Used Oil
This is incredibly important and often overlooked by beginners. Used motor oil is considered hazardous waste. You absolutely cannot just pour it down the drain, into the ground, or in your regular trash. It can contaminate soil and water.
Where to dispose of used oil:
- Auto Parts Stores: Most major auto parts retailers (like AutoZone, Advance Auto Parts, O’Reilly Auto Parts) accept used motor oil for recycling free of charge.
- Service Centers: Some local service stations or quick lube shops might accept it.
- Local Recycling Centers: Check with your local municipality or waste management authority for designated hazardous waste drop-off sites.
It’s best to store your used oil in a sealed container until you can take it for recycling. Make sure the container is clearly labeled “Used Motor Oil.”
How Often Should You Drain Your Car’s Oil?
The frequency of oil changes, and thus draining your oil, depends on several factors. There isn’t a one-size-fits-all answer, but we can break it down:
Consult Your Owner’s Manual
This is your ultimate guide! Manufacturers specify the recommended maintenance schedule for your specific vehicle. It will tell you the recommended mileage and/or time intervals for oil changes.
General Guidelines (but always check your manual!):
- Conventional Oil: Traditionally, oil changes were recommended every 3,000 miles or 3 months. While this is still a conservative and safe bet for older cars or those driven in severe conditions, many modern vehicles can go longer.
- Synthetic and Synthetic Blend Oils: These oils are engineered to be more stable under high temperatures and pressures. They typically last longer, often recommended every 5,000 to 7,500 miles, and sometimes even up to 10,000-15,000 miles for full synthetic oil in certain vehicles with advanced oil life monitoring systems.
-
Driving Habits: How you drive matters!
- Severe Driving Conditions: Short commutes where the engine doesn’t fully warm up, frequent stop-and-go traffic, driving in dusty or extreme temperatures (very hot or very cold), towing, or heavy hauling are all considered “severe.” If your driving habits fall into this category, you’ll need to change your oil more frequently than the standard recommendation.
- Normal Driving: Mostly highway driving, longer commutes on clear roads, and temperate climate driving are considered “normal.”
- Oil Life Monitoring Systems: Many newer cars have sophisticated oil life monitors that calculate when an oil change is due based on actual driving conditions, not just mileage. This system is usually displayed on your dashboard. When it indicates it’s time for an oil change, pay attention to it!
As a general rule, it’s better to change your oil a little too early than too late. If in doubt, err on the side of caution.
Frequently Asked Questions (FAQ)
How do I know what type of oil my car needs?
Your car’s owner’s manual is the best place to find this information. It will specify the recommended oil viscosity (e.g., 5W-30) and the type of oil (conventional, synthetic blend, or full synthetic) approved by the manufacturer. You can also often find this information on a sticker under the hood.