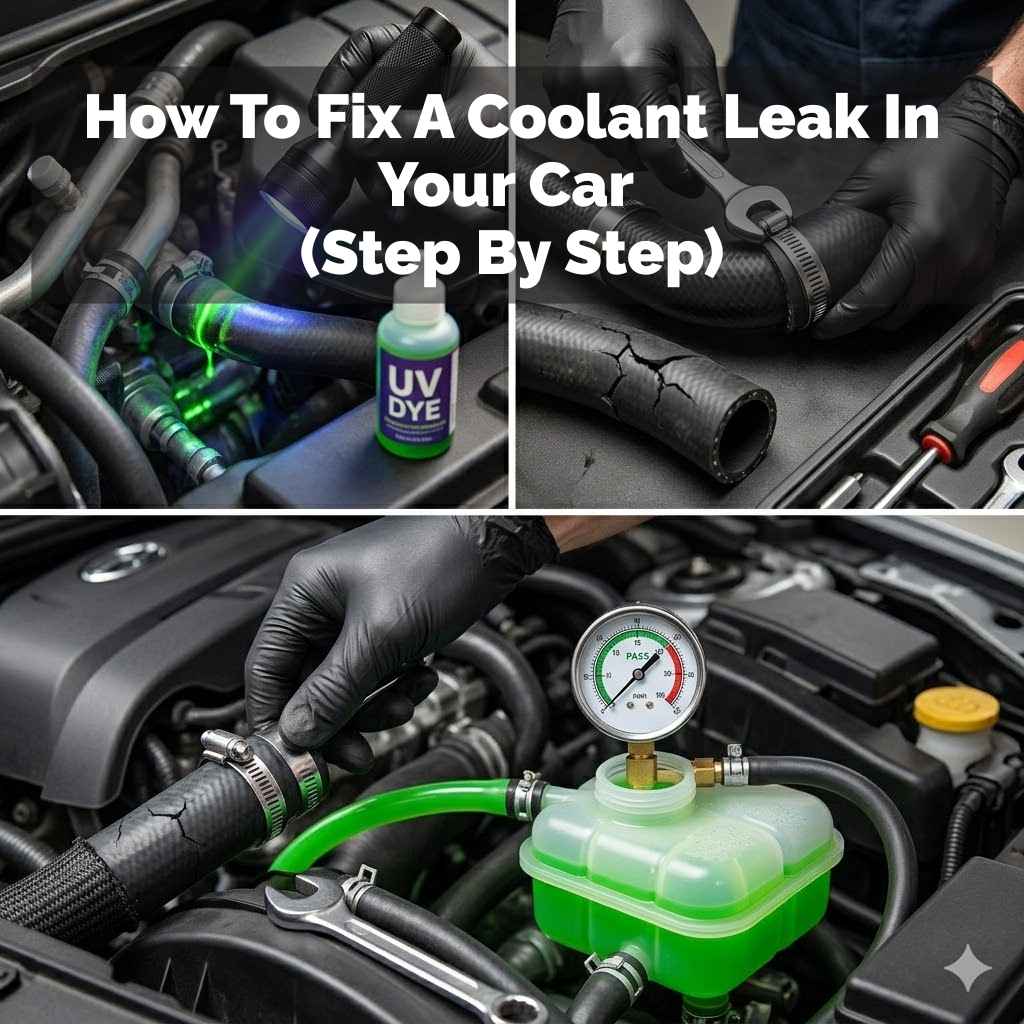
How To Fix A Coolant Leak In Your Car (Step By Step)
This article helps you understand and fix a coolant leak in your car. It covers common causes, DIY steps for repair, and when it’s best to seek professional help. You’ll learn to identify the leak, gather necessary supplies, and perform simple fixes to keep your engine cool and running smoothly.
Understanding Coolant Leaks
Your car’s cooling system is vital. It stops your engine from getting too hot. Coolant, also called antifreeze, flows through your engine.
It absorbs heat. Then, it goes to the radiator. The radiator cools the coolant down.
This cycle keeps your engine at a safe temperature. A leak means coolant is escaping this system. This is bad because there isn’t enough coolant.
Less coolant means the engine gets too hot. Overheating can damage engine parts. It can warp the engine block.
It can blow the head gasket. These are expensive repairs.
So, it is very important to check your coolant level often. Look for puddles under your car, too. If you see one, act fast.
Many leaks are not huge problems. They might be from a loose hose clamp. Or maybe a small crack in a hose.
Sometimes, it’s a faulty radiator cap. These are often easy fixes. But some leaks are more serious.
They could be a cracked engine block. Or a bad water pump. Knowing what to look for helps you decide what to do.
When you first notice a leak, stay calm. The first step is to figure out where it is coming from. Coolant can smell sweet.
It can also be sticky. It is usually brightly colored. This makes it easier to spot than oil.
You might see steam coming from under the hood. This means the engine is very hot. Do not open the radiator cap when the engine is hot.
This can cause severe burns. Let the engine cool down completely first.
My Own Coolant Leak Scare
I remember one time, I was driving home from a weekend trip. It was a hot summer day. I parked the car and saw a small puddle of bright green liquid under the front of my car.
My heart sank. I immediately thought, “Oh no, this is going to be expensive.” I popped the hood and looked around. I couldn’t see anything obviously wrong.
No hoses looked ripped. Nothing was spraying out. I felt a wave of panic.
I know cars, but I’m not a mechanic.
I decided to wait until the car cooled down. The next morning, I went back. I carefully opened the hood again.
I looked closely at all the hoses and connections. I noticed one of the hoses that went to the radiator seemed a little loose. It felt soft and worn.
I gently tugged on it. It wiggled more than it should have. That was it!
The clamp holding it was loose. It had been slowly dripping coolant. I felt so relieved.
It was a simple fix. I got a new clamp and tightened it. The leak stopped.
It taught me to check those simple things first before assuming the worst.
Common Coolant Leak Locations
Hoses: These rubber tubes carry coolant. They can crack, split, or become loose over time.
Radiator: This metal part cools the coolant. It can develop leaks from corrosion or damage.
Water Pump: This part circulates the coolant. A faulty seal can cause leaks.
Thermostat Housing: This part controls coolant flow. Its gasket can fail and leak.
Heater Core: This part warms the car’s cabin. It’s located inside the dashboard and can leak.
Identifying the Source of the Leak
Finding the leak is the biggest challenge. Coolant can travel. It might drip from one spot but originate higher up.
First, let your car cool down completely. This is for your safety. Then, gather some supplies.
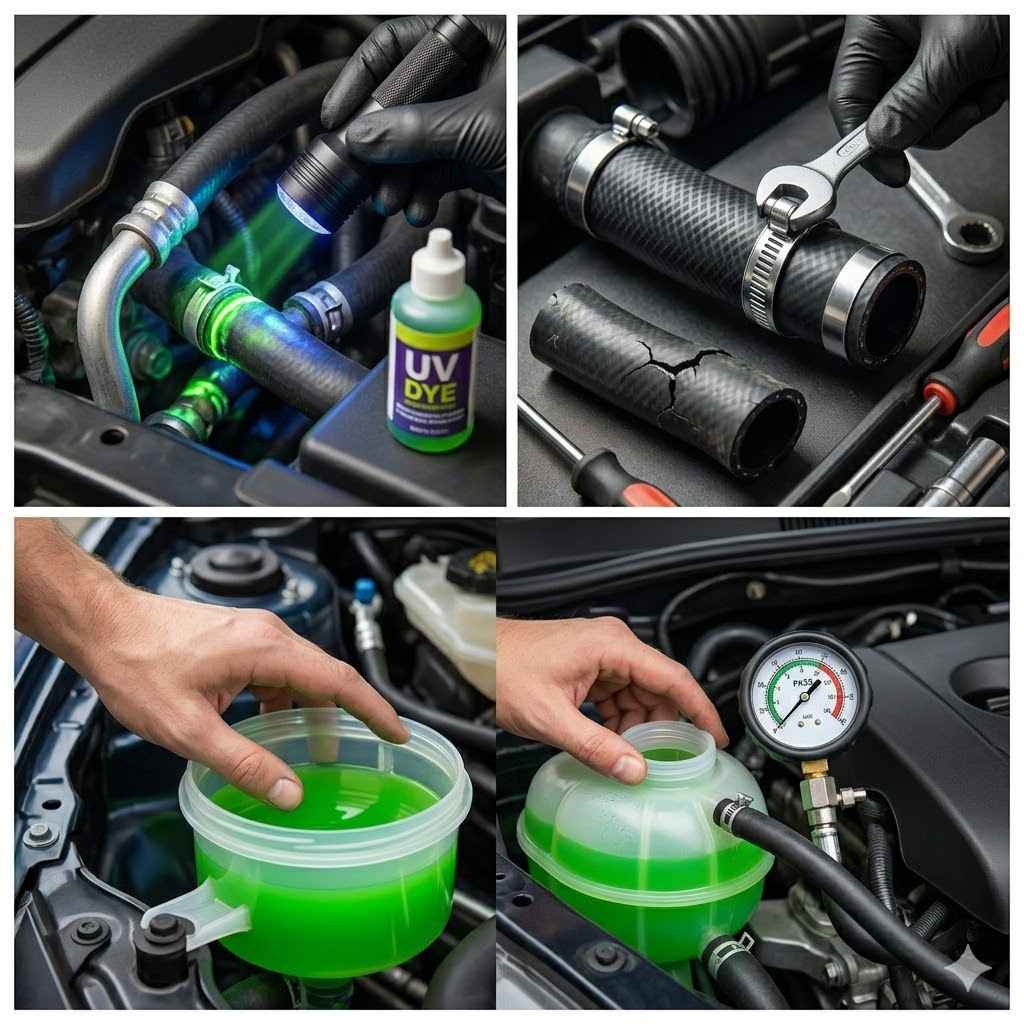
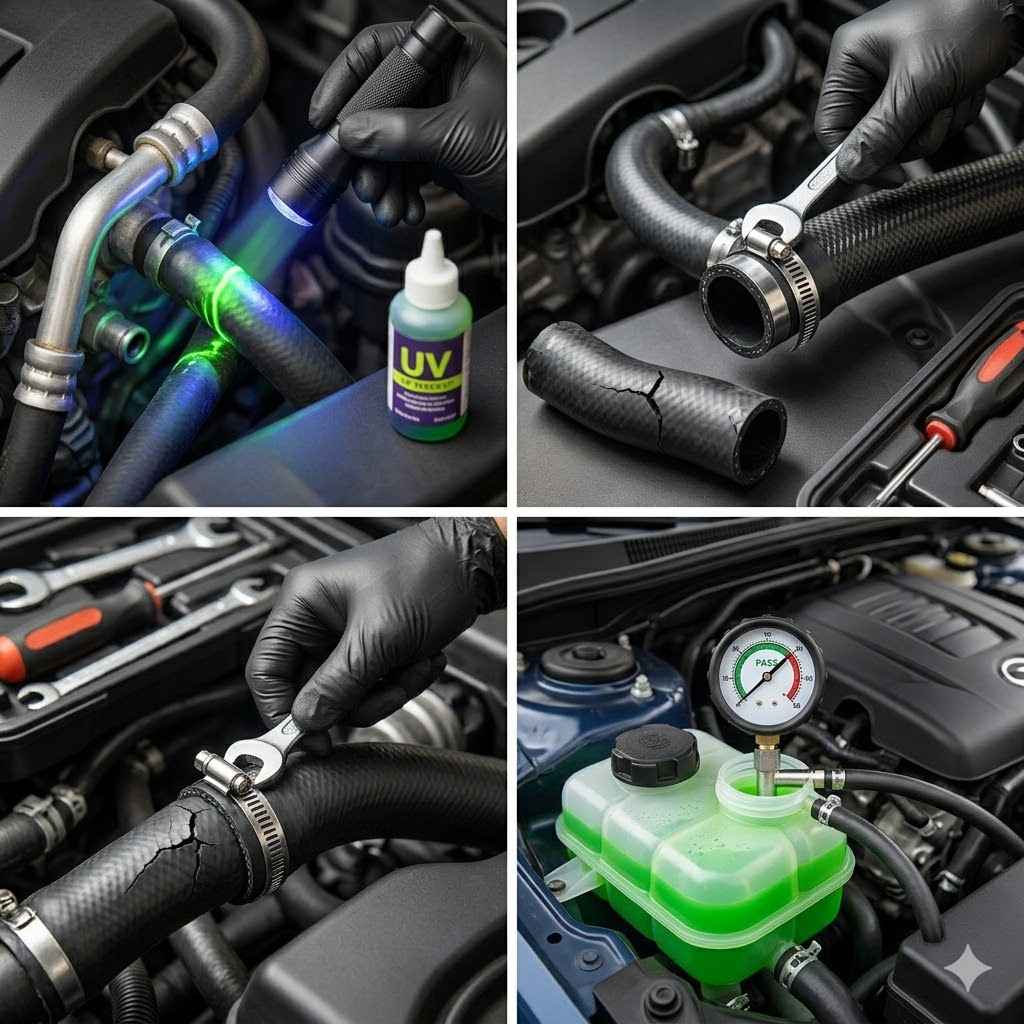
You’ll need a flashlight. You’ll also need paper towels. Some people use UV dye.
You add this to the coolant. It glows under a black light. This helps pinpoint the leak.
You can buy it at auto parts stores.
Open the hood. Look at the radiator. Check the hoses connected to it.
Squeeze them gently. Do they feel brittle or mushy? Look for wet spots on the hoses.
Check the hose clamps. Are they tight? Look at the radiator itself.
Are there any wet or corroded spots? Check the overflow tank. Is it cracked?
Is the cap on tight?
Next, look underneath the car. Where is the puddle located? Is it directly under the engine?
Or more towards the front or back? Use your flashlight to look up into the engine bay. See if you can spot any drips.
Coolant is often sticky. It might leave a residue. If you can’t find it, you might need to run the engine for a short time.
Then, look again. Be very careful when the engine is running. Hot parts can cause burns.
Quick Coolant Leak Check Steps
1. Safety First: Ensure the engine is completely cool.
2. Visual Inspection: Open the hood and look for wet spots.
3. Feel the Hoses: Check for cracks, softness, or looseness.
4. Inspect Radiator: Look for corrosion or damage.
5. Check Underneath: Pinpoint the location of the puddle.
What You’ll Need to Fix a Coolant Leak
The tools you need depend on the fix. For a simple hose clamp issue, you’ll need a screwdriver or a socket wrench. For a leaky hose, you might need a new hose.
You will also need pliers. For a radiator cap, you just need a new cap. If it’s a more complex issue, like a radiator, you might need more specialized tools.
Always wear safety glasses. Gloves are also a good idea. Coolant can irritate your skin.
You will need new coolant. Make sure it is the right type for your car. Check your car’s owner’s manual.
Using the wrong coolant can harm your engine. You can buy coolant pre-mixed. Or you can buy it concentrated.
If you buy concentrated, you need to mix it with distilled water. A 50/50 mix is common. You will also need a drain pan.
This is for catching old coolant.
A funnel is also helpful. It makes adding new coolant easier. You might need rags or shop towels.
They are useful for cleaning up spills. If you are replacing a part, you might need specific tools. For example, some hose clamps are spring-loaded.
You will need special pliers for those. Always consult your car’s repair manual. It will tell you the exact tools needed for your car model.
Essential Tools and Supplies
Safety Glasses: Protect your eyes.
Gloves: Protect your skin.
Screwdriver/Socket Wrench Set: For hose clamps.
Pliers: For various hose and clamp tasks.
Drain Pan: To catch old coolant.
Funnel: For adding new coolant.
Rags/Shop Towels: For cleanup.
New Coolant: The correct type for your vehicle.
Distilled Water: If using concentrated coolant.
Step-by-Step Guide to Fixing a Coolant Leak
Let’s assume you found a loose hose clamp. This is a common and easy fix. First, make sure the engine is cool.
Locate the loose clamp. Use your screwdriver or wrench. Tighten the clamp.
Make sure it’s snug but don’t overtighten. You don’t want to crush the hose.
Now, check the coolant level in the overflow tank. If it’s low, add the correct coolant mix. Use your funnel.
Don’t fill it past the ‘MAX’ line. Put the radiator cap back on securely. Start the engine.
Let it run for a few minutes. Watch for any new leaks. Also, check the temperature gauge on your dashboard.
If it stays in the normal range, you might have fixed it.
What if a hose itself is cracked or split? You will need to replace it. Again, ensure the engine is cool.
Open the hood. Locate the damaged hose. You might need to drain some coolant first.
Place your drain pan under the radiator. Open the drain plug at the bottom of the radiator. Let some coolant flow out.
Then close the plug.
Use your pliers to loosen the hose clamps at both ends of the damaged hose. Carefully pull the old hose off. It might be stuck.
You can use a utility knife to cut it off if needed, but be careful not to damage the pipes it connects to. Get the new hose. Make sure it’s the exact same size and shape.
Slide the new hose onto the pipes. Make sure it’s seated well. Position the hose clamps.
Tighten them securely with your screwdriver or wrench. Now, add new coolant. Fill the system through the radiator cap opening or the overflow tank, depending on your car.
Check your manual. Add coolant until it reaches the correct level. Start the engine.
Let it run. Look for leaks. Keep an eye on the temperature gauge.
Refill the coolant if needed after the engine has run for a bit and cooled down.
Simple Fix: Tightening a Hose Clamp
Step 1: Engine must be cool.
Step 2: Locate the loose hose clamp.
Step 3: Use a screwdriver or wrench to tighten the clamp firmly.
Step 4: Check coolant level and top up if needed.
Step 5: Start engine and watch for leaks.
Replacing a Leaky Coolant Hose
Step 1: Engine must be cool. Drain some coolant.
Step 2: Loosen clamps and remove the old hose.
Step 3: Install the new hose, ensuring a snug fit.
Step 4: Tighten new hose clamps securely.
Step 5: Refill the cooling system with the correct coolant mix.
Step 6: Start engine, check for leaks, and monitor temperature.
Dealing with Radiator Cap Issues
Sometimes, the simplest parts cause the biggest problems. The radiator cap is one of them. It’s not just a lid.
It actually seals the system under pressure. This pressure raises the boiling point of the coolant. This helps the engine run cooler.
A faulty cap might not hold pressure. Or it might not seal properly. This can cause coolant to escape.
You might see coolant leaking around the cap itself. Or the overflow tank might be full.
Replacing a radiator cap is usually very easy. First, ensure the engine is completely cool. Never open a hot radiator cap.
It’s dangerous. Locate the radiator cap. It’s usually on the top of the radiator.
Or sometimes it’s on a hose connected to the radiator.
Grip the cap firmly. Push down and turn it counter-clockwise. You should feel it release.
Carefully lift the cap off. Inspect the old cap. Look at the rubber seal.
Is it cracked, torn, or worn? If it looks damaged, it needs replacing. Also, check the spring mechanism.
Does it look rusted or weak?
Take the old cap to an auto parts store. Get an exact replacement. They are specific to your car model and pressure rating.
Look for the pressure rating printed on the old cap. The new cap must match this. Install the new cap.
Push down and turn it clockwise until it clicks. Make sure it’s sealed tightly. Then, check your coolant level.
Top it up if needed. Start the engine and check for leaks. The temperature gauge should behave normally.
Radiator Cap Check and Replacement
1. Engine Cool: Always ensure the engine is cool.
2. Locate Cap: Find the radiator cap on the top of the radiator.
3. Remove Cap: Push down and turn counter-clockwise.
4. Inspect Seal: Look for cracks, tears, or wear on the rubber seal.
5. Get Replacement: Match the pressure rating and model.
6. Install New Cap: Push down and turn clockwise until it clicks.
7. Top Up Coolant: Ensure the coolant level is correct.
8. Test Drive: Monitor temperature and check for leaks.
When a Leak is More Serious
Not all coolant leaks are simple fixes. Some indicate deeper engine problems. A leak from the water pump is more complex.
The water pump is driven by the engine’s belt. It circulates the coolant. If the pump’s seal fails, coolant will leak out.
This usually appears as a leak from the front of the engine, near the belts.
A cracked radiator is another serious issue. Radiators can corrode over time. Or they can be damaged by road debris.
A cracked radiator will leak coolant. You might see drips directly from the radiator fins or tanks. Repairing or replacing a radiator is a job for a mechanic.
It involves draining the entire system. It also requires refilling and bleeding the air out.
The heater core is located inside your car’s dashboard. It can also develop leaks. If your heater core leaks, you might smell coolant inside the car.
You might also see wetness on the passenger-side floor mat. This is a tricky repair. It often involves removing parts of the dashboard.
The most serious leaks come from the engine block or cylinder head. These can be caused by cracks or a blown head gasket. A blown head gasket lets coolant leak into the cylinders or oil.
You might see white smoke from the exhaust. Or the oil might look milky. These are major engine problems.
They require professional repair.
Signs of a Serious Coolant Leak
Persistent Puddles: Large or frequent puddles of coolant.
Overheating: The temperature gauge frequently goes into the red.
Steam from Engine: A visible sign of coolant boiling or leaking onto hot parts.
Sweet Smell Inside Cabin: Indicates a possible heater core leak.
Milky Oil: Coolant mixing with engine oil.
White Smoke from Exhaust: Coolant burning in the engine cylinders.
What This Means for Your Car
A small coolant leak, if fixed quickly, might not cause long-term damage. It’s like catching a small cut before it gets infected. The key is early detection.
If you ignore a small leak, it can lead to bigger problems. The engine might overheat.
Overheating is the main danger. Even one instance of severe overheating can warp metal parts. It can damage seals.
This means more expensive repairs down the line. Think of it like this: driving with low coolant is like running a marathon with no water. Your body (or engine) will suffer.
When is it normal to see a little coolant? It’s not really normal to see any coolant leaks. You might see a small amount of condensation.
That’s usually water. But coolant is a chemical. It shouldn’t be on your driveway.
If you top up your coolant regularly, and the level stays stable, you are probably okay. But if you have to add coolant every week, there’s a leak somewhere.
When should you worry? You should worry if the leak is large. You should worry if the leak is happening while the engine is running.
You should definitely worry if your car is overheating. If you see any of the serious signs we talked about, it’s time for a mechanic. Don’t try to fix major engine problems yourself unless you are trained.
Simple checks you can do at home include checking the coolant level. Do this every few weeks. Also, look under the car for any drips.
Feel your hoses when the engine is cool. Are they firm or mushy? These simple checks can save you a lot of trouble.
They help catch small issues before they become big, expensive ones. Your car’s cooling system is important. Keep it in good shape.
Quick Tips for Coolant Leak Prevention
Preventing coolant leaks is better than fixing them. Regular maintenance is key. Have your cooling system inspected at your regular service intervals.
Mechanics can spot potential problems early. They can check hoses for wear and tear. They can look for corrosion on the radiator.
They can ensure all clamps are tight.
Flush your cooling system at the recommended intervals. This removes old coolant. It also removes any rust or sediment.
Fresh coolant protects your engine better. It also helps prevent corrosion. Using the correct type of coolant is also vital.
Your owner’s manual will tell you what kind to use.
Never use plain water in your cooling system, except in an emergency. Water doesn’t have the same boiling or freezing protection as coolant. It also doesn’t have the anti-corrosion additives.
Over time, it can lead to rust and leaks.
Be careful when working under the hood. Avoid damaging hoses or other parts. If you notice any dampness or a strange smell, investigate it.
Don’t wait. Small problems can grow very quickly in a car’s cooling system.
Preventing Coolant Leaks
Regular Inspections: Have your mechanic check hoses, radiator, and clamps.
Coolant Flushes: Replace old coolant at recommended intervals.
Use Correct Coolant: Always use the type specified in your owner’s manual.
Avoid Plain Water: Only use water in true emergencies.
Address Smells/Dampness: Investigate any unusual signs promptly.
Frequently Asked Questions about Coolant Leaks
What color is car coolant?
Car coolant comes in several colors. Common colors include green, orange, pink, yellow, and blue. The color often indicates the type of coolant and its additives.
Always check your owner’s manual to know the correct color for your car.
How much coolant does a car typically lose from a small leak?
A small leak might only cause a loss of a cup or two of coolant over several weeks. You might see a small puddle under the car. The coolant level in the overflow tank will drop slowly.
Can I drive my car with a minor coolant leak?
It’s risky. If the leak is very small and you monitor the temperature gauge closely, you might be able to drive short distances. However, it’s best to fix the leak as soon as possible.
Driving with a leak risks overheating and more severe damage.
How do I know if my car is overheating?
Your car’s dashboard has a temperature gauge. If the needle goes into the red zone, your engine is overheating. You might also see steam coming from under the hood.
The engine might also make strange noises.
Is it dangerous to touch coolant?
Yes, coolant is toxic. It contains chemicals like ethylene glycol, which is harmful if swallowed. It can also irritate skin.
Always wear gloves and safety glasses when handling coolant. Keep it away from children and pets.
How long does it take to fix a coolant leak?
A simple fix, like tightening a hose clamp, can take minutes. Replacing a hose might take an hour or two. More complex repairs, like replacing a radiator or water pump, can take several hours and are best left to professionals.
What should I do if I see a large puddle of coolant?
If you see a large puddle, it’s best not to drive the car. Turn off the engine immediately. Wait for it to cool down.
Then, try to identify the source of the leak. If you can’t, or if it looks serious, call for a tow truck to take your car to a mechanic.
Conclusion
A coolant leak can be worrying. But often, it’s a manageable problem. By understanding your car’s cooling system, you can spot issues early.
Simple fixes are often within reach. Always prioritize safety. Let the engine cool.
Use the right tools. If you are ever unsure, don’t hesitate to call a professional mechanic. Keeping your cooling system in check keeps your engine healthy and your car reliable.