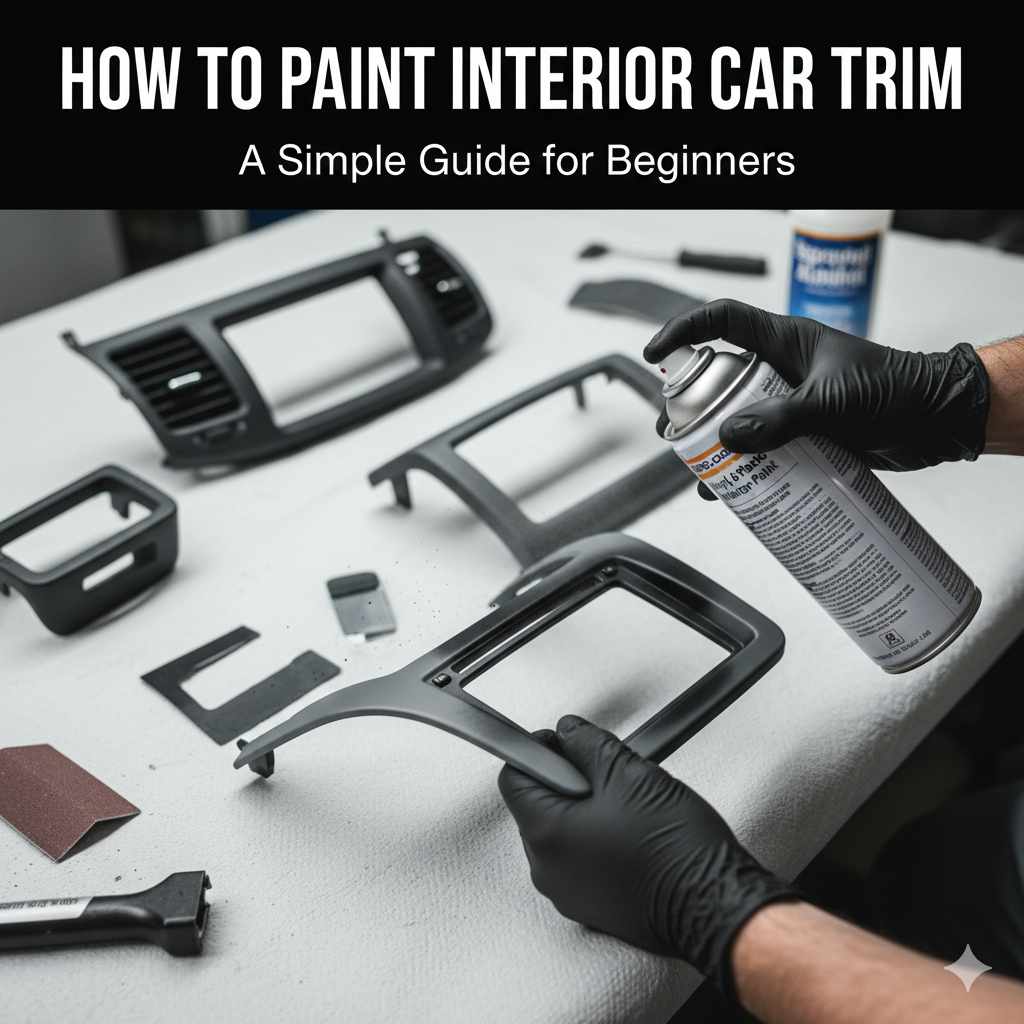
How to Paint Interior Car Trim: A Simple Guide for Beginners
Thinking about updating your car’s interior? The process of How to Paint Interior Car Trim might seem a bit tricky if you are just getting started. Many people find this project challenging because they worry about messing up their car’s interior. But don’t let that stop you! This guide will break down the process step-by-step, making it easy to achieve professional-looking results. Get ready to transform your car’s look with a simple approach to painting your interior trim.
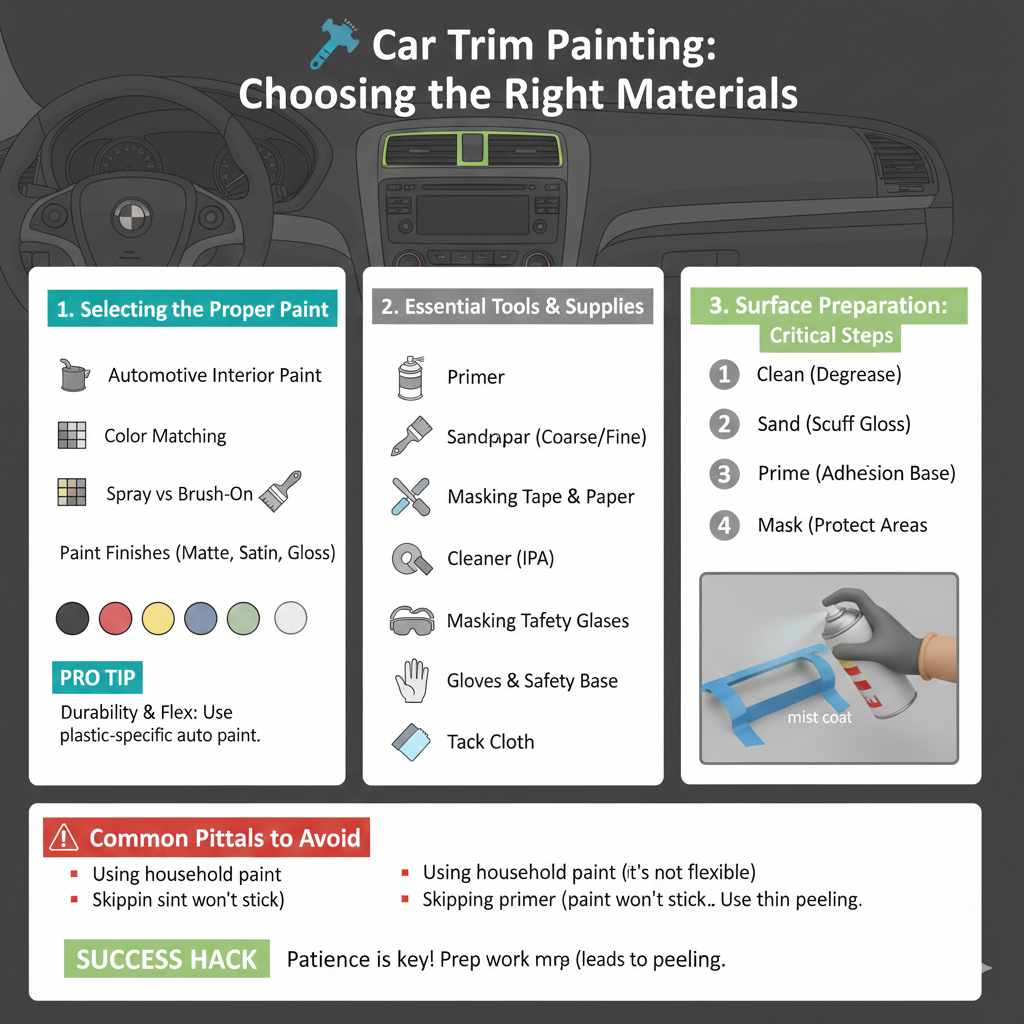
Choosing the Right Materials for Painting Car Trim
Before you begin painting your car’s interior trim, gathering the correct supplies is a must. The right materials will make the job easier and help you achieve a long-lasting, professional finish. You will need to select the correct type of paint, primer, and other tools. Think about what materials you are going to use. Preparing the surface properly is just as important as the painting itself, so don’t skip this critical first step. This part sets the stage for a successful paint job.
Selecting the Proper Paint
Choosing the correct paint is the most critical decision when painting your car’s interior trim. Regular household paints aren’t designed to withstand the wear and tear inside a vehicle, so using the right product is essential. Look for paints specially made for automotive interiors. These paints are flexible, durable, and resistant to scratches and fading. They also need to withstand temperature changes. Make sure you select a paint that is made for plastic or vinyl, depending on the material of your trim. Consider the finish you want as well; matte, satin, or gloss are all options, so pick the one that fits your car’s style. Selecting the perfect paint sets up your project for success.
- Automotive Interior Paint: This paint is designed specifically for vehicle interiors, offering superior durability, flexibility, and resistance to scratches and fading. It also stands up to the varying temperatures inside a car.
- Color Matching: Try to match your existing interior color as closely as possible. If you are changing the color, pick a hue that complements the rest of your car’s interior. Consider how it will look with your seats, dashboard, and other trim pieces.
- Spray Paint vs. Brush-On Paint: Spray paint offers a smooth, even finish, which is great for trim with intricate details. Brush-on paint may be better for small areas or when you want to avoid overspray.
- Paint Finishes: The finish you pick—matte, satin, or gloss—can drastically change the look of your interior. Matte finishes give a subtle, flat look, satin offers a slight sheen, and gloss delivers a shiny appearance. Consider your style to make the right choice.
Essential Tools and Supplies
Alongside the right paint, having the right tools makes the process a whole lot simpler. Think of it as your toolbox for success. The right tools help you prepare the surfaces, apply the paint evenly, and make the whole job go smoothly. This will save time and improve the final result. Gathering these supplies is a critical step in your planning and makes the job less hard.
- Primer: Use a primer that is suitable for plastic or vinyl. This helps the paint stick and provides a great base.
- Sandpaper: You’ll need several grits of sandpaper—coarse to smooth out any damage or imperfections, and finer grits for the final smoothing before painting.
- Cleaning Supplies: Car interior cleaner, soap, and water will help remove dirt and grease.
- Masking Tape and Paper: To protect areas you do not want to paint, use masking tape and paper to cover them.
- Gloves and Safety Glasses: Protect yourself from paint and solvents.
- Spray Gun (Optional): For a professional finish, consider a spray gun.
- Tack Cloth: To remove any dust or debris from your surface before painting.
Surface Preparation: The Critical First Step
Proper surface preparation is the secret ingredient for a great paint job. No matter how good your paint is, if the surface isn’t properly prepared, the paint won’t stick, and you’ll end up with a poor finish. This involves cleaning, sanding, and priming the trim to make sure the paint adheres and looks smooth. This part takes time, but it is super important. When you prepare the surface right, the paint job will look amazing.
- Cleaning: Use a car interior cleaner to wipe down the trim. This removes all the dirt and grime.
- Sanding: Use sandpaper to scuff the surface and remove any gloss or imperfections. This helps the primer and paint stick better. Start with a coarser grit and go to finer grits to smooth things out.
- Priming: After sanding, wipe away any dust, and apply a suitable primer. Primer provides a base for the paint to stick to and creates a more even color.
- Masking: Use masking tape and paper to protect parts of the interior you don’t want to paint. This will ensure your paint job looks clean and professional.
How to Paint Interior Car Trim: A Step-by-Step Guide
Painting your car’s interior trim doesn’t have to be complicated. If you take the time to prepare the surface and follow the steps, you can achieve a great look. Following a detailed guide makes it easy to keep track of each task. This approach breaks the process down into simple, easy-to-follow steps. If you are patient and careful, you can do it!
Step 1: Preparing Your Car’s Interior
Before you begin to paint, you need to prepare the space where you will be working. This step is about protecting the areas you won’t be painting and making sure you have good ventilation. You should move the car to a well-ventilated area, such as a garage with open doors or outside on a calm day. Taking these measures protects both you and your vehicle during the painting process.
- Ventilation: Make sure you are working in a well-ventilated area. This keeps the paint fumes from building up.
- Protection: Use masking tape and paper to cover parts of your car you do not want to paint. This includes the dashboard, seats, and any other surfaces around the trim.
- Surface Cleaning (Again): After removing the trim pieces, give them a final cleaning with a grease remover. This gets rid of any remaining dirt or grime.
- Disassembly: Carefully remove the trim pieces you plan to paint. This will allow you to paint the pieces completely.
Step 2: Sanding and Priming the Trim
Sanding and priming are key steps in getting the paint to stick well to your trim. It creates a great surface for the paint. Use the right sandpaper to get the surface ready. After sanding, use a primer that is suitable for the material. This provides an even surface that helps the paint look even and smooth. This sets up the paint job for success.
- Sanding Techniques: Start with a coarser grit to remove any imperfections, and switch to finer grits to smooth everything out.
- Choosing the Right Primer: The primer you pick should match the material of your trim. This helps with adhesion and the paint’s final appearance.
- Applying the Primer: Use thin, even coats of primer. Avoid applying too much primer at once, as this can lead to drips or runs. Let each coat dry fully before applying the next.
- Sanding the Primer: After the primer has dried, lightly sand it with a fine-grit sandpaper. This helps create an even smoother surface for the paint.
Step 3: Painting the Interior Trim
Now, the moment you’ve been waiting for! The painting step requires patience and careful technique. If you take your time, you can achieve a finish that looks professional. Think about the order you’re painting the surfaces and how to avoid mistakes, like runs or drips. With some patience and the right methods, you can add a fantastic new look to your car’s interior.
- Applying the First Coat: Apply thin, even coats of paint, using a spray gun or brush. Try to avoid applying too much paint at once, which could lead to runs.
- Drying Time: Always follow the directions on the paint can for drying times between coats. Waiting until the paint is fully dry will make it look its best.
- Multiple Coats: Most of the time, you will need to use multiple coats to achieve a great color and coverage. Usually, two or three coats are sufficient.
- Checking Your Work: Inspect the painted trim in good light to spot any areas that need more attention. Make sure there are no runs, drips, or areas you may have missed.
Step 4: Reassembly and Finishing Touches
After the paint has dried, it’s time to put everything back together. You want to avoid any damage to your new paint job. Slowly and carefully reassembling your interior trim will ensure a professional-looking result. Pay close attention to details, and you’ll be able to enjoy your newly painted interior trim for years to come. This stage brings your project to a satisfying end, showing off your work.
- Reattaching Trim Pieces: When reassembling the trim pieces, align them carefully. Make sure all the clips and fasteners are secure to prevent any rattling or movement.
- Detailing: Take a moment to inspect your work and clean up any overspray or imperfections. A quick detail can make a big difference.
- Cleaning Up: Wipe down the painted surfaces with a soft cloth to remove any dust or fingerprints.
- Enjoying the New Look: Now it’s time to enjoy the new, refreshed look of your car’s interior. Take pride in the job!
Common Issues and Troubleshooting in Automotive Painting
Even with careful preparation, problems can sometimes come up when painting car trim. This part covers some of the problems that commonly happen, such as runs, drips, and improper adhesion, and explains how to address these concerns. Understanding these problems will help you adjust quickly and still achieve a professional finish. Knowing what to do when something goes wrong lets you make corrections and improve your work.
Dealing with Runs and Drips
Runs and drips are one of the most common issues in painting. This can happen if you apply too much paint at once. Luckily, you can fix them. If you spot them while the paint is still wet, try lightly brushing them out. If the paint has dried, you can gently sand them down, being careful not to damage the underlying layers, and then repaint the area. This helps you get a smooth surface and ensures your trim looks perfect.
- Cause: Runs and drips usually occur when too much paint is applied at once. This can be prevented by applying thin, even coats of paint.
- Immediate Action: If the paint is still wet, gently use a clean brush to try to smooth out the run.
- Dry Paint Fix: If the paint has dried, you can gently sand down the run with fine-grit sandpaper.
- Prevention: Apply thin, even coats. Build up the color gradually.
Addressing Poor Paint Adhesion
Poor paint adhesion can cause the paint to peel or bubble. It often means the surface wasn’t correctly prepared. If your paint isn’t sticking, you can re-sand the surface and make sure it’s completely clean. Then, use a high-quality primer to give the paint a good base. This will improve the paint’s hold. Make sure the primer and paint are compatible with the material you are working with. Proper preparation is your best defense against adhesion issues.
- Cause: Usually caused by a poorly prepared surface. It is often from not cleaning the surface thoroughly or not using primer.
- Immediate Action: Re-sand the surface. Clean it again with a degreaser. Apply primer.
- Preventative Measures: Properly clean, sand, and prime the surface. Use a primer that is suitable for the material.
- Paint Compatibility: Ensure the paint is compatible with the primer and the material of your trim.
Dealing with Uneven Color or Finish
Uneven color or finish can be caused by not applying the paint evenly or using low-quality paint. Applying thin, even coats of paint is very important. Always shake the paint thoroughly before using it to make sure the pigment is mixed well. Sometimes you can fix this by applying another coat of paint or lightly sanding the area. Using the correct techniques and top-notch materials will help to avoid these issues and ensure an even, professional finish.
- Cause: Uneven application of paint, using poor-quality paint, or not shaking the paint can properly.
- Remedies: Apply additional coats of paint. Lightly sand the area and re-apply paint.
- Prevention: Apply thin, even coats, use high-quality paint, and shake the paint thoroughly before use.
- Lighting: Make sure you are working in good light.
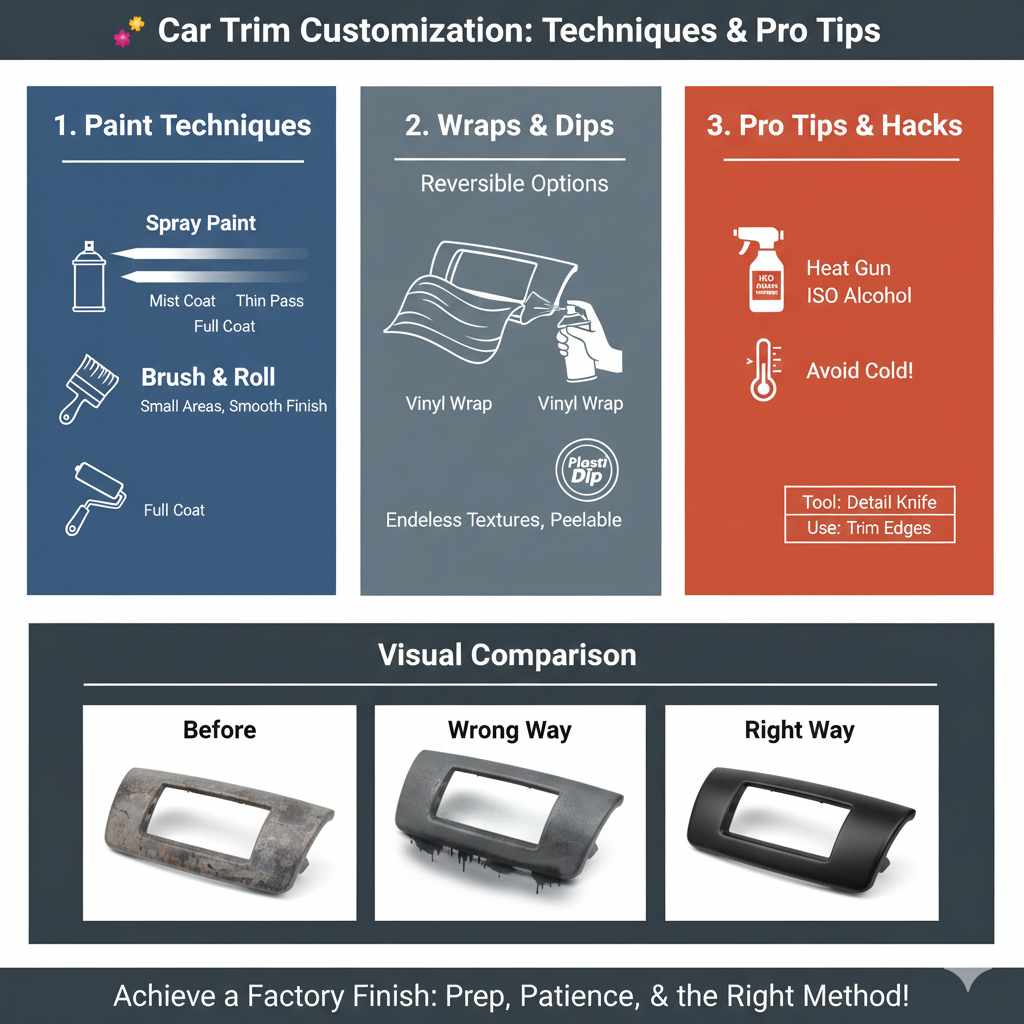
Alternative Painting Techniques for Car Trim
There are different ways to paint your car’s interior trim. These methods can give you more options for your project. Whether you want a specific finish or need a different approach, exploring alternative techniques can help you achieve the results you want. Using the method that fits your needs will make the project easier and more enjoyable. These different methods let you personalize your car’s interior.
Using Spray Paint for Interior Car Trim
Spray painting is a common and useful technique for painting car trim. It is ideal for applying an even, smooth finish. Spray paint is good for trim with many details. While this technique may need some practice, it offers great results. The secret to success lies in proper surface preparation, applying thin coats of paint, and patience. With practice, you can get a smooth and professional finish.
- Choosing the Right Spray Paint: Select automotive-specific spray paint that matches the material and finish you want.
- Application Techniques: Hold the spray can about 6-8 inches from the surface. Use even, back-and-forth motions. Overlap each pass slightly.
- Avoiding Overspray: Use masking tape and paper to protect areas you do not want to paint. Work in a well-ventilated area.
- Multiple Coats: Apply thin, even coats, waiting the recommended time between coats. This builds up the color and finish without causing drips.
Brushing and Rolling Techniques
Brushing and rolling are alternative methods for painting car trim. These methods might be better for those who prefer more control or are working on smaller areas. Brushing is helpful for applying paint to trim with detailed areas. Rolling can give you a smooth finish on flatter surfaces. The key is to use the right tools, such as high-quality brushes or foam rollers, and to apply the paint evenly. By trying these methods, you can make your car’s trim look great.
- Brushing Tips: Use a high-quality brush to avoid brush strokes. Apply thin, even coats.
- Rolling Tips: Use a foam roller. Apply the paint in even strokes to achieve a smooth finish.
- Paint Type: Use paints that are made for brushing or rolling.
- Preparation: The same surface preparation steps apply. Cleaning, sanding, and priming remain essential.
Using Vinyl Wraps and Dips as Alternatives
Vinyl wraps and dips offer another way to change the appearance of your car’s trim. Vinyl wrapping involves applying a thin sheet of vinyl to the trim, offering many colors and textures. Plastidip is a rubberized coating that can be applied to surfaces. Both of these methods are great if you want to test out a new look. They’re also helpful if you do not want to do something permanent. They offer flexibility and are easy to remove or change if you change your mind. These are excellent choices if you are looking for easy ways to change the look of your car’s interior.
- Vinyl Wraps: Provide a wide range of colors and textures. They are durable and can protect your trim.
- Plasti Dip: A rubberized coating that is easy to apply. It is also removable.
- Ease of Application: Both methods are great for those who want a change without the long-term commitment of paint.
- Maintenance: Vinyl wraps and dips require some care to stay looking their best.
Frequently Asked Questions
Question: Can I use any type of paint to paint my car trim?
Answer: No, it’s not recommended. You should always use paint that is made for automotive interiors. These paints are designed to withstand the wear and tear inside a car. They resist scratches and fading.
Question: Do I need to remove the trim to paint it?
Answer: It is best to remove the trim pieces to paint them. This allows you to apply the paint evenly and completely. It also prevents paint from getting on other parts of your car.
Question: How do I remove the trim pieces?
Answer: Each trim piece is attached in a different way. Some may use clips, screws, or adhesive. Search online for guides specific to your car model. Use the right tools, like a trim removal tool, to prevent damage.
Question: What if the paint is peeling or bubbling after I paint?
Answer: This often means that the surface wasn’t properly prepared. You’ll need to sand the surface, clean it, prime it, and then reapply the paint. Make sure the paint and primer you use are compatible.
Question: How long does the paint need to dry before I can reassemble the trim?
Answer: Always follow the drying times on the paint can. Usually, you need to wait several hours, or overnight, for the paint to be completely dry before you put the trim back. This prevents any damage to the paint job.
Final Thoughts
Now that you have explored How to Paint Interior Car Trim, you have a simple and great way to transform your car’s interior. You have the info you need to approach the project with confidence. Remember to always start with proper surface preparation, including cleaning, sanding, and priming. Choose the right materials and methods, whether it’s spray painting or brushing. Be patient when applying the paint, and remember to use multiple, thin coats. Addressing any issues, such as runs or poor adhesion, is key to getting a great finish. Taking the time to do things correctly will result in a professional-looking result. So, grab your materials, plan your work, and get ready to upgrade your car’s interior!