How To Recline Safety First Car Seat: Essential Guide
Properly reclining your Safety First car seat is simple and crucial for your child’s safety and comfort. Follow these easy steps, checking recline indicators and ensuring a snug installation, to get it just right. This guide breaks it down for you, step-by-step.
Getting a car seat installed correctly can feel like a puzzle, especially when it comes to getting the recline angle just right. If you’ve ever looked at your Safety First car seat and wondered, “Am I sure this is at the best angle for my little one?” you’re not alone. It’s a common worry for parents and caregivers, and for good reason!
The recline angle plays a big part in keeping your baby safe and comfortable, particularly if they’re still too young to hold their head up well. But don’t stress! I’m here to walk you through exactly how to get that recline angle set up perfectly, every time. We’ll cover everything you need to know to feel confident and ensure your child is as secure as can be. Let’s make sure that car seat is a cozy and safe spot for every journey.
Why the Recline Angle Matters for Car Seat Safety
You might be thinking, “How much difference can a little tilt make?” Well, when it comes to car seats and tiny passengers, that angle is more important than you might imagine. It’s all about protecting your child’s developing body, especially their head, neck, and spine. For infants and younger babies, the recline angle helps prevent their chin from slumping forward onto their chest. This position, sometimes called “chin-to-chest,” can dangerously restrict their airway, making it hard for them to breathe easily, especially while asleep. A good recline angle ensures their airway stays open and clear.
For older children in forward-facing seats, the recline angle can still contribute to comfort on longer rides, helping them to relax without slouching too much. However, the primary safety concern for recline is with rear-facing infants. According to the National Highway Traffic Safety Administration (NHTSA), incorrect installation is a major reason car seats don’t offer their full protective benefits. Getting the recline angle correct is a key part of that proper installation. So, while it seems like a small detail, it’s a significant safety feature that we absolutely need to get right.
Understanding Your Safety First Car Seat’s Recline Features
Safety First car seats are designed with safety and ease of use in mind, and that includes features to help you achieve the correct recline angle. Most Safety First car seats will have one or more ways to indicate the proper recline position. These can include built-in bubble levels, color-coded recline indicators, or sometimes just specific seating positions on the car seat itself that are meant for different age groups (infant vs. toddler, rear-facing vs. forward-facing).
It’s vital to consult your specific Safety First car seat manual. Why? Because different models have different features and adjustment methods. Some might have a knob or lever to adjust the recline, while others might have a system where you insert the vehicle’s seat belt through different routes to achieve the desired angle. Always refer to your manual for the most accurate information for your particular model.
Common Recline Indicator Types on Safety First Seats:
- Bubble Level Indicators: Many seats have a small indicator with a bubble. When the bubble is centered between the indicated lines, the recline is correct.
- Color-Coded Markings: Some seats use colored lines or zones. You’ll align a part of the seat or its base with the appropriate color for the correct recline.
- Base Adjustments: Certain infant car seats have a base with an adjustable recline foot. This foot extends or retracts to change the angle.
- Car Seat Shell Markings: For some convertible or all-in-one seats, there might be lines directly on the side of the car seat shell itself that indicate the correct recline range, particularly for rear-facing use.

Step-by-Step Guide: How to Recline Your Safety First Car Seat
Let’s get down to the nitty-gritty! Reclining your Safety First car seat correctly involves a few key steps. We’ll break this down for both rear-facing and forward-facing installations, as the needs are different.
Section 1: Rear-Facing Installation (Infants and Younger Children)
This is where the recline angle is MOST critical for safety. The goal is to ensure your baby’s airway stays open.
Step 1: Identify the Correct Recline Position
First, find your car seat’s manual. Locate the section on rear-facing installation. It will clearly show you where to position the car seat or its base to achieve the proper recline angle. For most Safety First infant seats, this means tilting the seat back as far as it will safely go, while still meeting the indicator requirements. For convertible or all-in-one seats, there will be specific lines to check.
Step 2: Position the Seat or Base
Place the car seat or base on your vehicle’s seat. Pay attention to how it sits. For bases with an adjustable recline foot, extend or retract the foot so that it rests firmly on the vehicle floor. Make sure the foot is stable and not wobbling.
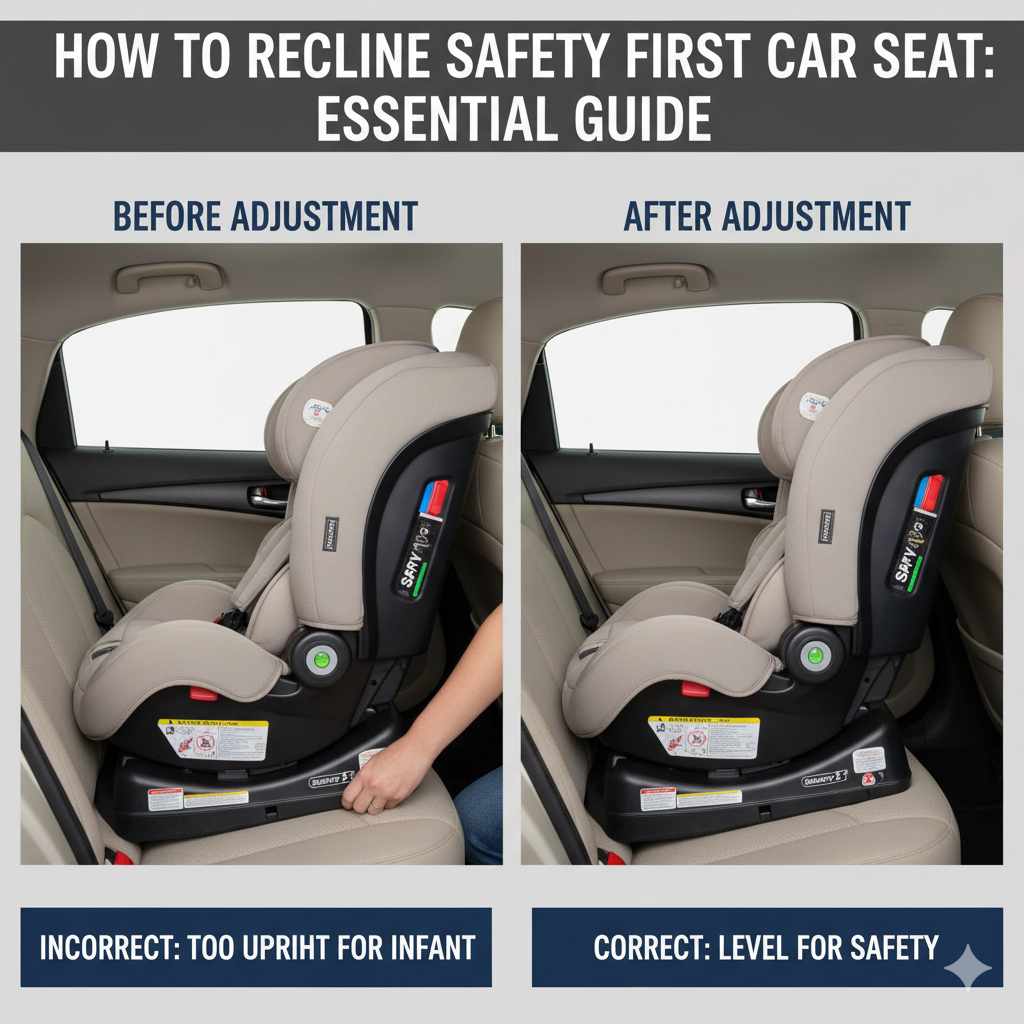
Step 3: Check the Recline Indicator
Now, look at your car seat’s recline indicator (the bubble level, color marking, etc.). The goal is to have the indicator show the correct recline angle for a rear-facing infant. This usually means the seat is tilted quite far back.
Step 4: Secure the Seat (Using LATCH or Seat Belt)
You will need to secure the car seat or base to the vehicle. You can often use either the vehicle’s LATCH system (Lower Anchors and Tethers for Children) or the vehicle’s seat belt. Refer to your car seat manual and your vehicle owner’s manual for the best method and for instructions on using each.
- Using LATCH: Attach the LATCH connectors from the car seat or base to the lower anchors in your vehicle. Tighten the LATCH strap until the seat is snug.
- Using Seat Belt: Thread the vehicle’s seat belt through the correct belt path on the car seat or base, buckle it, and lock the seat belt (usually by pulling it all the way out to engage the retractor lock-off or by using a locking clip, depending on your vehicle and car seat).
Step 5: Perform the “Wiggle Test”
Once secured, grab the car seat by the base (where it meets the vehicle seat) and try to move it side-to-side and front-to-back. It should not move more than one inch in any direction. If it moves freely, it’s too loose and needs to be tightened further. Double-check your installation method and try again.
Step 6: Re-Verify the Recline Indicator
After tightening and performing the wiggle test, check the recline indicator one last time. Sometimes, tightening the seat can shift the angle. Ensure it’s still within the correct range.
Important Note for Rear-Facing: For infants who cannot yet sit up independently, the most reclined position is generally best, as long as it passes the recline indicator and wiggle test. As your child grows and can hold their head up well, and as they approach the weight or height limits for rear-facing, you might be able to use a slightly less reclined position if your seat allows and the indicator shows it’s acceptable. Always prioritize airwary safety for the youngest passengers.
Section 2: Forward-Facing Installation (Older Children)
Once your child has outgrown the rear-facing limits of their Safety First car seat, you’ll transition them to a forward-facing position. The recline needs for forward-facing are generally less extreme but still important for comfort and safety.
Step 1: Consult Your Manual for Forward-Facing Recline
Check your Safety First car seat manual for the specific recline requirements for forward-facing mode. Most seats will have a lighter recline angle here, allowing the child to sit up more. Some seats might have a specific “forward-facing” recline setting or indicator. If your seat only has one indicator, it may have a range that accommodates both rear-facing and forward-facing, but you’ll need to confirm the specific acceptable range for forward-facing in your manual.
Step 2: Position the Seat
Place the car seat on the vehicle’s seat in the forward-facing orientation. If your seat has an adjustable recline foot on the base, you might need to retract it or adjust it to a less reclined position according to the manual’s guidance for forward-facing.
Step 3: Check the Recline Indicator
Look at the recline indicator. For forward-facing, you’ll typically want the seat to be more upright than for rear-facing. Ensure the indicator shows the angle is within the acceptable range for forward-facing use. For many seats, this means the bubble is no longer as far back.
Step 4: Secure the Seat (Using LATCH or Seat Belt)**
Similar to rear-facing, secure the car seat using either the LATCH system or the vehicle’s seat belt. Follow the car seat and vehicle manual instructions for proper installation. Remember to use the top tether, which is a crucial safety feature for forward-facing car seats. Attach the top tether to the designated anchor point in your vehicle and tighten it.
Step 5: Perform the “Wiggle Test”
Again, grab the car seat at its base where it meets the vehicle seat. It should not move more than one inch side-to-side or front-to-back. If it’s loose, tighten the LATCH strap or seat belt securely.
Step 6: Re-Verify the Recline Indicator and Top Tether
After tightening, check the recline indicator one last time. Also, ensure the top tether is snug and properly attached. A secure installation is key for both recline and overall safety.
Important Note for Forward-Facing: While more upright than rear-facing, the recline angle in forward-facing mode is still important for comfort, especially on longer trips. It helps prevent slouching that can also restrict breathing, though less critically than in rear-facing infants. Always ensure the seat belt is routed correctly and the top tether is used whenever possible for forward-facing seats.
Tips for Achieving the Correct Recline Angle
Sometimes, getting that perfect recline angle can be a little tricky, especially depending on the slope of your vehicle’s seat. Here are some tricks and tips to help you out:
- Know Your Vehicle Seat Slope: Every car is different. Some vehicle seats are naturally sloped, making it easier to get a good recline. Others are flatter, requiring more adjustment.
- Use a Rolled Towel or Pool Noodle (Check Manual First!): For some car seats, if you’re struggling to get a sufficient recline (especially for rear-facing), you can use a tightly rolled towel or a pool noodle placed under the car seat’s recline foot or base. Crucially, check your Safety First car seat manual and your vehicle owner’s manual. Many manuals will explicitly state whether this is permitted and where to place them. If not permitted, do not use this method. Safety First and NHTSA often advise against placing items under the base unless specifically approved by the manufacturer.
- Tighten Evenly: When using the seat belt or LATCH, try to tighten the belt or strap from both sides simultaneously if possible, to ensure even pressure and prevent the seat from shifting to an improper angle.
- Check for Gaps: After installation, ensure there are no large gaps between the car seat and the vehicle seat cushion, which can affect stability and recline.
- Get Professional Help: If you’re truly struggling or just want to be absolutely sure, seek help from a certified Child Passenger Safety Technician (CPST). You can find one near you through resources like Safe Kids Worldwide. They are trained to help with car seat installations for free.
Common Pitfalls to Avoid
Even with the best intentions, a few common mistakes can lead to an improperly reclined car seat. Awareness is key!
- Over-Tightening the Seat Belt/LATCH Straps: While you want the seat snug, over-tightening can sometimes pull the seat into an incorrect angle or put stress on the adjuster. Aim for snug, not strained.
- Ignoring the Recline Indicator: Trust the indicator! It’s there for a reason. Don’t judge the recline angle by just looking at it; use the built-in indicators.
- Not Considering Vehicle Seat Slope: As mentioned, your car’s seat angle matters. Don’t expect a flat vehicle seat to give you a highly reclined angle without proper adjustments or aids (if permitted).
- Forgetting the Top Tether for Forward-Facing: This is a critical safety feature for forward-facing seats. Not using it significantly reduces the seat’s effectiveness in a crash.
- Using an Unapproved Accessory: Avoid jamming extra blankets or pillows under the seat unless your manual specifically allows it. Stick to manufacturer-approved methods or professional guidance.
- Assuming One Install Fits All: Every car and car seat combination is unique. What worked in your old car or in a friend’s car might not be correct for your current setup.
Table: Rear-Facing vs. Forward-Facing Recline Considerations
To summarize the key differences in recline needs:
| Feature | Rear-Facing Installation | Forward-Facing Installation |
|---|---|---|
| Primary Safety Goal | Maintain open airway by preventing chin-to-chest slump. | Prevent forward head excursion, injury reduction. |
| Typical Recline Angle | Highly reclined; tilted back significantly. | More upright; less recline than rear-facing. |
| Indicator Use | Must be within the strict infant/rear-facing range, usually very reclined. | Must be within the acceptable range for forward-facing, which is less reclined. |
| Head/Neck Support Importance | Crucial for infants who cannot support their own head. | Still important, but child has better head/neck control. |
| Potential Aids (Check Manual!) | May use approved rolled towels/pool noodles if manual permits for steep recline. | Rarely needed; vehicle seat slope is usually sufficient. |
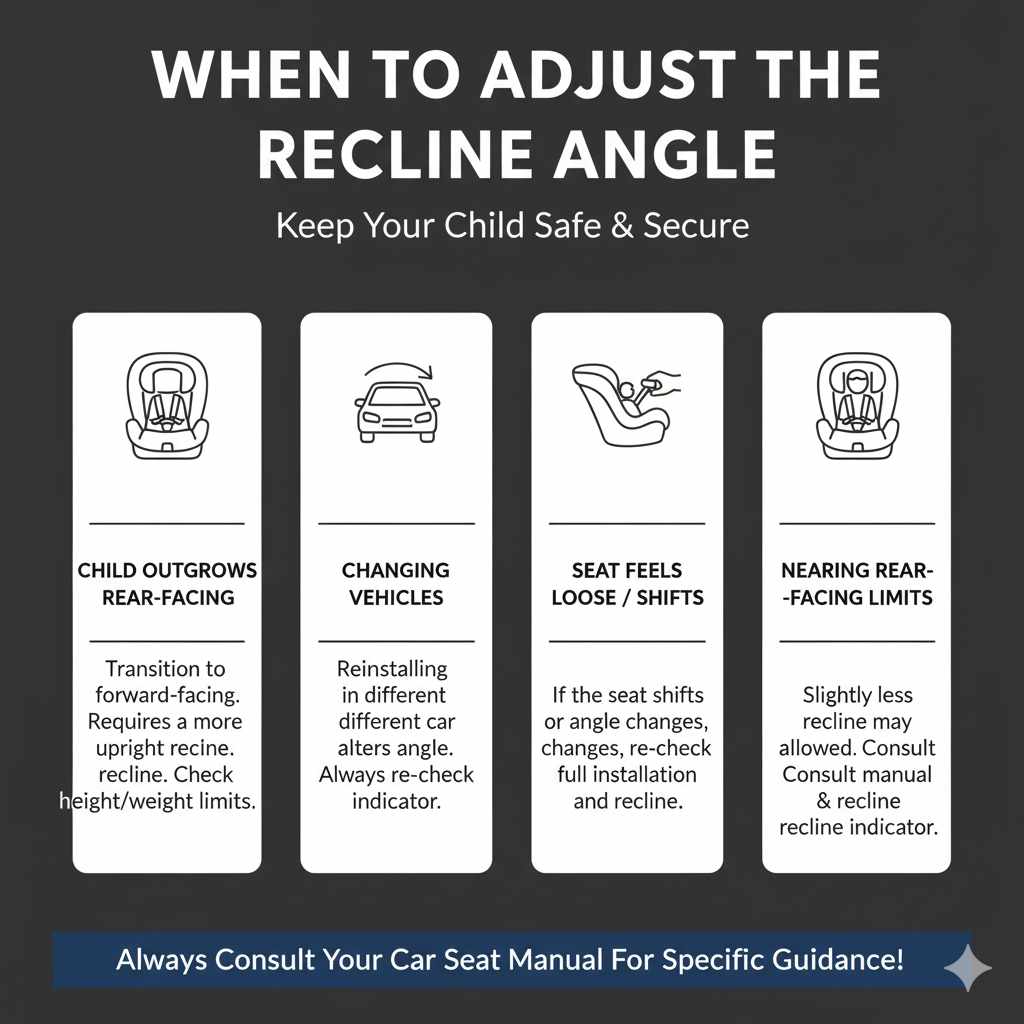
When to Adjust the Recline Angle
The recline angle isn’t a once-and-done setting. You’ll need to check and potentially adjust it as your child grows or when switching vehicles.
- When Your Child Outgrows Rear-Facing Limits: This is the most significant change. Once your child reaches the maximum rear-facing height or weight limit for their Safety First car seat, you will transition them to forward-facing, which requires a more upright recline.
- When Changing Vehicles: Even if you’re keeping the car seat in the same orientation (rear-facing or forward-facing), uninstalling and reinstalling it in a different vehicle can change the angle due to different seat contours and slopes. Always re-check the recline indicator after installation in a new vehicle.
- If the Seat Feels Loose or Shifts: If you notice the car seat has become loose or settled into a different angle over time, it’s time to re-check the installation, including the recline.
- When Your Child Nears the Rear-Facing Height/Weight Limit: Some car seats allow for a slightly less reclined position as your child gets towards the end of their rear-facing journey, provided they can still pass the recline indicator test and support their head well. Always check your manual for these specific transitions.
Frequently Asked Questions (FAQ) about Safety First Car Seat Recline
Q1: My Safety First car seat has a bubble level indicator. When is it correct?
A1: For a Safety First car seat with a bubble level, the bubble should be between the indicated lines or within the designated zone for the correct recline angle. For rear-facing infants, this is typically more reclined (bubble further back); for forward-facing, it’s more upright (bubble more forward).
Q2: Can I use a rolled towel to get a better recline angle if my car seat isn’t reclined enough in rear-facing mode?
A2: It depends on your specific Safety First car seat model and your vehicle’s manual. Some manufacturers allow the use of tightly rolled towels or pool noodles under the recline foot to achieve a better angle, especially for rear-facing. ALWAYS check both your car seat and vehicle manuals first. If it’s not permitted, do not use this method, as it can compromise the seat’s stability and effectiveness.
Q3: My child seems uncomfortable in the car seat, even if the recline indicator is correct. What should I do?
A3: For rear-facing infants, the most reclined position that meets safety standards is often the most comfortable as it supports their head and neck. Ensure the harness straps are at the correct height (at or below the shoulders for rear-facing). If your child is forward-facing and seems uncomfortable, ensure the recline is within the acceptable range for forward-facing mode and check that the harness is snug but not too tight. Dressing your child in thinner layers can also make a difference. If problems persist, consult your manual or a CPST.
Q4: How do I know if my car seat is too reclined or not reclined enough?
A4: The best way is to use the recline indicator built into your Safety First car seat. For rear-facing, too little recline means their airway could be compromised. Too much recline might mean the seat isn’t stable or the belt path isn’t correctly positioned. For forward-facing, too much recline can lead to slouching and breathing issues, while too little might be uncomfortable and less safe in a crash. Always follow the indicator and manual guidance.
Q5: Does the recline angle change when I switch from rear-facing to forward-facing?
A5: Yes, absolutely. The recline angle requirement is significantly different between rear-facing and forward-facing positions. Rear-facing requires a much greater recline to protect an infant’s airway, while forward-facing allows for a more upright position as the child has better head and neck control.
Q6: What’s the difference between the LATCH system and the seat belt for installing a Safety First car seat?
A6: Both LATCH (Lower Anchors and Tethers for Children) and vehicle seat belts are designed to securely install a car seat. You should use only one method at a time (unless your manuals explicitly state otherwise). The LATCH system uses anchors built into your vehicle’s seats, while the seat belt uses the vehicle’s existing seat belt system. It’s best to consult both your car seat and vehicle manuals to determine which method is best for your specific installation and if there are any weight limits for using LATCH for older children.
Q7: How often should I check my car seat installation and recline?
A7: It’s a good practice to check the tightness of your car seat installation (the “wiggle test”) regularly, perhaps weekly. You should always re-check the recline indicator and tightness anytime you reinstall the car seat, such as after taking it out for cleaning or when switching vehicles. Also, re-evaluate the need for recline adjustments as your child grows and approaches weight or height limits.
Conclusion
Ensuring your Safety First car seat is correctly reclined is a fundamental step in protecting your child on every drive. It’s not just about comfort; it’s about ensuring their airway remains open and that they are positioned as safely as possible. By understanding your car seat’s specific features, referring to your manual diligently, and following these step-by-step instructions, you can achieve the correct recline angle with confidence. Remember to always perform the wiggle test and re-verify the recline indicator after installation.
Never hesitate to seek help from a certified Child Passenger Safety Technician if you feel unsure. These professionals are invaluable resources who can provide hands-on assistance and peace of mind. With a properly installed and reclined car seat, you’re providing the best possible protection for your little one, making every journey a safer one. Drive with peace of mind, knowing you’ve taken this crucial safety step!