How to Fix Squeaky Brakes: Causes, DIY Fixes & When to Replace Pads
Squeaky brakes are caused by worn brake pads triggering a metal wear indicator, surface rust on rotors, dry caliper slide pins, or high-metal-content semi-metallic pads vibrating against the rotor. If you ignore the squeak, it progresses to grinding — metal-on-metal contact that destroys rotors and reduces stopping power. This guide covers every cause with a direct fix: from a 5-minute brake cleaner spray to full pad replacement, with a brake pad type comparison table and clear signs you need a mechanic instead of a DIY fix.
To fix squeaky brakes: spray brake cleaner on the rotors, lubricate caliper slide pins with brake-specific grease, and check pad thickness — replace if under 1/8 inch. Morning squeaks from surface rust usually disappear after a few brake applications. Persistent squeaks with no rust cause need pad inspection. Never use WD-40 on brakes — it destroys rubber seals.
What Are Squeaky Brakes?
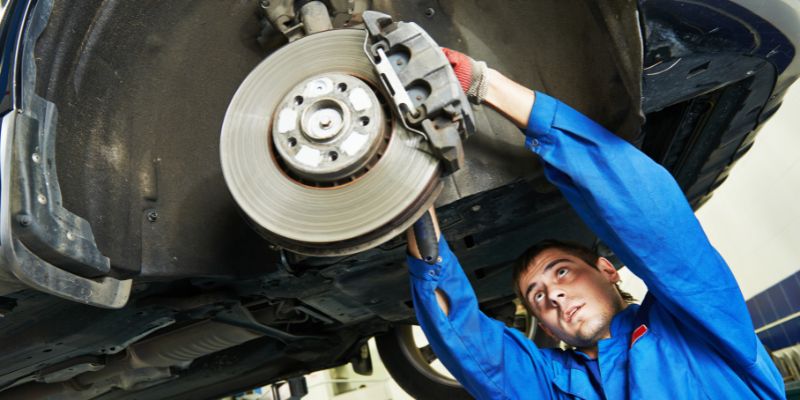
Squeaky brakes produce a high-pitched noise when you apply the brake pedal. The sound comes from vibration between the brake pad and rotor — the spinning metal disc your pads clamp against to slow the car. Most squeaks are a symptom of something specific: a worn wear indicator, surface rust, pad glazing, or metal-on-metal contact. Identifying which one determines whether you need a $10 can of brake cleaner or a full pad and rotor replacement. Your brakes need attention any time a squeak persists for more than one or two stops.
How to Fix Squeaky Brakes: Quick Diagnosis by When the Squeak Happens
The timing and conditions of the squeak tell you exactly what’s wrong. Use this table to diagnose before you touch anything.
| When the Squeak Happens | Most Likely Cause | Fix | DIY? |
|---|---|---|---|
| Only in the morning / after rain | Surface rust on rotors (normal) | Drive and brake normally — rust wears off in 1–2 stops | ✅ No action needed |
| Every time you brake, all day | Worn brake pad — wear indicator engaged | Inspect pad thickness; replace if under 1/8 inch | ✅ DIY or shop |
| At low speeds, goes away at higher speeds | Glazed pads or rotor deposits | Spray brake cleaner; if persists, light rotor scuff with fine emery cloth | ✅ DIY |
| Squeak + brake pedal pulsing | Warped rotor | Rotor replacement (or resurfacing if thickness allows) | ⚠️ Shop recommended |
| Squeak when braking lightly, goes away under hard braking | Dry caliper slide pins or missing shims | Clean and lubricate slide pins with brake-specific grease; add shims | ✅ DIY |
| Squeak + grinding or metal scraping sound | Pads fully worn — metal on metal | Immediate pad + rotor replacement — do not drive | ⚠️ Urgent shop visit |
Why Do Brakes Squeak?
Brakes squeak for specific, diagnosable reasons. Here’s what’s actually happening inside the caliper for each cause.
Worn Brake Pads
Brake pads have a built-in metal wear indicator tab — a small steel clip that contacts the rotor and squeals when pad friction material wears down to approximately 2mm (about 1/8 inch). This squeak is intentional: it’s your car telling you the pads need replacing. Ignoring it leads to the metal backing plate grinding directly against the rotor, scoring it deeply and often requiring rotor replacement on top of pad replacement.
Dirt or Debris
Mud, dust, fine sand, or small stones trapped between the pad and rotor create an abrasive layer that produces squealing or chirping under braking. A quick spray with brake cleaner on the rotor and pad surfaces usually resolves this without removing the wheel. If you drove through gravel or standing water recently, this is the first thing to check.
Rust from Moisture
Bare cast iron rotors rust rapidly when exposed to rain, dew, or high humidity. An overnight rust layer on the rotor surface causes squeaking on the first few stops of the day as the brake pads scrub it off. This is completely normal and not a sign of brake wear — the squeak disappears within 1–2 brake applications. If the squeak persists all day, the cause is something else.
Cheap Brake Pads
Semi-metallic brake pads contain 30–70% metal fibers (steel, iron, or copper) for heat transfer. That metal content makes them noisier than ceramic pads, especially when cold. Budget semi-metallic pads also tend to have looser manufacturing tolerances, which increases vibration between the pad and rotor. Upgrading to ceramic pads — which use ceramic fibers instead of metal — is one of the most effective long-term fixes for chronic brake squeal.
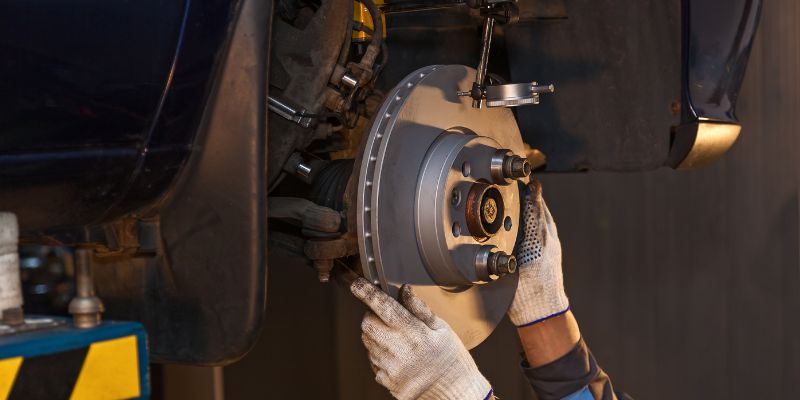
Lack of Lubrication
Caliper slide pins are steel pins that allow the caliper to float and apply even pressure on both sides of the rotor. When the pins dry out or corrode, the caliper drags and the pads contact the rotor at an angle, causing squeaking and uneven pad wear. Lubricating the slide pins with brake-specific caliper grease (never WD-40 or regular grease — both destroy rubber boots and contaminate friction surfaces) is one of the most overlooked fixes for persistent brake squeal.
Recommended Products for Squeaky Brakes

Ceramic Brake Pads
Quieter than semi-metallic — ceramic fibers reduce vibration and brake dust
View on Amazon
CRC Brakleen Brake Cleaner
Fast-drying non-chlorinated formula — removes brake dust, grease, and debris
View on Amazon
Permatex Brake Caliper Lube
High-temp synthetic grease for caliper slide pins — prevents squeal and sticking
View on Amazon
ACDelco Brake Rotor
OE-quality replacement rotor — pairs with new pads when old rotors are grooved or warped
View on AmazonHow to Stop Squeaky Brakes on a Car
Work through these steps in order — start with the simplest fixes before removing wheels or replacing parts.
Step 1: Check for Simple Fixes
Before removing anything, try these quick checks first:
- Drive and brake a few times. If the squeak appeared after rain or overnight parking, surface rust on the rotors is the likely cause. It clears after 1–2 normal brake applications. If the squeak stops, no further action is needed.
- Check for debris. Spray brake cleaner through the wheel spokes onto the rotor and pads without removing the wheel. Let it dry fully (30–60 seconds) and test. Small stones or debris between pad and rotor often clear with this alone.
Step 2: Inspect Your Brake Pads
Worn pads are the leading cause of persistent squeaks. To check them:
- Park on a flat surface and secure with wheel chocks.
- Use a jack to lift the car and support it on jack stands — never work under a car on a floor jack alone.
- Remove the wheel with a lug wrench.
- Look at the brake pads visible in the caliper bracket — they’re the flat friction material pieces pressed against each side of the rotor.
- If the friction material is thinner than 1/8 inch (roughly the thickness of two stacked pennies), replace the pads now.
See our full guide on how to change brake pads on a car for the complete replacement procedure.
| Pad Thickness | Condition | Action Needed |
|---|---|---|
| Thicker than 1/4 inch | Good | No action |
| 1/8 to 1/4 inch | Getting low | Plan replacement within 1–2 months |
| Less than 1/8 inch | Worn — wear indicator active | Replace immediately |
Step 3: Clean the Brakes
With the wheel removed, spray brake cleaner generously on the rotor face and the exposed pad surfaces. Avoid getting it on rubber components (caliper boots, brake hoses). Let dry completely. Use a clean lint-free cloth to wipe away loosened debris. Inspect the rotor surface — light surface rust is normal and will wear off; deep grooves or scoring mean the rotor needs replacement or resurfacing.
Step 4: Lubricate Brake Parts
Dry slide pins are a very common and often missed squeak source. With the pads removed:
- Remove the caliper slide pins (two bolts on most calipers). They should slide out smoothly — stiff or corroded pins confirm the diagnosis.
- Clean pins thoroughly with a wire brush to remove old grease and corrosion.
- Apply fresh brake caliper grease (Permatex or equivalent) to the pins and inside the pin bores.
- Apply a thin smear of brake grease to the back of the brake pads (the metal backing plate only — never the friction surface).
- Reinstall pins, pads, caliper, and wheel.
Critical: Keep all lubricants off the pad friction material and rotor face. Any contamination requires replacing the pads and cleaning the rotor with brake cleaner immediately.
Step 5: Add Brake Pad Shims
Shims are thin rubber or metal-backed rubber layers that fit between the brake pad and caliper piston. They dampen the high-frequency vibration that translates as brake squeal. Many quality ceramic pads come with shims pre-attached. If your pads don’t have them, purchase shims specific to your vehicle make and model, slide them onto the pad backing plate, and reassemble. This is a particularly effective fix for light squeaks when pads and rotors are otherwise in good condition.
Step 6: Replace Brake Pads
If pads are worn below 1/8 inch or the wear indicator has been squealing for a while, replacement is the only permanent fix:
- With the caliper removed, compress the caliper piston back into the bore using a C-clamp or brake piston tool — this makes room for the new, thicker pads.
- Remove old pads from the caliper bracket.
- Clean the bracket contact points with a wire brush.
- Install new pads and reinstall the caliper.
- Pump the brake pedal 10–15 times before moving the car to seat the pads against the rotors.
| Pad Type | Noise Level | Durability | Dust | Cost (per axle) |
|---|---|---|---|---|
| Ceramic | Very quiet | High (50,000–70,000 mi) | Low, light gray | $50–$100 |
| Semi-Metallic | Moderate — can squeal when cold | High (50,000–60,000 mi) | High, dark | $20–$50 |
| Organic (NAO) | Quiet | Lower (30,000–40,000 mi) | Moderate | $30–$60 |
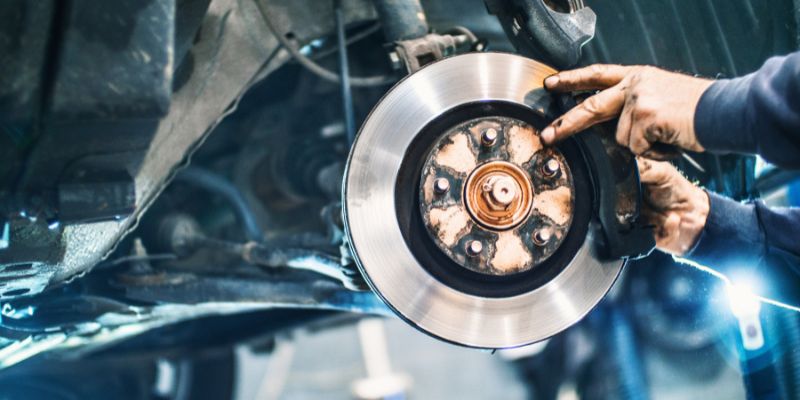
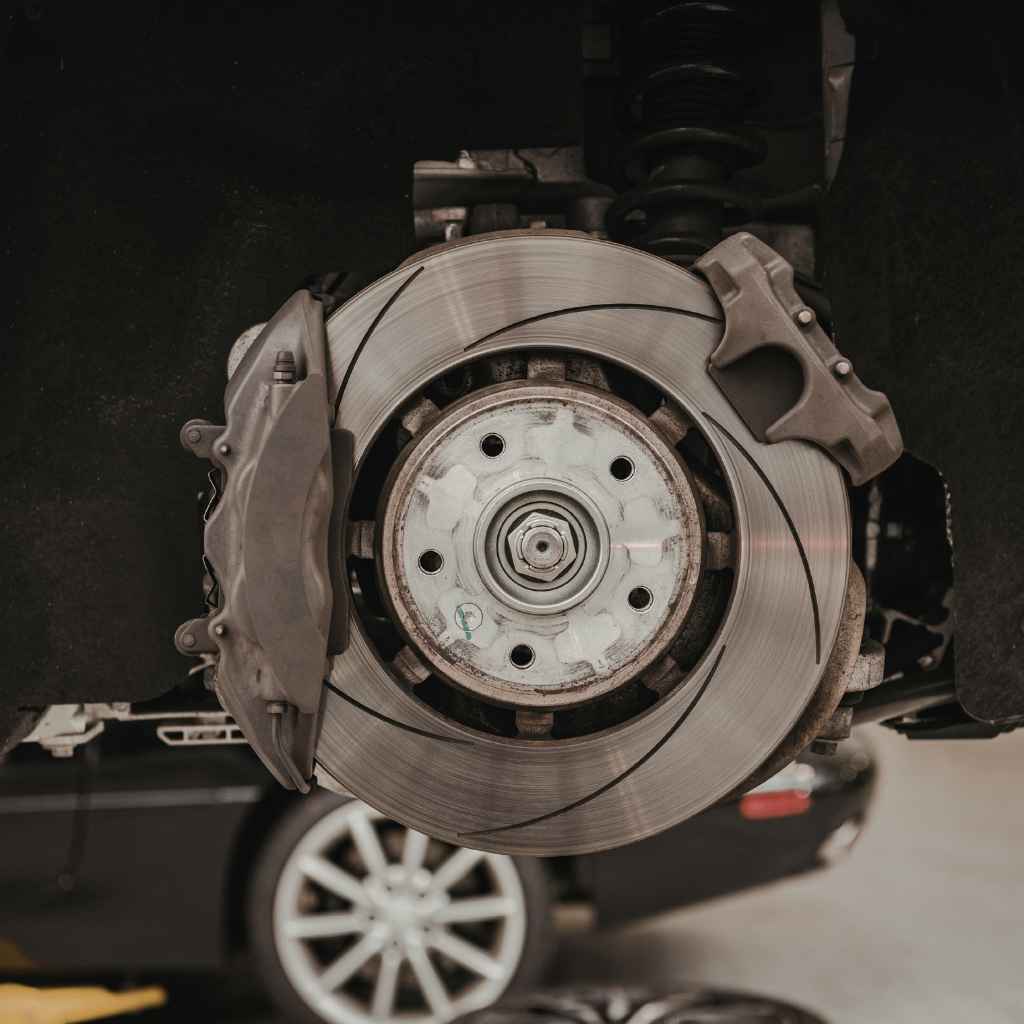
Step 7: Check Rotors
Inspect car rotors for grooves deeper than 1mm, visible heat cracks, or significant thickness variation (felt as brake pedal pulsing). A rotor with deep grooves will cause new pads to wear unevenly and can trigger squeaks even with fresh pads installed. Most rotors have a minimum thickness specification stamped on the hub — measure with a micrometer; if at or below minimum, replace rather than resurface. Always replace pads and rotors as a set on the same axle for even braking.
Common Mistakes to Avoid
- Using WD-40 on brakes. WD-40 is a water displacer and solvent — it destroys the rubber seals on caliper pistons and contaminate friction surfaces. Use only brake-specific caliper lubricant.
- Lubricating the rotor or pad friction surface. Any grease or oil on these surfaces dramatically reduces stopping power. If it happens, replace the pads immediately and clean the rotor with brake cleaner.
- Ignoring squeaks that turn to grinding. The transition from squeak to grinding means the pad friction material is gone and bare metal is contacting the rotor. Each additional stop deepens the rotor grooves and increases repair cost.
- Skipping the bedding-in procedure. New pads need 10–15 gentle stops from 30 mph before hard use to transfer an even layer of friction material onto the rotor. Skipping this step can cause glazing and squeaks even on brand-new parts.
- Replacing only one pad per axle. Always replace both front or both rear pads as a set. Mismatched pad thickness causes uneven braking force and pulls the car to one side.
When to See a Mechanic
See a mechanic instead of attempting a DIY fix when: the squeak has progressed to grinding (metal-on-metal — rotors are likely damaged); the brake pedal feels soft, spongy, or goes closer to the floor than normal; the car pulls to one side under braking (stuck caliper or seized slide pin); or you see brake fluid leaking at any wheel. These symptoms indicate hydraulic or structural brake system issues beyond a pad and rotor replacement. For a related issue, see our guide on how much it costs to replace car rotors.
Conclusion
Most squeaky brakes can be fixed at home with brake cleaner, caliper lubricant, or new pads — the diagnosis table at the top of this article points you to the right fix for your specific situation. The single most important rule: don’t let a squeak become a grind. Address it while pads are the only thing that needs replacing, and you’ll avoid the much larger cost of damaged rotors.
Frequently Asked Questions
Why do my brakes squeak only in the morning?
Morning squeaks are almost always surface rust on the rotors. Cast iron rotors rust overnight when exposed to moisture or dew. The first 1–2 brake applications scrub the rust layer off, and the noise disappears. If the squeak continues through your entire drive, the cause is pad wear, debris, or dry slide pins — not rust.
Can I drive with squeaky brakes?
A morning squeak that clears in a few stops is safe to drive on. A persistent squeak that happens on every stop is a warning — it typically means the wear indicator is active and pads need replacement soon. A grinding or scraping sound means pads are fully worn; stop driving and repair immediately to avoid rotor damage.
How much does it cost to fix squeaky brakes?
Brake cleaner costs $5–$10. Caliper lubricant is $5–$12. New ceramic pads run $50–$100 per axle for parts. If you need rotors too, add $40–$120 per rotor for parts. DIY total for pads and rotors on one axle: $100–$200. At a shop, expect $200–$400 per axle for pads and rotors including labor.
Are cheap brake pads bad?
Budget semi-metallic pads function adequately for stopping, but they typically squeal more (especially when cold), produce more brake dust, and may wear faster than quality ceramic pads. For daily driving where noise and dust matter, the $20–$40 extra for ceramic pads is worthwhile. Save the semi-metallic pads for high-performance track use where maximum bite matters more than noise.
How often should I check my brakes?
Inspect brake pad thickness every 6 months or 6,000 miles — most easily done during a tire rotation when the wheels are already off. Replace pads when they reach 3mm (about 1/8 inch) of remaining friction material. High-mileage drivers or those who do a lot of city/stop-and-go driving should check every 4–5 months.
What’s the difference between squeaking and grinding?
Squeaking is a high-pitched noise caused by the wear indicator tab, surface rust, debris, or pad vibration — the friction material is still present. Grinding is a harsh, low metallic scraping sound that means the friction material is completely gone and bare metal backing plate is contacting the rotor. Grinding requires immediate repair; every additional stop permanently damages the rotor surface.
Can I fix squeaky brakes myself?
Yes — spraying brake cleaner, lubricating slide pins, adding shims, and replacing pads are all straightforward DIY jobs requiring basic tools (jack stands, lug wrench, C-clamp, and a socket set). Rotor replacement is slightly more involved but still DIY-friendly. The only jobs that require a shop are hydraulic issues: bleeding brake lines, replacing calipers, or diagnosing a soft pedal.