How to Fix a Burn Hole in Car Seat: Proven Method
Fixing a burn hole in your car seat is achievable with a DIY repair kit. You’ll clean the area, trim frayed edges, fill the damage with a color-matched filler, and blend it smoothly. With the right kit and a little patience, you can make that burn mark disappear and restore your car’s interior.
Accidents happen, and a moment of carelessness can lead to a frustrating burn hole in your car seat. Whether it’s a dropped cigarette, a stray spark, or something else entirely, seeing that damage can really detract from your car’s appearance. It’s a common issue that many car owners face, and it’s perfectly understandable to feel a bit discouraged. But don’t worry! You don’t always need an expensive upholstery professional to fix it. With a few simple tools and some clear, step-by-step instructions, you can successfully repair that burn hole yourself and regain that clean, polished look for your car’s interior. We’ll walk you through a proven method that’s beginner-friendly and effective.
Why Does This Happen and What Are Your Options?
Burn holes in car seats are typically caused by high-heat sources coming into direct contact with the upholstery material. The most common culprits include:
- Dropped cigarettes or matches.
- Sparks from tools or faulty electrical components.
- Overheated portable electronics or chargers.
- Chemical reactions that produce heat.
When you discover a burn hole, you have a few paths you can take:
- Ignore it: This is the easiest, but least satisfactory, option. The hole will remain an eyesore and can potentially get larger or snag other materials.
- Professional Repair: Upholstery specialists can often make these repairs look seamless. However, this can be quite costly, often running into hundreds of dollars depending on the damage and the seat material.
- DIY Repair: With the right approach and materials, you can achieve excellent results yourself, saving significant money in the process. This is what we’ll focus on today.
For most minor to moderate burn holes, a DIY approach is a fantastic way to tackle the problem. It’s a rewarding process that boosts your confidence in handling car maintenance tasks. We’ll guide you through identifying the best repair kits and using them effectively.

Understanding Your Car Seat Material
Before you start fixing, it’s essential to know what kind of material your car seats are made from. The repair method and materials might vary slightly depending on whether you have fabric, leather, or vinyl seats. Most modern cars use fabric upholstery, often a tightly woven polyester or nylon blend. Higher-end vehicles might offer leather or simulated leather (vinyl) seats.
Identifying Your Seat Material:
- Fabric: Feels soft, has a textured weave, and is most common.
- Leather: Smooth, natural grain, often with a distinct smell. It feels supple and can be cool to the touch.
- Vinyl: Feels smoother and more plastic-like than leather. It often has a uniform texture and may be slightly shiny.
The repair kits we’ll discuss today are generally most effective for fabric seats, as they involve specialized filler compounds that mimic fabric textures. Leather and vinyl repairs often use different leather/vinyl repair kits that might involve heat tools and flexible fillers, but the principle of cleaning, filling, and blending is similar.
The Proven Method: Step-by-Step Burn Hole Repair
This method is designed for fabric car seats and uses a typical DIY upholstery repair kit. These kits are widely available online and at auto parts stores. Always follow the specific instructions that come with your chosen kit, as formulations can vary slightly.
What You’ll Need:
Gathering your supplies before you begin will make the process much smoother. Here’s a list of common items you’ll likely need:
- Upholstery Burn Hole Repair Kit: These kits usually contain color compounds, a filler/binder, texture paper, and a mixing tool. Look for a kit with a wide range of colors so you can match your seat.
- Sharp Small Scissors or Craft Knife: For trimming ragged edges.
- Fine-Grit Sandpaper (Optional, usually included): For smoothing.
- Rubbing Alcohol or Upholstery Cleaner: For cleaning the damaged area.
- Clean Cloths or Paper Towels: For cleaning and application.
- Cardboard/Stiff Paper: To act as a backing if a hole goes all the way through.
- Spatula or Applicator Tool (Often in kit): For applying the filler.
- Hair Dryer (Optional, check kit instructions): Some kits recommend gentle heat for curing.
- Small Bowl or Palette: For mixing colors.
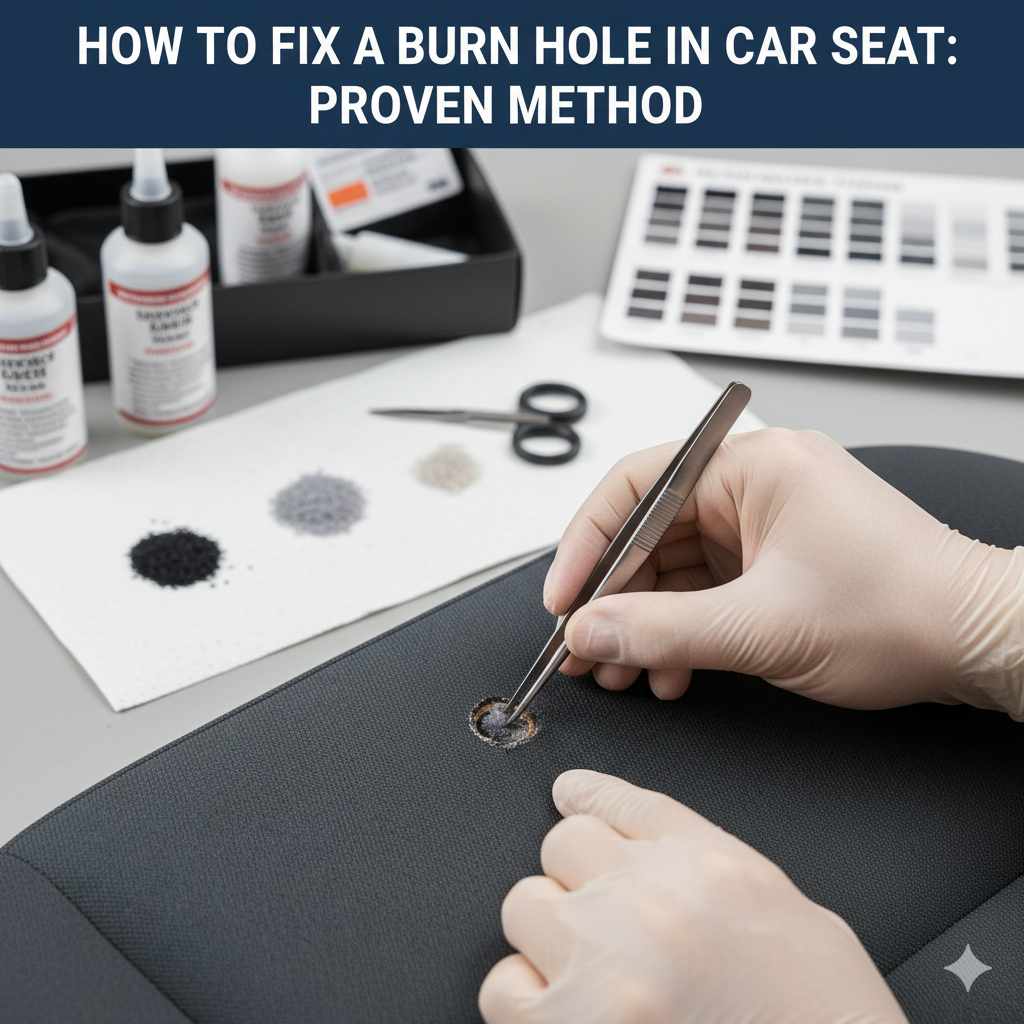
Step 1: Prepare the Damaged Area
This is a crucial first step. A clean working surface ensures the repair materials adhere properly.
- Trim the Frayed Edges: Carefully use your small scissors or craft knife to trim away any loose, burnt threads or ragged edges around the hole. You want to create a clean border so the filler can bond to intact material. Be precise and careful not to enlarge the hole further.
- Clean the Area: Lightly dampen a clean cloth with rubbing alcohol or a mild upholstery cleaner. Gently blot the area around the burn hole to remove any dust, dirt, or residue. Avoid over-wetting the fabric. Let the area dry completely. You can use a hairdryer on a cool setting to speed this up.
- Assess the Depth: With the edges trimmed and the area clean, examine how deep the burn hole is. If it’s just a surface char, you’ll just need to fill. If it’s a true hole that goes through the fabric, you might need a backing.
Step 2: Create a Backing (If Necessary)
If the burn created a hole that goes through the fabric layers, you’ll need to bridge the gap. This prevents the filler from falling through.
- Cut a Backing Piece: Cut a small piece of sturdy cardboard or stiff paper. It should be slightly larger than the burn hole itself.
- Insert the Backing: Carefully slide the backing material underneath the damaged area through the hole. You want it to sit behind the fabric where the hole is. You might need to gently lift the edges of the surrounding fabric to slip it in. It should lie flat and provide a stable base for the filler. If the hole is small and the fabric is tightly woven, this step might not be necessary, but it’s a good precaution for larger or deeper burns.
Step 3: Mix Your Color Compound
This is where the magic happens and where patience pays off. The goal is to match your seat’s color as closely as possible.
- Consult the Color Chart: Your repair kit will likely come with a guide or a set of base colors (e.g., black, white, brown, red, blue, yellow).
- Start with a Base Color: Begin by putting a small amount of the base color that is closest to your seat into your mixing bowl or palette.
- Add Other Colors Sparingly: Gradually add tiny amounts of other colors to adjust the shade. Think of it like mixing paint. For example, if your seat is dark grey, start with black and add a tiny bit of white or even a hint of blue or brown if needed to get the exact tone.
- Use Natural Light: Mix and check the color in good natural light. Artificial light can be deceiving and make colors look different.
- Test on an Inconspicuous Area: Once you think you have a good match, test a tiny dab of the mixed color on an hidden part of the seat, like underneath the seat or on a seam allowance flap. Let it dry completely and check the color again. Adjust your mix as needed. This testing is critical for a near-invisible repair.
Knowing the exact color code for your car’s interior can be helpful, but often it’s difficult to find. Relying on visual matching in good light is usually the best approach for DIYers.
Step 4: Apply the Filler and Color
Now it’s time to fill the hole and disguise the damage.
- Mix Filler with Color: Follow your kit’s instructions. Some kits have you mix the color into a binder paste, while others have you apply a clear filler and then tint it or layer tinted colors. Typically, you’ll mix your perfectly matched color compound with the provided binder or filler paste. Aim for a consistency something like thick toothpaste or putty.
- Apply the Filler: Using your spatula or applicator tool, carefully apply the colored filler into the burn hole. Start in the center and work your way outwards. Gently press the filler down, especially if you have a backing piece, to ensure it fills the void completely and adheres to the surrounding fabric. Don’t over-apply; you want it to be flush or slightly below the surface initially.
- Level the Surface: Use the applicator tool to gently smooth the filler, trying to match the surrounding fabric’s texture as best as possible. Avoid dragging the tool too much, which can create streaks or pull material. You are essentially recreating the fabric surface.
Step 5: Add Texture and Blend
This step is key to making the repair look natural and not just like a patch.
- Apply Texture Paper (If Included): Many kits come with a textured paper or mat. Place this paper over the wet filler. Gently press it down to imprint the fabric texture onto the filler.
- Use Gentle Heat (If Recommended): Some repair kits suggest applying gentle heat with a hairdryer (on a low setting, held at a distance) to help cure or set the filler and better adhere the texture. Always check your kit’s specific instructions for heat application—too much heat can damage the surrounding upholstery or the filler itself.
- Remove Texture Paper: Once the filler has started to set (either by drying or gentle heat), carefully peel away the texture paper. If done correctly, it should leave a texture similar to your car’s seat fabric.
- Feather the Edges: Use a very fine-grit sandpaper (often supplied in kits) to gently sand away any slight raised edges or imperfections. Feather the edges of the repair so they blend seamlessly into the surrounding fabric. The goal is to make the repair flush with the original surface.
Step 6: Final Touches and Curing
Allowing the repair to cure properly ensures its durability.
- Multiple Coats (If Needed): For deeper holes, you might need to apply thin layers of colored filler, allowing each to set slightly before adding the next. This builds up the repair more effectively.
- Allow to Cure: Let the repaired area dry and cure completely according to the kit’s instructions. This could take anywhere from a few hours to 24 hours. Avoid putting pressure on the spot or cleaning it aggressively during this time.
- Final Inspection: Once fully cured, inspect the repair in good light. You should see a smooth, textured area that blends in with the surrounding fabric. You might notice a slight difference because perfectly matching factory finishes is challenging, but it should be a significant improvement.
Tools and Materials: A Quick Comparison
Here’s a table that breaks down the common types of burn hole repair materials and their suitability:
| Repair Type | Best For | Pros | Cons | Ease of Use (Beginner) |
|---|---|---|---|---|
| Fabric Upholstery Burn Repair Kit | Fabric seats with small to medium burn holes. | Relatively inexpensive, good texture replication, includes color matching. | Color matching can be tricky, may not be perfectly invisible, requires some patience. | Moderate |
| Leather/Vinyl Repair Kit | Leather or vinyl seats with tears, burns, or holes. | Effective for smooth surfaces, often includes heat tools for flexibility. | Can be more expensive, matching texture and smoothness can be difficult for fabric-like damage, less suitable for woven fabric. | Moderate to Hard |
| Patching | Large, irreparable holes where color matching is impossible. | Can cover significant damage, quick fix. | Very obvious, can look unprofessional, finding a matching patch is hard. | Easy |
| Professional Repair | Any size damage, especially for valuable or rare vehicles. | Often provides the most seamless and undetectable result. | Most expensive option. | N/A (Professionally done) |
Tips for Success and Avoiding Common Mistakes
As your automotive guide, here are some extra pointers to help you achieve the best possible outcome:
- Patience is Key: Don’t rush the color mixing or application. Take your time, especially with matching the color.
- Start Small: Use small amounts of color additives. You can always add more, but you can’t easily take it away.
- Work in Good Light: Always match your colors and inspect your work in bright, natural daylight.
- Follow Kit Instructions: Every kit is a little different. Read and adhere to the manufacturer’s specific directions.
- Test First: Always test your color mix and repair method on an inconspicuous area if possible.
- Don’t Over-Sand: Sanding is for blending, not for removing excess filler. Be gentle.
- Ventilation: If your kit involves chemical compounds, ensure the area is well-ventilated during application and curing.
- Practice: If you have a very visible or important seat, consider practicing the technique on a spare piece of fabric or an old seat cover first if you can find one.
A common mistake is using too much filler, which can create a bump. Also, failing to match the color precisely is the most frequent reason a repair stands out. Remember, the goal is to make it blend, not necessarily to be completely invisible if the damage is significant.
When to Call a Professional
While DIY repair kits are effective for many situations, there are times when professional help is the better choice. Consider calling an upholstery specialist if:
- The burn hole is very large or has caused significant fabric de-lamination (separation of layers).
- Your car’s seats are made of delicate or exotic materials (e.g., Alcantara, premium full-grain leather, unique weaves) that are difficult to match and repair.
- You have invested in a high-end vehicle and want a factory-perfect finish that you are not confident you can achieve.
- Your repair attempts have not yielded satisfactory results, and you are making the damage worse.
Professionals have specialized tools, pigments, and techniques that can sometimes achieve near-invisible repairs that are beyond the scope of a typical DIY kit. For instance, they might use a spray gun for fine color application or have advanced heat-bonding tools.

Frequently Asked Questions
Q1: How long does a DIY burn hole repair take?
A1: The actual repair work typically takes between 30 minutes to 1.5 hours, depending on the size and complexity of the burn hole, and how long it takes you to match the color. The curing time afterward can be several hours to overnight.
Q2: Can I fix a burn hole in a leather car seat with a fabric repair kit?
A2: No, you should not use a fabric burn hole repair kit on leather. Leather and vinyl have different repair needs. You will need a dedicated leather or vinyl repair kit, which usually involves different fillers and application methods, sometimes including heat.
Q3: Will the color match perfectly?
A3: While DIY kits allow for color matching, achieving a perfect, invisible match can be challenging, especially with textured or multi-toned fabrics. However, you can usually get a very close match that significantly improves the appearance and makes the damage much less noticeable.
Q4: What if the hole is too big for a repair kit?
A4: For very large holes, a repair kit might not be sufficient. You might consider a patch, but this can look obvious. In such cases, professional repair or potentially replacing the affected seat panel might be necessary for the best aesthetic result. Always check the specific size limitations of your chosen repair kit.
Q5: How durable is a DIY burn hole repair?
A5: If done correctly and the kit is of good quality, the repair can be quite durable for normal use. It should withstand regular sitting and wear. However, it might be more susceptible to damage than the original upholstery if exposed to excessive friction or harsh cleaning chemicals specifically applied to the repaired area.
Q6: Where can I buy a car seat burn hole repair kit?
A6: You can find these kits at most major auto parts stores (like AutoZone, Advance Auto Parts), large retailers with automotive sections (like Walmart, Target), and online marketplaces (like Amazon, eBay). Brands like Permatex, 3M, and various specialized upholstery repair companies offer these products.
Q7: Can I repair multiple small burn holes at once?
A7: Yes, as long as you have enough filler and color compound. You can work on multiple small holes sequentially. Ensure each repair is allowed to cure properly before you move on to the next area or put the seat back into heavy use.
Conclusion
Dealing with a burn hole in your car seat doesn’t have to be a cause for despair or a drain on your wallet. By following this proven, step-by-step method using a quality DIY upholstery repair kit, you can effectively mend the damage, blend the area, and restore the clean look of your car’s interior. Remember to prepare the area meticulously, take your time with color matching, apply the filler carefully, and allow ample time for curing. Each step builds on the last to create a repair that you can be proud of. You’ve got this!