How Much Brake Fluid Is Needed for a Full Flush
Figuring out How Much Brake Fluid Is Needed for a Full Flush? can feel tricky when you’re new to car maintenance. It’s a common question because not having enough fluid can cause problems, but buying too much means wasted money. Don’t worry, we’ll walk through this step-by-step so you know exactly what to get. We’ll cover everything you need to know to get your brakes working perfectly.
How Much Brake Fluid for a Full Flush
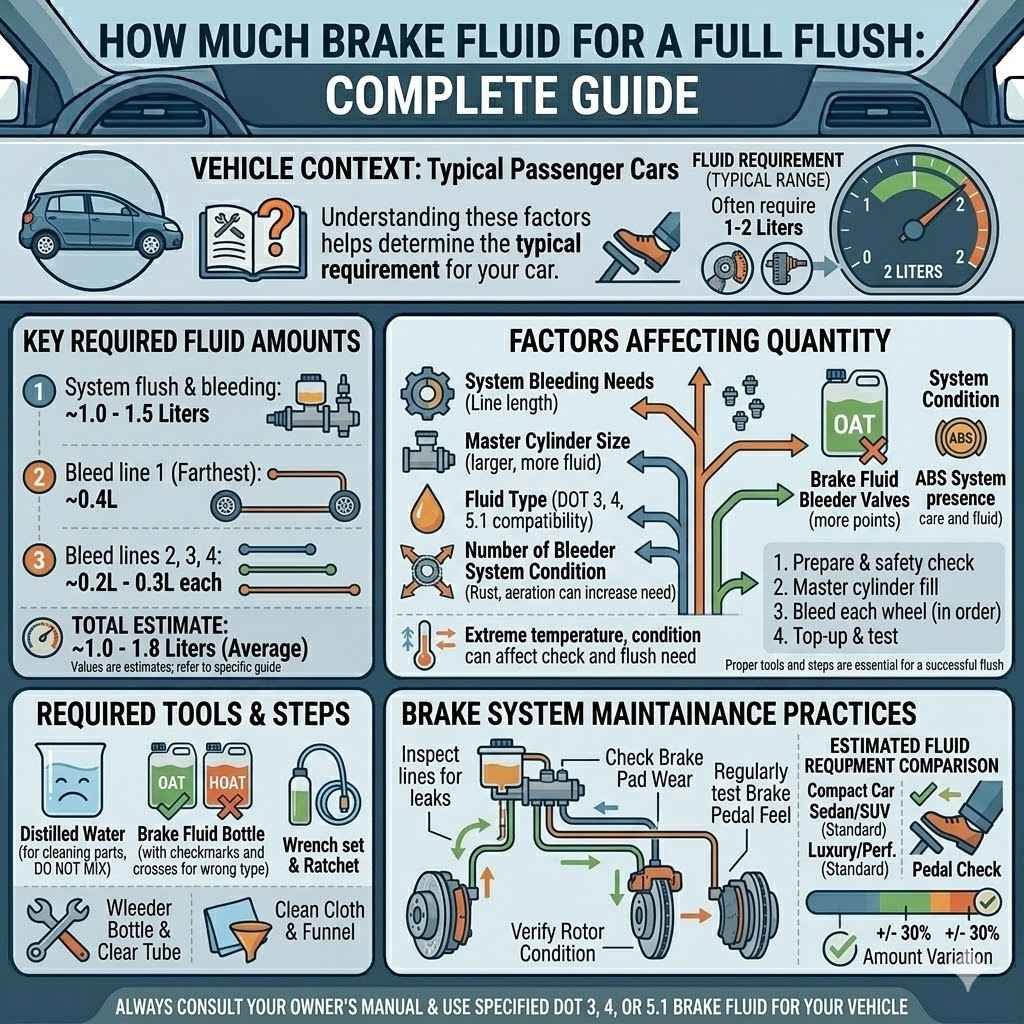
When you ask How Much Brake Fluid Is Needed for a Full Flush?, the answer isn’t a single, fixed number for every car. It really depends on the size of your vehicle’s braking system and how much old fluid needs to be replaced. Most car manufacturers suggest using about one quart (or liter) of brake fluid for a complete flush.
This amount usually ensures you have enough to fill the master cylinder, lines, and calipers or wheel cylinders, while also accounting for any minor spills or air that might get introduced and need purging. It’s always better to have a little extra on hand than to run short mid-job.
Understanding Brake Fluid Types
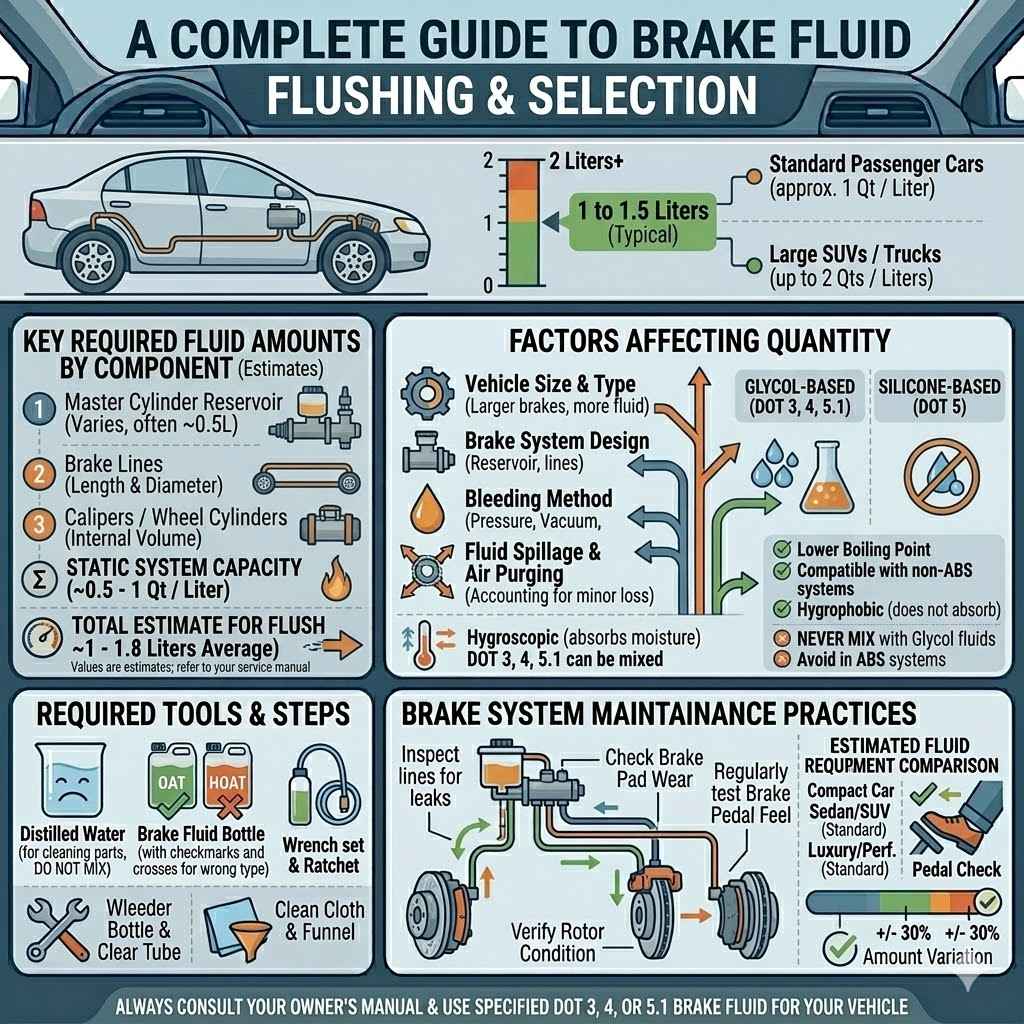
Brake fluid is a special liquid that helps your car stop. It’s designed to handle high temperatures and pressures without boiling or compressing. There are several types of brake fluid, mainly DOT 3, DOT 4, and DOT 5.1. DOT 3 is the most common and works for many everyday cars. DOT 4 is for vehicles that need a higher boiling point, like those with ABS or performance brakes. DOT 5.1 is also a higher performance fluid. It’s super important to use the type of brake fluid recommended by your car’s manufacturer, which you can usually find in your owner’s manual.
Mixing different types can be bad for your brakes. For example, DOT 3, 4, and 5.1 are all glycol-based and can be mixed. However, DOT 5 is silicone-based and should never be mixed with the others. Using the wrong type can damage seals and cause your brakes to fail.
Glycol-Based Fluids (DOT 3, DOT 4, DOT 5.1)
These fluids are the most common. They are made from a mixture of glycols and are hygroscopic, meaning they absorb moisture from the air. This is why brake fluid needs to be flushed periodically; the absorbed water lowers its boiling point, making it less effective, especially under heavy braking.
DOT 3: Has a minimum dry boiling point of 401°F (205°C) and a minimum wet boiling point of 270°F (132°C). It’s suitable for most standard passenger vehicles.
DOT 4: Has a higher minimum dry boiling point of 446°F (230°C) and a minimum wet boiling point of 311°F (155°C). It’s often used in vehicles with anti-lock braking systems (ABS) and electronic stability control (ESC) because these systems generate more heat.
DOT 5.1: Shares the same base as DOT 3 and DOT 4 but has additives that give it an even higher boiling point, typically around 500°F (260°C) dry and 356°F (180°C) wet. It’s compatible with DOT 3 and DOT 4 systems.
Silicone-Based Fluid (DOT 5)
This fluid is different. It does not absorb water, so it doesn’t need to be changed as often due to moisture. However, if water does get into the system, it can separate and form pockets of water, which can freeze or boil. DOT 5 fluid is generally not recommended for vehicles with ABS because it can sometimes cause issues with the system’s sensitive valves. It also has a lower boiling point than high-performance DOT 4 or DOT 5.1 fluids. It is not compatible with glycol-based fluids and will cause major damage if mixed.
Why Fluid Type Matters
Using the correct brake fluid is vital for safety. If the fluid boils during hard braking, you can lose brake pressure, a condition known as “brake fade.” This can happen on steep downhill roads or during spirited driving. Additionally, incorrect fluid can degrade rubber seals in the brake system, leading to leaks and system failure. Always check your vehicle’s owner’s manual or the label on the brake fluid reservoir cap for the recommended fluid type.
A common mistake is assuming all brake fluids are the same. They are not, and the consequences of using the wrong one can be severe.
How Much Brake Fluid Does a Vehicle Typically Need for a Full Flush
When considering How Much Brake Fluid Is Needed for a Full Flush?, it’s important to think about the entire braking system. The system includes the master cylinder, brake lines, and the calipers or wheel cylinders. To ensure all the old fluid is replaced and no air gets trapped, you’ll need enough to fill all these components and then some to bleed the system thoroughly.
Most passenger cars and light trucks require around 1 to 1.5 quarts (or liters) of brake fluid for a complete flush. This includes the fluid that will remain in the system, plus a bit extra to push out the old fluid and any air bubbles. Larger vehicles, like SUVs or heavy-duty trucks, might need slightly more, perhaps up to 2 quarts.
It’s always safer to buy a little more than you think you’ll need. You can store any leftover, unopened brake fluid for future top-ups or if you need to do another flush later. Unopened containers are typically good for a long time.
Brake System Components and Fluid Volume
The amount of brake fluid a vehicle uses is directly related to the volume of its brake system. Key components that hold brake fluid include:
Master Cylinder Reservoir: This is where you add new fluid. Its size varies but is usually designed to hold enough for a flush with some buffer.
Brake Lines: These are the metal or rubber tubes that carry fluid from the master cylinder to the brakes at each wheel. The length and diameter of these lines contribute to the total fluid volume.
Calipers (Disc Brakes) or Wheel Cylinders (Drum Brakes): These are the parts that apply pressure to the brake pads or shoes. The internal volume of these components also needs to be filled with fresh fluid.
A typical passenger car brake system holds roughly 0.5 to 1 quart of fluid. However, a flush requires more than just filling the system. You need to push out all the old fluid and any trapped air. This purging process is why more fluid is needed than the system’s static capacity.
Factors Affecting Fluid Quantity
Several factors can influence exactly How Much Brake Fluid Is Needed for a Full Flush?
Vehicle Size and Type: Larger vehicles with bigger brake components naturally hold more fluid. For instance, a large SUV will likely require more fluid than a small sedan.
Brake System Design: Some brake systems might have slightly larger reservoirs or longer lines, requiring a bit more fluid.
Bleeding Method: The method you use to bleed the brakes can affect how much fluid is used. Gravity bleeding might use less, while pressure bleeding or vacuum bleeding might require slightly more to ensure all air is expelled.
Fluid Spillage: Even with careful work, some fluid might be spilled during the process. Having extra helps compensate for this.
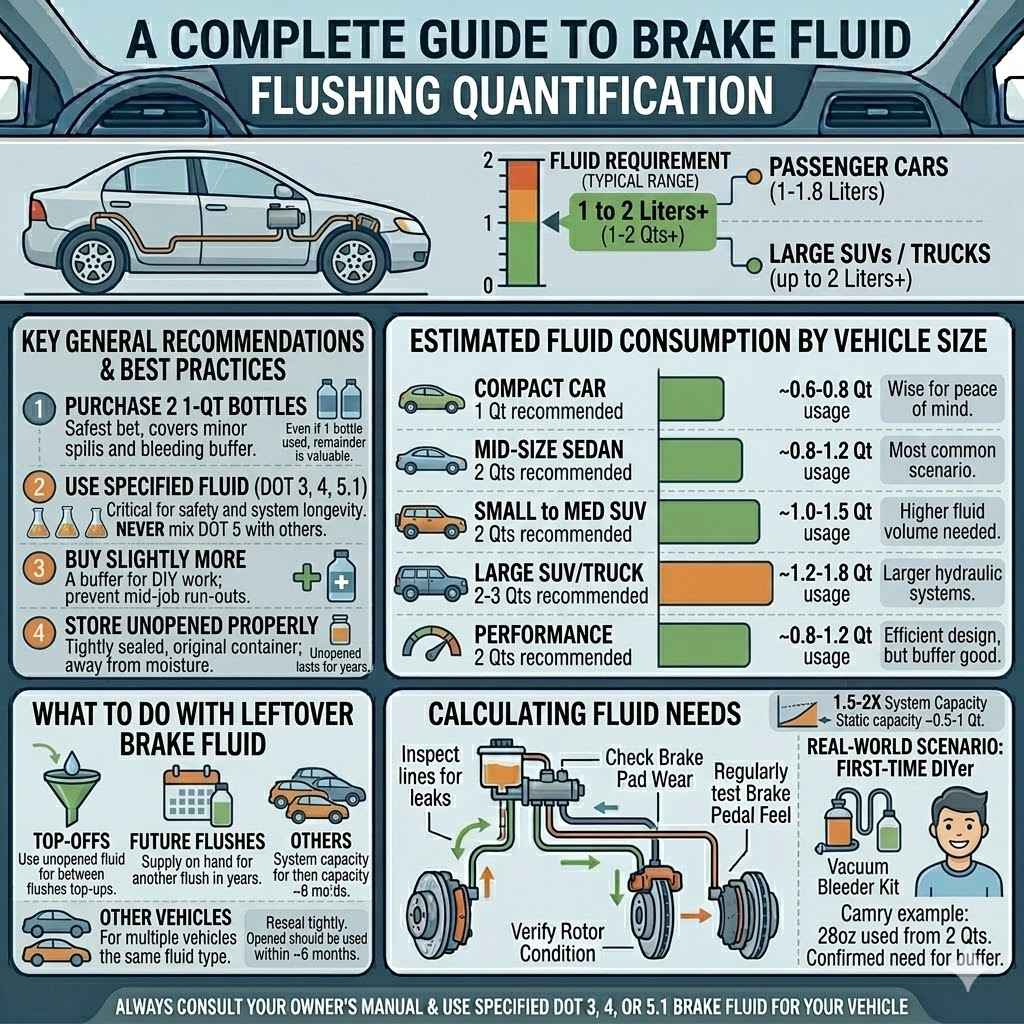
It’s a good rule of thumb to have at least one full quart (or liter) of the correct brake fluid available. Many mechanics recommend buying two quarts just to be absolutely safe, especially if it’s your first time doing a flush. The extra fluid can be saved for future top-ups.
Sample Fluid Requirements by Vehicle Type
Here’s a general idea of how much brake fluid you might need for a full flush, depending on the vehicle type. These are estimates, and your specific vehicle may vary.
| Vehicle Type | Estimated Fluid Needed for Flush | Notes |
|---|---|---|
| Small Car (Sedan) | 1 Quart (0.95 Liters) | Sufficient for most compact and mid-size sedans. |
| Medium SUV | 1 to 1.5 Quarts (0.95–1.4 Liters) | Larger brake components and lines often require a bit more. |
| Large SUV/Truck | 1.5 to 2 Quarts (1.4–1.9 Liters) | Heavy-duty brakes and larger hydraulic systems need more fluid. |
| Performance Car | 1 to 1.5 Quarts (0.95–1.4 Liters) | Often use higher-performance fluids with higher boiling points; system might be designed for efficiency. |
| Classic Car | Varies Widely | Older systems might have different capacities; consult the service manual for the specific model. |
Buying two 1-quart bottles is a very safe bet for most common vehicles. You will likely use most of one bottle and have a bit left over. This leftover can be used to top off the reservoir later if needed, or for future brake maintenance. Always keep brake fluid in a tightly sealed container to prevent it from absorbing moisture from the air.
The Brake Fluid Flush Process Explained
A brake fluid flush is a maintenance task that involves draining the old, contaminated brake fluid from your car’s braking system and replacing it with fresh fluid. This process is essential for keeping your brakes working efficiently and safely. The question of
How Much Brake Fluid Is Needed for a Full Flush? is directly tied to the thoroughness of this process. A complete flush ensures that all the old fluid, which can absorb water and debris over time, is completely removed. This prevents corrosion and maintains the optimal boiling point of the fluid, which is crucial for preventing brake fade under heavy use.
Why Flushing Brake Fluid Is Important
Over time, brake fluid can degrade. The primary reason for this degradation is its hygroscopic nature; it absorbs moisture from the surrounding air. Even small amounts of water can significantly lower the boiling point of the brake fluid. When you brake hard, the friction generates heat, and if the fluid’s boiling point is too low, it can start to boil. This creates vapor pockets in the brake lines, which are compressible, leading to a spongy brake pedal and reduced braking effectiveness, a dangerous condition known as brake fade.
Furthermore, old brake fluid can become contaminated with small particles of brake dust and metal shavings from wear within the brake system. These contaminants can clog small passages in the ABS modulator or other hydraulic components, leading to expensive repairs. They can also accelerate wear on brake system seals and parts. Regular flushing removes these contaminants and helps protect the entire braking system. Manufacturers recommend flushing the brake fluid every 2 to 3 years, or as specified in your vehicle’s maintenance schedule.
Consequences of Neglecting Brake Fluid Flushes
Ignoring brake fluid flushes can lead to several problems:
Reduced Braking Performance: As mentioned, water contamination lowers the boiling point, leading to brake fade. This means your car won’t stop as quickly when you need it to the most, especially during emergency situations or when descending long hills.
Corrosion of Brake Components: Water in the brake fluid promotes rust and corrosion within the brake lines, master cylinder, and calipers. This corrosion can weaken these parts over time, potentially leading to leaks or component failure.
Damage to ABS and Other Systems: Modern vehicles have sophisticated anti-lock braking systems (ABS), electronic stability control (ESC), and other electronic braking aids. Contaminated fluid can damage the delicate valves and sensors in these systems, leading to costly repairs. For example, a clogged ABS valve can prevent the system from working correctly, negating its safety benefits.
Spongy Brake Pedal: The accumulation of air or vapor in the brake lines due to fluid degradation causes a spongy feeling when you press the brake pedal. This is a clear sign that the fluid needs to be replaced.
Premature Wear and Leaks: Contaminants can act like an abrasive, wearing down seals and internal components of the brake system. This can lead to leaks and the eventual failure of brake parts.
Signs Your Brake Fluid Needs Changing
You might notice some signs that indicate it’s time for a brake fluid flush even before your scheduled maintenance:
Dark or Discolored Fluid: Fresh brake fluid is typically clear or slightly amber. If it appears dark brown, black, or murky, it’s contaminated.
Spongy or Soft Brake Pedal: A pedal that feels soft or sinks to the floor when you press it is a strong indicator of air in the lines or fluid degradation.
Warning Lights: Some vehicles may have a brake fluid warning light on the dashboard.
Rust Spots on Brake Lines: In older vehicles, you might notice small rust spots appearing on the brake lines. This is a sign that internal corrosion is likely occurring due to contaminated fluid.
The Two Main Methods for Flushing Brake Fluid
There are a few ways to perform a brake fluid flush, but two common methods stand out: the pressure method and the vacuum method. Both aim to completely
Pressure Bleeding Method
The pressure bleeding method involves connecting a special tool to the master cylinder reservoir that pressurizes the system. This positive pressure pushes the old fluid out through the bleeder screws at each wheel as you open them. You’ll need a pressure bleeder kit, which typically includes an adapter for your car’s master cylinder and a pressure gauge.
How it works: A container filled with new brake fluid is attached to the bleeder screw at one wheel at a time. The pressure bleeder applies a steady stream of pressure, forcing the new fluid through the system and out the bleeder screw, carrying the old fluid and any air with it. You continue this process at each wheel until fresh, clear fluid flows out.
Advantages: This method is often considered easier for a single person to perform because the pressure does the work. It’s also very effective at removing air from the system.
Disadvantages: Requires specialized equipment. If the adapter doesn’t seal perfectly, you can force air into the system.
Vacuum Bleeding Method
Vacuum bleeding, also known as “reverse bleeding” when done from the caliper up, uses a vacuum pump to pull the old fluid out. You can use a hand-held vacuum pump or an electric one.
How it works: You attach the vacuum pump to the bleeder screw at each wheel. As you operate the pump, it creates a vacuum that sucks the old fluid out. You’ll need to continuously add new fluid to the master cylinder reservoir to prevent it from running dry, which would introduce air into the system. You stop when you see clear fluid coming out.
Advantages: Can be performed by one person. It’s generally less messy than gravity bleeding.
Disadvantages: It can be tricky to ensure you’re not pulling air in around the bleeder screw threads, which can be mistaken for air in the brake lines. The vacuum pump needs to be emptied regularly.
A third, simpler method is gravity bleeding, but it’s less effective and takes a long time. For a proper flush, pressure or vacuum methods are preferred.
Step-by-Step Brake Fluid Flush (General Guide)
While specific steps might vary slightly depending on your car and the bleeding method you choose, here’s a general guide:
1. Gather Your Supplies: You’ll need the correct type and amount of new brake fluid (usually 1-2 quarts), a wrench to open bleeder screws, a catch container for old fluid, rags, gloves, safety glasses, and a pressure or vacuum bleeder if using those methods.
2. Prepare the Vehicle: Park your car on a level surface and engage the parking brake. Safely elevate the vehicle using jack stands if necessary, especially if you need to access bleeder screws underneath.
3. Locate Bleeder Screws: Find the bleeder screws on each brake caliper (front) and wheel cylinder (rear, if applicable). They look like small nipples with a hex head.
4. Attach Catch Container and Bleeder Tool: For pressure bleeding, attach the pressure bleeder to the master cylinder. For vacuum bleeding, attach the vacuum pump to the bleeder screw. Place a catch container under the bleeder screw to collect old fluid.
5. Bleed Each Wheel: Start with the wheel furthest from the master cylinder (usually the right rear), then move to the left rear, right front, and finally the left front. This sequence helps ensure complete flushing.
Pressure Bleeding: Open the bleeder screw slightly. The new fluid will be pushed through, and you’ll see old fluid and air exiting into your catch container. Close the bleeder screw when clear fluid flows out consistently.
Vacuum Bleeding: Open the bleeder screw. Operate the vacuum pump to draw fluid out. Continue until clear fluid flows consistently. Close the bleeder screw.
6. Monitor Fluid Level: Crucially, keep an eye on the brake fluid level in the master cylinder reservoir. Never let it drop below the MIN mark, or you’ll suck air into the system, undoing your work. Refill as needed with fresh fluid.
7. Test Brakes: Once all wheels are bled and the reservoir is topped off, close the bleeder screws securely. Remove any tools or containers. Carefully pump the brake pedal several times until it feels firm. Then, test the brakes at low speed in a safe area before driving normally.
Example Scenario: Flushing a Sedan
Let’s say you’re flushing a typical four-door sedan. You’ve consulted your owner’s manual and confirmed it uses DOT 3 brake fluid. You decide to buy two 1-quart bottles of DOT 3 fluid to be safe. You’ll need a 10mm or 11mm wrench for the bleeder screws, a turkey baster to remove excess old fluid from the reservoir before starting, a piece of clear tubing to fit over the bleeder screw and go into a collection bottle, and your new fluid.
You’ll follow the sequence: right rear, left rear, right front, left front. You’ll spend about 15-20 minutes at each wheel, ensuring you see clear fluid and no bubbles before closing the bleeder. You’ll likely use about 0.75 to 1 quart of fluid total, leaving you with a good amount left for future use.
Factors Influencing Fluid Consumption
Beyond the basic system volume, several other aspects can influence precisely How Much Brake Fluid Is Needed for a Full Flush?. These factors relate to the efficiency of the bleeding process, the condition of the brake system, and even the specific tools you use. Understanding these can help you better estimate your needs and avoid running short or buying excessively.
Bleeding Technique and Fluid Loss
The way you bleed the brakes significantly impacts how much fluid is consumed. Different methods have different levels of efficiency and potential for waste.
Gravity Bleeding: This is the simplest method, where you just open a bleeder screw and let gravity pull the fluid out. It requires no special tools beyond a wrench and a container. However, it’s the slowest method and often requires leaving bleeder screws open for extended periods, increasing the chance of contamination if not done carefully. It also doesn’t always expel air effectively, meaning you might need to repeat the process or use a different method. Because it’s slow and less efficient, you might end up using more fluid trying to ensure all air is out.
Pressure Bleeding: Using a pressure bleeder attached to the master cylinder reservoir is generally efficient. It forces fluid through the system. While it requires less fluid to purge than gravity bleeding, there’s a slight risk of fluid leakage around the reservoir adapter if it’s not sealed perfectly, leading to a small loss. The controlled flow usually means less waste than manual methods.
Vacuum Bleeding: This method pulls fluid out from the bleeder screw. A common issue is pulling air into the system through the bleeder screw threads if the seal isn’t perfect, which can make the process seem like it’s taking longer and thus using more fluid as you try to purge the “air” that’s actually entering the system. Using a bit of grease or PTFE tape on the bleeder screw threads can help prevent this.
Brake Bleeder Wands/Kits: Many DIY kits include a one-way valve in the tubing that connects to the bleeder screw. This prevents air from being sucked back into the system when the bleeder screw is slightly open. These can make the process more efficient and potentially reduce the amount of fluid used by preventing the re-introduction of air.
Statistically Speaking: Studies by automotive repair associations indicate that a typical pressure or vacuum bleed of a passenger car’s brake system uses approximately 0.5 to 1 quart (0.47 to 0.95 liters) of fluid. However, this does not account for spillage, contamination, or situations where multiple attempts are needed. Therefore, having a full quart extra (totaling 1.5 to 2 quarts) is generally recommended for DIYers.
Condition of the Brake System
The state of your brake system can also influence how much fluid is needed. A system with leaks or older components might require more attention and fluid.
Leaks: If your brake system has small leaks in the lines, hoses, or at the caliper/wheel cylinder seals, these will need to be addressed. During the flush, you might notice fluid escaping from a faulty connection. While you should fix the leak first, if you’re performing a flush and discover one, you might need extra fluid to compensate for the leakage during the bleeding process. Some mechanics recommend performing a basic leak check and repair before* flushing.
Corrosion and Wear: Heavily corroded bleeder screws can be difficult to open or close properly, potentially leading to leaks. Worn seals in the master cylinder or calipers might not hold pressure as well, requiring more fluid to ensure a complete flush.
ABS System Components: Vehicles equipped with ABS have more complex hydraulic systems. The ABS modulator itself contains a network of valves and accumulators that hold fluid. If the system has been opened or if there are known issues, it might retain more air or require a more thorough bleeding process, potentially using a bit more fluid.
Real-Life Case Study: The Leaky Hose
Sarah drives a 2015 Honda Civic. She decided to flush her brake fluid herself. She bought one quart of DOT 3 fluid. While bleeding the front passenger side caliper, she noticed a small drip from the brake hose connection. Upon closer inspection, she saw a tiny bit of fluid seeping from the banjo bolt connection. She tightened it, but some fluid had already escaped. She continued bleeding, and by the time she finished all four wheels, she had used almost the entire quart and the fluid looked clean, but the reservoir was just at the MIN line.
She realized if the leak had been worse or if she hadn’t had any extra fluid, she would have been in trouble. She decided to buy another quart the next day to have as a spare. This situation highlights why having a little extra is wise.
Tools and Equipment Used
The specific tools you employ for a brake fluid flush can also affect fluid consumption and efficiency.
Master Cylinder Reservoir Cap/Adapter:
For pressure bleeders, the quality of the adapter that seals to the master cylinder reservoir is critical. A poor seal can allow air in, or fluid to escape, leading to more fluid usage.
Bleeder Screw Wrenches: Using the correct size wrench prevents stripping the bleeder screw head, which can cause significant problems and potential fluid loss during the process.
One-Way Valves: As mentioned, a one-way valve in your bleeding kit tubing ensures fluid only flows out and not back in, making the process more efficient and potentially using less fluid.
Fluid Transfer Pumps: Some people use electric or manual pumps to transfer fluid from the new container to the reservoir or directly to the bleeder screw. The efficiency of these pumps can influence how quickly and cleanly you can add fluid.
Sample Scenario: Using a Pressure Bleeder
Mark is flushing the brakes on his pickup truck. He has a pressure bleeder and two quarts of DOT 4 fluid. He connects the bleeder to the master cylinder reservoir, ensuring a tight seal. He inflates the bleeder to 15 PSI. Starting with the furthest wheel, he opens the bleeder screw. He watches the clear tubing connected to the bleeder screw. He sees old fluid, then air bubbles, then clear fluid. He closes the screw once the fluid runs consistently clear.
He repeats this for all four wheels. He refills the reservoir periodically. By the end, he has used about 1.25 quarts of fluid. He has about 0.75 quarts left. This shows how a well-sealed system and efficient bleeding method can result in using a predictable amount of fluid.
How Much Brake Fluid Is Needed for a Full Flush? Quantifying Needs
Let’s get down to the numbers and practical advice when asking, How Much Brake Fluid Is Needed for a Full Flush?. While a general estimate of one quart often suffices, it’s always prudent to have a little extra. This ensures you can complete the job without interruption and have some left for future top-offs, which can extend the life of your brake fluid between flushes.
General Recommendations and Best Practices
For the vast majority of passenger cars and light trucks, purchasing two 1-quart (or 1-liter) bottles of the correct brake fluid type is the safest bet. This amount generally covers the entire flush process, including any minor spills or the need to bleed a bit more to ensure all air is out. Even if you only end up using one bottle, the leftover fluid, kept in its tightly sealed original container, is valuable for maintaining your brake system in the future.
Always use the recommended fluid type: As discussed earlier, using DOT 3, DOT 4, or DOT 5.1 as specified by your vehicle manufacturer is critical for safety and system longevity. Never mix DOT 5 (silicone-based) with other types.
Buy slightly more than you think you need: This is a golden rule for DIY auto maintenance. Running out of a critical fluid mid-job can be frustrating and potentially problematic. Having an extra half-quart or quart provides a buffer.
Store unopened brake fluid properly: Keep brake fluid in its original, sealed container away from moisture and extreme temperatures. Properly stored, unopened brake fluid can last for several years. Once opened, however, it should be used or discarded within a few months as it will start to absorb moisture from the air.
Average Fluid Consumption by Vehicle Size
Here’s a more detailed breakdown of estimated fluid needs based on common vehicle sizes. These figures assume a complete flush where all old fluid is expelled and replaced.
| Vehicle Size | Recommended Purchase | Estimated Usage (for flush) | Notes |
|---|---|---|---|
| Compact Car | 1 Quart | 0.6 – 0.8 Quarts | May even get away with just one quart if very careful, but having a second is wise for peace of mind. |
| Mid-Size Car/Sedan | 2 Quarts | 0.8 – 1.2 Quarts | This is the most common scenario where two quarts are recommended, ensuring you have enough to complete the job. |
| Small to Medium SUV | 2 Quarts | 1.0 – 1.5 Quarts | Larger brake components mean higher fluid volumes are needed for a thorough flush. |
| Large SUV/Truck | 2–3 Quarts | 1.2 – 1.8 Quarts | Larger hydraulic systems, longer lines, and bigger calipers/cylinders necessitate more fluid. |
| Performance Vehicle | 2 Quarts | 0.8 – 1.2 Quarts | Often use higher-performance DOT 4 or 5.1 fluid; system design may be efficient, but a buffer is still good. |
It’s worth noting that if you are performing other brake maintenance, such as replacing a caliper or brake line, you might need to bleed the system again, and having extra fluid on hand will be beneficial.
Calculating Fluid Needs Based on System Volume
While not all manufacturers publish the exact brake fluid capacity of their systems, you can estimate based on general knowledge and the factors discussed. A typical passenger car brake system holds between 0.5 to 1 quart of fluid. A full flush requires at least 1.5 to 2 times this volume to effectively purge the old fluid and any air introduced during the process.
For example, if a system has an estimated static capacity of 0.75 quarts, you would aim to use at least 1.5 quarts to ensure a good flush. This is why purchasing two quarts is a standard recommendation; it provides that margin.
Real-World Scenario: A First-Time DIYer
Consider a first-time DIYer working on a 2010 Toyota Camry. They’ve never flushed brake fluid before. They buy two 32oz (1 quart) bottles of DOT 3 fluid. They use a vacuum bleeder kit. They are careful to keep the reservoir topped up. After bleeding all four wheels, they notice the fluid in the lines is clear. They’ve used approximately 28 ounces (a bit less than one full quart) from the two bottles. They have plenty left over. This experience reassures them that having the second bottle was unnecessary for this specific flush but provides confidence for future maintenance.
What to Do with Leftover Brake Fluid
Don’t discard leftover, unopened brake fluid. It’s a valuable resource for future maintenance.
Top-offs: You can use it to top off your brake fluid reservoir between flushes if the level drops slightly due to normal brake pad wear.
Future Flushes: If your vehicle requires another brake fluid flush in a few years, you’ll already have a supply on hand.
Other Vehicles: If you have multiple vehicles that use the same type of brake fluid, the leftover fluid can be used for those as well.
Always ensure the container is tightly resealed. If you opened a bottle for the flush and only used a portion, it’s best to use that opened bottle within six months to a year, as it will have started absorbing moisture from the air.
Frequently Asked Questions
Question: How often should I flush my brake fluid?
Answer: Most manufacturers recommend flushing your brake fluid every two to three years, or approximately every 30,000 to 45,000 miles. This is because brake fluid absorbs moisture over time, which lowers its boiling point and can lead to corrosion.
Question: Can I use any type of brake fluid in my car?
Answer: No, it is crucial to use the specific type of brake fluid recommended by your vehicle’s manufacturer, usually found in the owner’s manual or on the master cylinder reservoir cap. Using the wrong type can damage your brake system.
Question: Is it okay if I accidentally mix DOT 3 and DOT 4 fluid?
Answer: Yes, DOT 3 and DOT 4 fluids are both glycol-based and are designed to be compatible. Mixing them is generally safe, but it might lower the overall boiling point of the fluid compared to using pure DOT 4.
Question: What happens if I run the brake fluid reservoir dry during a flush?
Answer: If you let the brake fluid reservoir run dry, you will introduce air into the entire brake system. This will require you to bleed the system again thoroughly to remove all the air, and it makes the flush process much more difficult and time-consuming.
Question: Can I use a turkey baster to remove old brake fluid?
Answer: Yes, a clean turkey baster is a common and effective tool to remove most of the old brake fluid from the master cylinder reservoir before you start the bleeding process. This helps ensure you’re starting with a clean reservoir filled with new fluid.
Summary
When asking How Much Brake Fluid Is Needed for a Full Flush?, the general answer for most cars is about one quart, but it’s best to buy two. This ensures you have enough to completely replace the old fluid, purge any air, and account for minor spills. Always use the correct fluid type recommended by your car’s manufacturer and store any leftovers properly for future use. A little preparation goes a long way in keeping your brakes safe and effective.