How To Apply Clear Coat On A Car For A Flawless Finish
We’ll cover the whole process, from picking the right materials to the final buff. You’ll learn how to prep your surface perfectly. We’ll also talk about the best ways to spray the clear coat.
You’ll discover common problems and how to fix them. By the end, you’ll feel confident tackling this yourself.
Applying clear coat to a car involves careful surface preparation, proper spray technique, and ideal environmental conditions to achieve a smooth, glossy, and durable finish that protects the base coat. Understanding the process prevents common issues like runs, sags, and uneven coverage.
What is Car Clear Coat?
Clear coat is the topmost layer of paint on a car. It’s not colored. It’s a transparent protective coating.
This layer sits right on top of the base coat, which is the color you see. Think of it like a shield. It guards the color from things like the sun’s UV rays, rain, and minor scratches.
This shiny layer is what gives cars that deep, wet look. It reflects light. This makes the paint look smooth and brilliant.
Without clear coat, the base color would fade faster. It would also be more prone to damage. Most modern car paints have this clear coat layer.
It’s usually applied right after the base color.
The chemistry behind clear coats is pretty neat. They are typically a two-part system. You mix a resin with a hardener.
This mixture starts to cure or harden. This creates a tough, glossy surface. It’s designed to withstand the elements and everyday wear.
The quality of the clear coat matters. It affects how long the shine lasts and how well it protects the paint underneath.
Why Does Clear Coat Matter So Much?
Clear coat is vital for a car’s appearance and its paint’s health. It’s the first line of defense. It protects the base coat from harm.
Without it, the color would fade quickly. Exposure to sunlight is a big culprit here. UV rays break down the pigments in the base coat.
Clear coat has UV inhibitors. These block much of that damaging light.
It also offers a barrier against chemicals. Things like bird droppings, tree sap, and road salt can etch into paint. Clear coat helps prevent this.
It also adds a physical layer of protection. Minor scuffs and scratches might only go through the clear coat. This means the color layer below is still safe.
This is a big deal for maintaining your car’s value.
Beyond protection, the visual impact is huge. A good clear coat makes colors look richer. It gives that deep, mirror-like shine.
It makes the car look new and well-cared-for. This is why auto detailers and enthusiasts put so much effort into applying it well. It’s the final touch that makes a paint job truly shine and last.
My Own Clear Coat Scare
I remember one sweltering summer day. I was helping a friend paint his old pickup truck. It was his passion project.
We’d spent weeks on the bodywork. The base coat looked amazing. It was a deep metallic blue.
We were so excited to move to the clear coat. That’s when things got stressful.
We had this brand-new can of clear coat. The instructions seemed simple enough. Mix part A and part B.
Shake it up. Spray it on. Easy, right?
Wrong. We were in my friend’s garage. It was hot.
The air was still. We mixed the clear coat. I started spraying.
The first pass looked okay. But then I got nervous. I wanted it perfect.
I went back over an area too soon. Then I tried to fix a little drip I thought I saw. My spray pattern wavered.
The temperature was high. The clear coat started to tack up too fast. It was like a nightmare.
I ended up with noticeable runs. There were also spots that looked dull. It looked worse than before.
I felt sick. My friend saw my face. He was trying to stay calm.
It was a hard lesson learned about clear coat application.
Setting Up for Success: Prep Work is Key
Before you even think about spraying clear coat, you need to prep. This step is non-negotiable. It’s more important than the spraying itself.
If your surface isn’t ready, your clear coat won’t look good. It doesn’t matter how skilled you are with a spray gun. Think of it like baking a cake.
You need the right ingredients and a well-greased pan.
First, the surface must be perfectly clean. Wash the car thoroughly. Use a good car soap.
Rinse it well. Then, you need to decontaminate the paint. This means removing any wax, grease, or silicone.
Use a wax and grease remover spray. Wipe it down with clean microfiber towels. Make sure there’s no residue left.
Next is sanding. Yes, you need to sand the base coat. This might sound scary.
But it’s necessary. You’re not trying to remove the color. You’re just scuffing it up slightly.
This gives the clear coat something to grab onto. Use very fine-grit sandpaper. Think 800 to 1000 grit.
You can wet sand or dry sand. Be gentle. The goal is a uniform dull finish.
After sanding, wipe it down again with wax and grease remover.
Surface Prep Checklist
- Wash the Car: Use car soap and water. Rinse well.
- Decontaminate: Use a wax and grease remover. Wipe with clean towels.
- Sand the Base Coat: Use 800-1000 grit sandpaper. Wet or dry. Aim for a dull, even finish.
- Clean Again: Wipe down with wax and grease remover after sanding.
- Inspect: Check for any dust or debris. Remove it carefully.
It’s also important to have a clean environment. Dust is the enemy of clear coat. Try to spray in a clean garage or a booth.
If you can’t, try to minimize dust. You can dampen the floor. You can also use tack cloths.
These sticky cloths pick up tiny bits of dust. They are cheap and very effective.
Choosing the Right Clear Coat and Supplies
Not all clear coats are the same. You need to pick one that fits your project and skill level. For beginners, some aerosol cans are available.
These are easier to use. They often have a more forgiving spray. However, they don’t offer the same level of durability or shine as a professional two-part system.
For a professional finish, you’ll want a two-part automotive clear coat. These come in a can or a bottle. They also come with a separate bottle of hardener.
You have to mix these together before you spray. This is called the pot life. Once mixed, you have a limited time to use it.
This is why you only mix what you can spray.
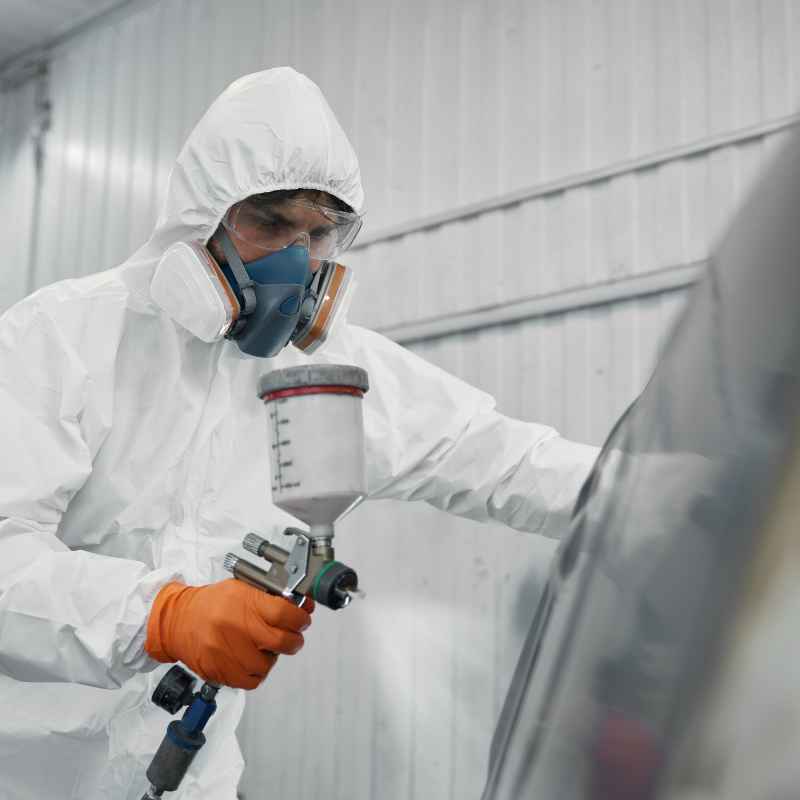
You’ll also need the right spray gun. A gravity-feed spray gun is popular. It uses gravity to feed paint to the tip.
This is efficient. You’ll need a compressor that can supply enough air. Look for a gun with a nozzle size around 1.3 to 1.5mm for clear coats.
You also need good quality masks. Breathing in these fumes is dangerous. Wear a respirator.
Other supplies include:
- Mixing cups and stir sticks
- A scale for precise mixing
- Quality microfiber towels
- Tack cloths
- Gloves
- Safety glasses
- A good respirator mask
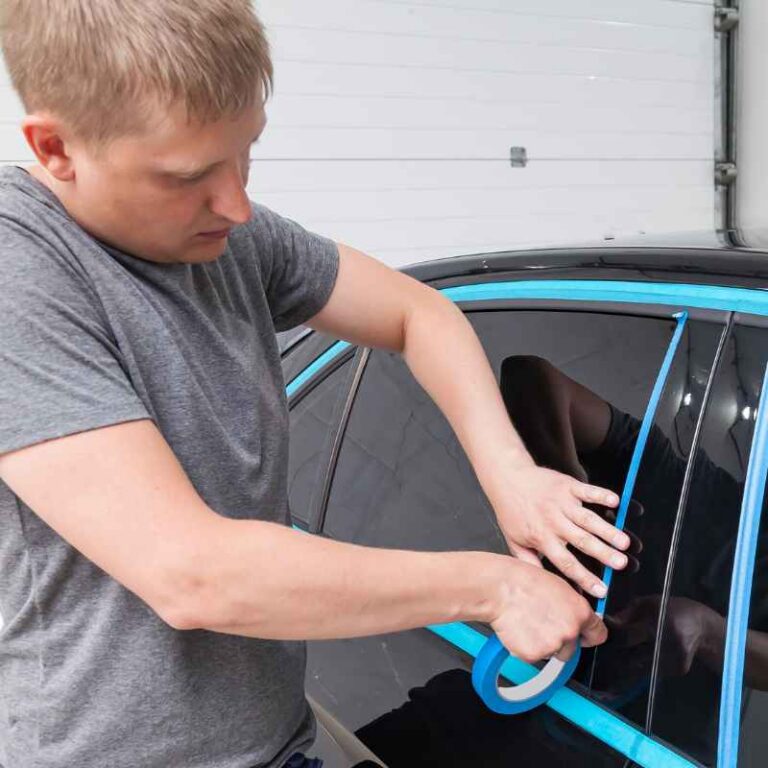
- Painter’s tape and paper
Essential Supplies for Clear Coating
Clear Coat Type: Choose based on skill level (aerosol vs. 2K system).
Spray Gun: Gravity-feed with a 1.3-1.5mm nozzle is ideal.
Air Compressor: Needs to supply consistent airflow.
Personal Protective Equipment (PPE): Respirator, gloves, safety glasses are crucial.
Mixing Tools: Cups, sticks, and a scale for accurate ratios.
Cleaning Supplies: Wax and grease remover, tack cloths.
Read the manufacturer’s instructions carefully. Each product has specific mixing ratios and flash times. These details are critical for getting the clear coat to cure properly.
Not following them can lead to a weak or damaged finish.
Spray Gun Technique Matters
How you hold and move the spray gun is crucial. Good technique prevents common problems. The goal is an even, consistent coat of paint.
You want each pass to overlap the previous one. This ensures full coverage. And it avoids thin spots or heavy build-up.
Start by testing your spray pattern. Aim at a piece of cardboard. Adjust the air pressure and fluid flow until you get a nice, even fan shape.
The edges of the fan should blend smoothly into the center. This tells you your gun is set up correctly.
When you spray the car, keep the gun moving. Never start or stop spraying on the panel itself. Trigger the gun before you reach the edge of the panel.
Release the trigger after you pass the other edge. This prevents heavy spots at the beginning and end of your pass.
Hold the gun perpendicular to the surface. Keep it the same distance away for every pass. A good distance is usually about 6 to 8 inches.
Moving the gun too fast will cause thin spots or dry spray. Moving it too slow will cause runs or sags.
Overlap each pass by about 50 percent. This means the edge of one spray pattern overlaps the center of the previous one. This creates a uniform film.
Make sure your passes are parallel. Work your way across the panel. Then, do a second coat in the opposite direction.
This helps ensure even coverage.
Spray Gun Best Practices
Trigger Control:
Start and stop spraying off the panel. This prevents heavy spots.
Consistent Distance:
Hold the gun 6-8 inches from the surface at all times.
Steady Speed:
Move the gun at a consistent rate. Not too fast, not too slow.
Perpendicular Angle:
Keep the gun at a 90-degree angle to the surface.
Overlap Passes:
Overlap each spray pass by about 50% for even coverage.
The number of coats you apply depends on the product. Most systems recommend two to three medium coats. You need to let the clear coat “flash off” between coats.
This is the time it takes for solvents to evaporate. It makes the surface slightly tacky. This allows the next coat to bond well.
Check the product’s data sheet for recommended flash times. These can change based on temperature and humidity.
Understanding the Environment: Temperature and Humidity
The environment where you spray clear coat is incredibly important. Temperature and humidity play huge roles. They affect how the clear coat behaves.
They also impact how it cures. Trying to spray in bad conditions is a recipe for disaster. I learned this the hard way, as you saw.
Temperature: Most clear coats have an ideal temperature range. This is usually between 70°F and 80°F (21°C to 27°C). If it’s too cold, the clear coat might not flow out properly.
It could look dull or rough. It might even take forever to dry. If it’s too hot, the clear coat can flash off too quickly.
This leads to poor leveling. You can get dry spray or runs.
Humidity: High humidity is also problematic. It slows down the evaporation of solvents. This means longer flash times.
It can also cause the clear coat to absorb moisture. This can lead to a hazy or milky finish. This is called blushing.
It’s very hard to fix. Ideally, humidity should be below 50%.
Airflow: Good ventilation is also key. It helps solvents evaporate. It clears away fumes.
A slight airflow can help prevent dust from settling. But too much airflow can dry the surface too quickly. It can also blow dust onto the wet paint.
It’s a delicate balance.
Ideal Spraying Conditions
Temperature: 70-80°F (21-27°C) is usually best.
Humidity: Below 50% is recommended to avoid blushing.
Clean Air: Good ventilation helps with solvent evaporation and fume removal.
Low Dust: A clean environment is crucial. Dampen floors if needed.
If you’re doing this outside, pick a calm day. Avoid direct sunlight. The sun can heat the panel unevenly.
This causes problems. Try to spray in the morning or late afternoon. These times often have more stable temperatures and lower humidity.
Always check the weather forecast before you start.
Common Clear Coat Problems and How to Fix Them
Even with the best preparation, things can go wrong. Knowing how to identify and fix common issues is part of the process. Don’t panic if you see a problem.
Most can be corrected. The key is to wait until the clear coat is fully cured.
Runs and Sags: These happen when too much clear coat is applied in one spot. Or if the spray gun is held too close or moved too slowly. If they are small, you can sometimes sand them down after curing.
Use very fine-grit sandpaper (2000-3000 grit). Then, wet sand and polish the area. For larger runs, you might need to sand them down more aggressively.
Then re-apply clear coat to that section.
Orange Peel: This looks like the skin of an orange. It’s a textured surface instead of smooth. It can be caused by spraying too fast.
It can also happen if the clear coat is too thick or too thin. Or if the temperature is wrong. Light orange peel can often be wet sanded and polished out.
Heavier orange peel might require more sanding and re-application.
Dry Spray: This looks like a dusty, dull finish. It happens when the spray gun is too far away. Or if the spray pattern is too thin.
Or if the air pressure is too low. This is usually fixable by sanding. You’ll sand off the dry spray.
Then re-apply the clear coat with correct technique.
Dust and Debris: Tiny specks of dust or bugs can land in the wet clear coat. These are very annoying. If they are minor, you can let the clear coat cure.
Then carefully sand them down. Use fine grit sandpaper. Then polish the area.
For larger contaminants, you might need to sand the entire panel and re-coat.
Troubleshooting Common Issues
Runs/Sags:
Sand smooth after curing. Re-apply if needed.
Orange Peel:
Wet sand and polish. Re-coat for severe cases.
Dry Spray:
Sand off and re-apply with correct technique.
Dust/Debris:
Carefully sand and polish. Re-coat if significant.
The key to fixing these is patience. Let the clear coat cure fully. Trying to fix wet paint will usually make it worse.
Have good lighting. Use fine-grit sandpaper and polishing compounds. Work slowly and carefully.
Sometimes, a slight imperfection is better than damaging the entire paint job.
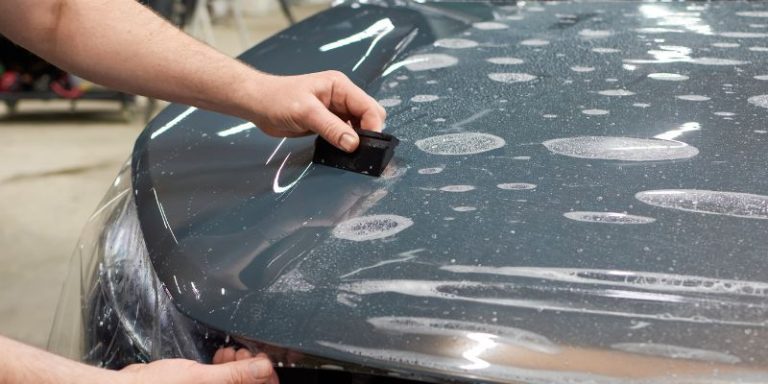
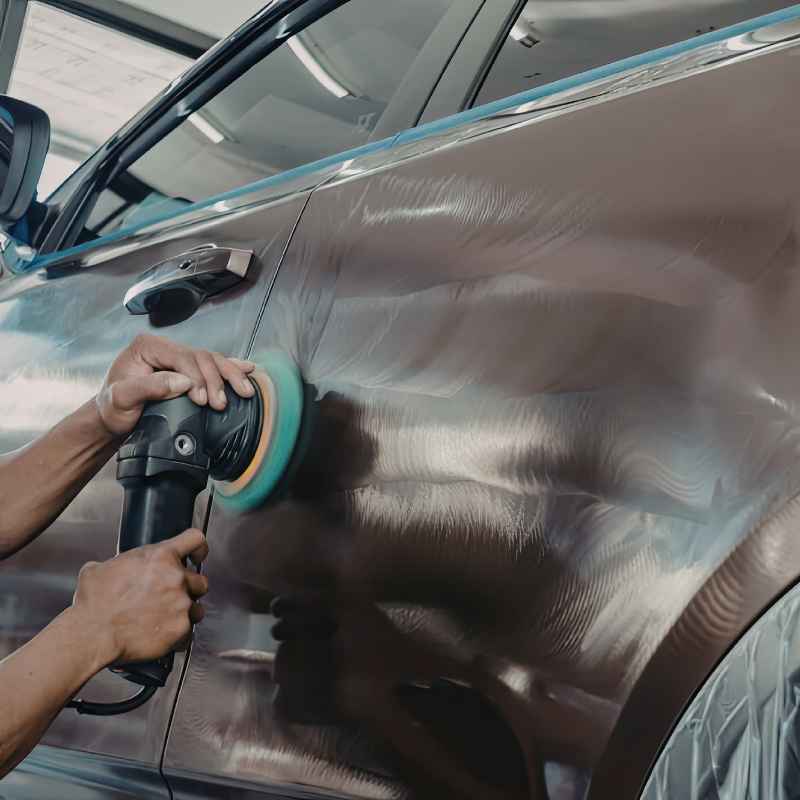
The Art of Buffing and Polishing
After the clear coat has cured for at least 24-48 hours (check product instructions), you can buff and polish. This step brings out the final shine. It removes any minor imperfections left from spraying or sanding.
Start with wet sanding. Use very fine grit sandpaper. Start with something like 2000 grit.
Then move to 2500, and finally 3000 grit. Wet sanding helps smooth out the surface. It removes any faint orange peel or imperfections.
Keep the sandpaper wet. Use a sanding block for flat surfaces. This helps keep the sanding even.
After wet sanding, the surface will look dull. This is normal. You need to remove the sanding marks with polishing compounds.
Use a buffer. A dual-action (DA) polisher is good for beginners. It’s less aggressive than a rotary buffer.
Start with a medium-cut polishing compound. Apply a small amount to a polishing pad. Work in small sections.
Use moderate pressure. Move the polisher slowly and evenly. Overlap your passes.
Wipe off the residue with a clean microfiber towel. Check your work under good light.
If needed, move to a finer polishing compound. This will remove any swirl marks left by the coarser compound. The goal is a deep, mirror-like shine.
You can follow up with a finishing glaze or wax. This adds extra protection and gloss.
Buffing and Polishing Steps
Wet Sanding:
Use 2000, 2500, and 3000 grit sandpaper. Keep wet.
Compound:
Use a medium-cut compound with a polisher. Work in sections.
Fine Polish:
Follow up with a finer polish to remove swirls.
Wax/Sealant:
Apply for added protection and shine.
This stage requires patience. Don’t rush. Take your time.
Clean your pads frequently. This prevents them from getting clogged with paint residue. The results are worth the effort.
A well-polished clear coat looks incredible. It makes the entire paint job look fresh and new.
Maintaining Your New Clear Coat Finish
Once you’ve achieved that perfect shine, you’ll want to keep it that way. Regular maintenance is key to prolonging the life and beauty of your clear coat. It’s not just about washing; it’s about how you wash.
Regular Washing: Wash your car often. Aim for every two weeks. Use a pH-neutral car soap.
Avoid harsh detergents. These can strip protective waxes or sealants. Always use the two-bucket wash method.
One bucket for soapy water, one for rinsing your wash mitt. This prevents dragging dirt back onto the paint.
Drying: Dry your car immediately after washing. Use clean, plush microfiber drying towels. Avoid using old bath towels or chamois cloths.
They can scratch the paint. Blot or gently pat the surface dry. Don’t rub vigorously.
Protection: Apply a good quality wax or sealant every few months. This adds an extra layer of protection. It helps repel water and dirt.
It also makes washing easier. Ceramic coatings offer even longer-lasting protection. They are a more significant investment but can last for years.
Long-Term Care for Clear Coat
Frequent Washing: Use pH-neutral soap and the two-bucket method.
Gentle Drying: Use clean microfiber towels; blot don’t rub.
Apply Protection: Use wax, sealant, or ceramic coating regularly.
Avoid Harsh Chemicals: Steer clear of abrasive cleaners or industrial solvents.
Park Wisely: Avoid prolonged exposure to direct sun or harsh elements when possible.
Be Careful with Contaminants: Remove bird droppings, tree sap, and bug splatter as soon as possible. These can etch into the clear coat if left on for too long. Use a quick detailer spray and a microfiber towel for safe removal.
Avoid Automatic Car Washes: Many automatic car washes use brushes that can scratch clear coat. Touchless washes are better, but still not ideal. Hand washing is always the safest option for maintaining a pristine finish.
When to Call a Professional
While DIY clear coating can be rewarding, it’s not always the best option. There are times when professional help is needed. If you’re painting a classic car or a high-value vehicle, you might want a pro from the start.
Their experience and equipment can ensure a flawless finish.
If you’ve made a significant mistake, like a large run or extensive orange peel that you can’t fix, a professional can help. They have the tools and expertise to correct major errors. They can often sand down and re-coat sections without having to repaint the entire car.
For those who lack the time, space, or confidence to do it themselves, hiring a professional painter is the way to go. They can achieve results that are very difficult to match at home. It’s an investment in your car’s appearance and longevity.
Sometimes, paying for expertise saves money and frustration in the long run.
Frequently Asked Questions About Applying Clear Coat
What is the main purpose of clear coat on a car?
The main purpose of clear coat is to protect the colored base coat from environmental damage like UV rays, scratches, and chemical etching. It also provides the glossy, deep shine that makes car paint look appealing.
Can I apply clear coat over old, faded paint?
Generally, no. The base coat needs to be in good condition. If the old paint is severely faded, peeling, or oxidized, it needs to be addressed first.
Often, this means sanding down to the primer or base coat and starting fresh. Clear coat won’t magically fix badly damaged paint.
How many coats of clear coat should I apply?
Most automotive clear coat systems recommend two to three medium coats. Always follow the specific product’s instructions. Applying too much can lead to runs, while too little can result in poor coverage and protection.
What is “orange peel” and how do I fix it?
Orange peel is a textured finish resembling an orange peel, caused by improper spray technique or environmental conditions. Light orange peel can often be corrected by wet sanding with fine-grit sandpaper and then polishing. Severe cases might require more sanding and re-application of the clear coat.
How long does clear coat need to cure before buffing?
Clear coat needs to cure for at least 24 to 48 hours before buffing or polishing. However, some products may require longer cure times. Always check the manufacturer’s product data sheet for specific recommendations, as full hardness can take days or even weeks.
Is it safe to spray clear coat in my home garage?
It can be done, but safety is paramount. Ensure excellent ventilation and wear a high-quality respirator designed for organic vapors. Minimize dust by dampening the floor and using tack cloths.
However, professional spray booths offer the cleanest and safest environment.
Final Thoughts on Getting a Flawless Finish
Achieving a flawless clear coat finish takes practice and attention to detail. It’s a process that rewards patience and careful preparation. From the initial cleaning and sanding to the final buff and polish, each step is critical.
Don’t be discouraged by setbacks; they are learning opportunities.
Remember the importance of your environment, the quality of your materials, and your spray technique. With the right knowledge and a bit of practice, you can achieve results you’ll be proud of. Enjoy your beautifully coated car!