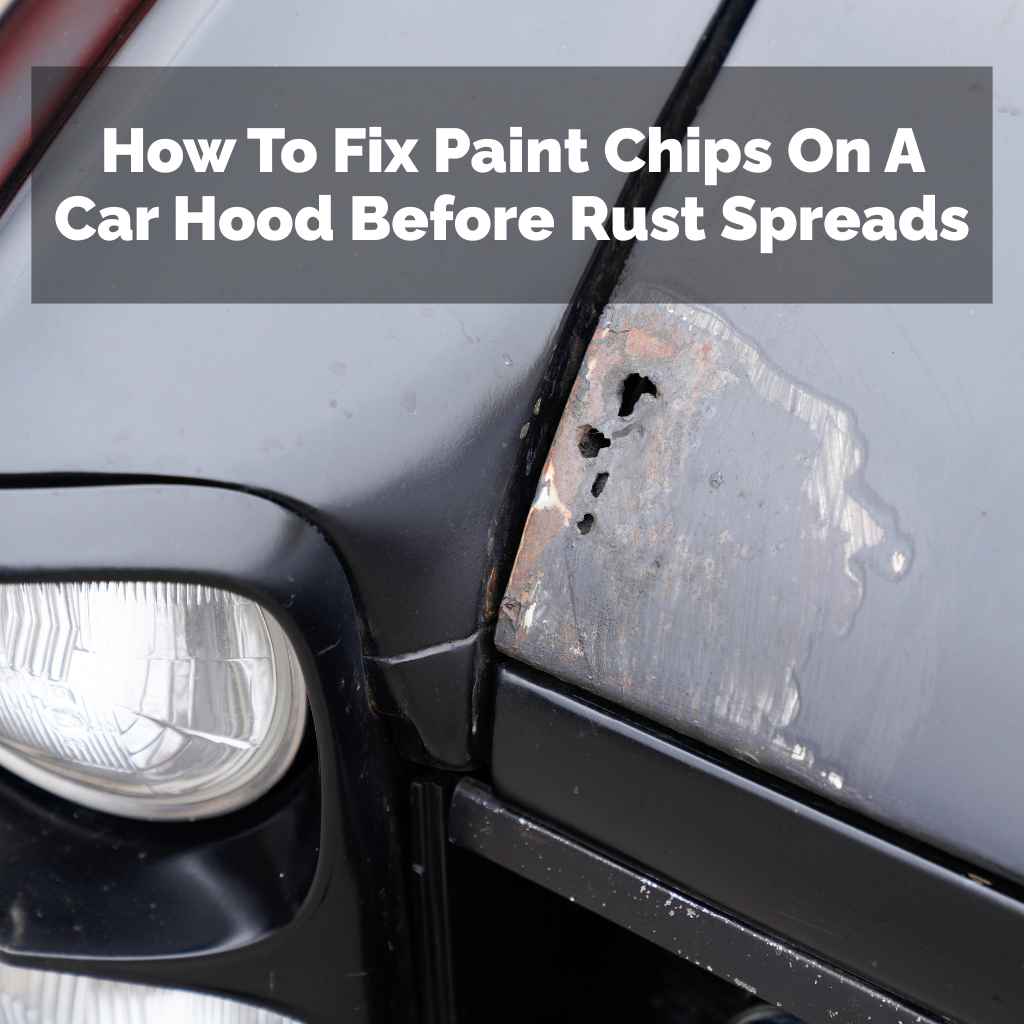
How To Fix Paint Chips On A Car Hood Before Rust Spreads
It’s a common sight. You’re driving along, enjoying your day, and then you see it. A tiny chip on your car’s hood.
It might seem small, but it can lead to bigger problems. Rust is the main worry. Once it starts, it can spread fast.
This can make your car look old and worn out. It can also hurt its value. But don’t worry.
Fixing these chips is often a simple job. You can do it yourself. This guide will walk you through it.
We’ll cover everything you need to know. You’ll learn how to fix those chips before they become a rust problem. Let’s get your car looking its best again.
The best way to fix paint chips on a car hood is to clean the area, apply a primer, then touch-up paint that matches your car’s color. Seal it with a clear coat to protect the repair. This prevents rust and makes the chip nearly invisible.
Understanding Car Paint Chips
Your car’s paint is more than just color. It’s a shield. It protects the metal underneath.
This metal is usually steel or aluminum. These metals can rust when exposed to air and water. Car paint has layers.
The base coat is the color. The clear coat is on top. It adds shine and protects the color.
Sometimes, a primer goes down first. This helps the paint stick.
Paint chips happen for many reasons. Rocks and pebbles from the road are common culprits. They get kicked up by tires.
They hit your car’s paint. Other things can cause chips too. Debris from construction zones can fly.
Even hail can chip paint. Parking too close to curbs can scrape paint. Sometimes, car doors opening can hit another car.
This can cause chips or scratches.
These chips go through the paint layers. They reach the primer. Or worse, they reach the bare metal.
This is where the danger begins. The metal is now exposed. It can react with moisture.
This is how rust starts. Rust is a reddish-brown substance. It’s weak and flaky.
It eats away at the metal. It can spread under the paint. This makes the chip look bigger over time.
Why Fixing Chips Matters
You might think a small chip is no big deal. But it’s a gateway. It’s an opening for damage.
Ignoring it is like leaving a door open for trouble. The first thing that happens is rust. It starts small.
It might be a tiny orange spot. But it grows. It can spread under the paint.
This causes the paint to bubble. Then, the bubbled paint flakes off. This makes the chip much larger.
Besides rust, chips also affect how your car looks. A car with many chips looks neglected. It can make your car seem older than it is.
This lowers its resale value. People want cars that look well-cared for. Even minor damage can put off a buyer.
A clean, chip-free car shows pride of ownership.
Fixing chips is an investment. It protects your car. It keeps it looking good.
It maintains its value. Plus, it’s often a simple fix. You don’t need to be a car expert.
With the right tools and a little patience, you can do it. It’s rewarding to fix it yourself. You know it’s done right.
And you save money too.
Gathering Your Supplies
Before you start, get everything ready. Having all your supplies in one place makes the job smooth. You don’t want to stop halfway.
You’ll need a few key items. The exact products might vary. But the basics are the same.
First, you need to clean the area. A good car wash soap and water are essential. You’ll also want some rubbing alcohol.
This is for final cleaning. It removes oils and grime. This helps the new paint stick.
You’ll need microfiber cloths. They are soft. They won’t scratch your paint.
Have plenty of them handy.
Next is the repair material. You’ll need a touch-up paint pen or small bottle. The color must match your car exactly.
You can usually find this at auto parts stores. Or you can order it online. Provide your car’s make, model, and year.
Sometimes, there’s a paint code. This code is on a sticker in your car. It ensures a perfect match.
You’ll likely need a primer. This goes on first. It helps the paint adhere.
It also adds a base layer. A small bottle of primer is usually enough. You’ll also need a clear coat.
This goes on last. It seals the repair. It adds protection and shine.
It matches your car’s original clear coat.
For applying the paint, small tools are best. Toothpicks are great for tiny chips. Some touch-up paint comes with a small brush.
You might also want a fine-tip detail brush. This gives you more control. You may need a small container.
You can pour a little paint into it. This makes it easier to use with a brush.
Finally, consider a wax and grease remover. This is stronger than rubbing alcohol. It helps ensure a perfectly clean surface.
A fine-grit sandpaper, like 2000-grit, can be useful. It helps smooth rough edges around the chip. But use this with caution.
You only want to smooth the edges, not the good paint.
Your Repair Toolkit
What you need:
- Car wash soap and water
- Rubbing alcohol or wax/grease remover
- Microfiber cloths
- Matching touch-up paint
- Primer (optional, but recommended)
- Clear coat
- Toothpicks or fine-tip detail brush
- Small container for paint
- Fine-grit sandpaper (2000+ grit, optional)
Tips for supplies:
Always check your car’s paint code. It’s usually on a sticker in the driver’s side doorjamb. This guarantees the best color match.
The Step-by-Step Repair Process
Now, let’s get to the actual fixing. It’s a careful process. Take your time.
Rushing can lead to mistakes. Make sure you’re in a good spot. Direct sunlight can be too harsh.
It can make the paint dry too fast. A shaded, well-lit area is best. A garage is ideal.
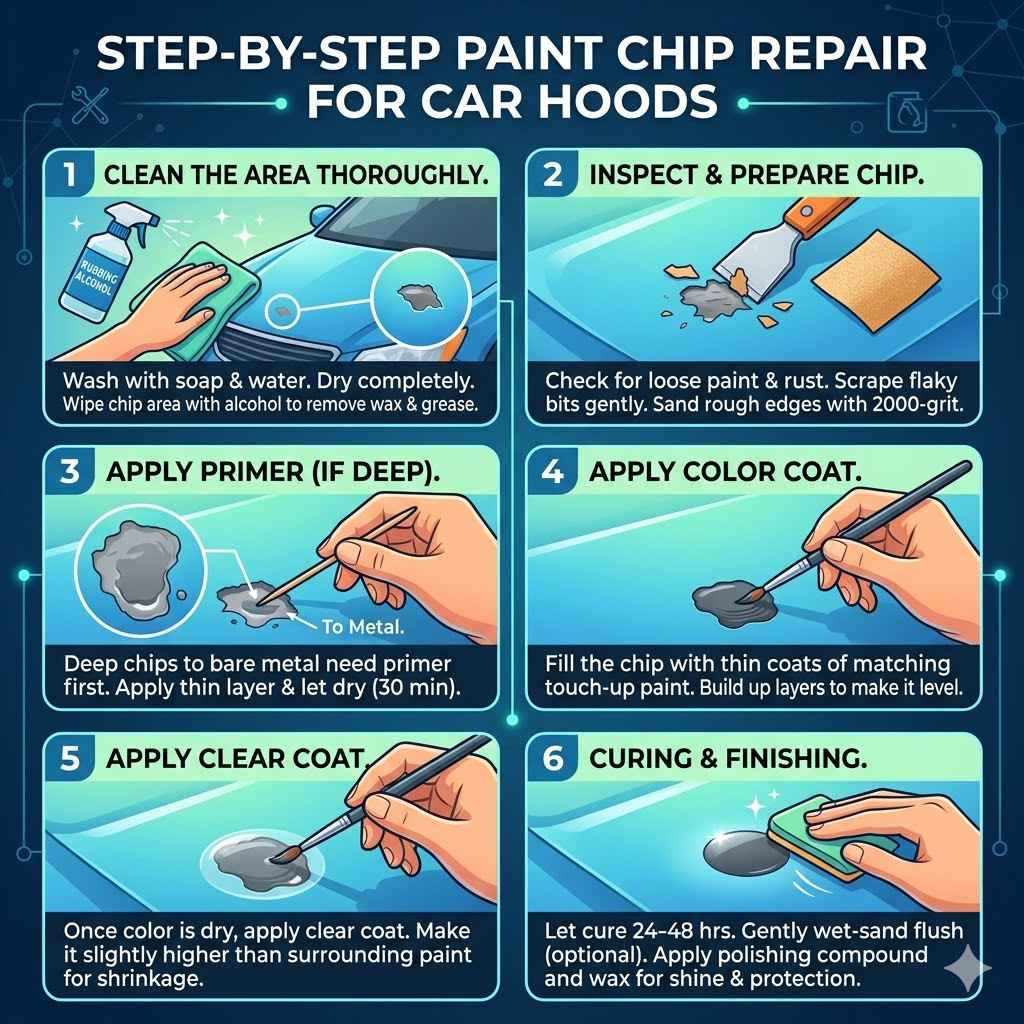
Step 1: Clean the Area Thoroughly
Start by washing the entire hood. Use car wash soap and water. Rinse it well.
Then, dry it completely with a clean microfiber cloth. Now, focus on the chipped area. Spray some rubbing alcohol or wax and grease remover onto a microfiber cloth.
Gently wipe the chip and the area around it. You want it to be spotless. No dirt, dust, or oil should be present.
This is critical for good adhesion.
Step 2: Inspect and Prepare the Chip
Look closely at the chip. Is there any loose paint around it? If so, you need to remove it.
You can use a sharp hobby knife or a tiny scraper. Be very gentle. You only want to remove flaky bits.
You don’t want to damage the surrounding good paint. If there’s any rust visible, you need to address that first. For minor rust, you can try a rust remover.
For significant rust, it’s a bigger job.
Sometimes, the edges of the chip are rough. You can lightly wet-sand these edges. Use your 2000-grit sandpaper.
Dip it in water first. Gently rub the edges. This creates a smoother surface.
Then, clean the area again with alcohol. Make sure no dust from sanding remains.
Step 3: Apply Primer (If Needed)
If the chip is deep and went down to the metal, primer is a good idea. Shake your primer bottle well. Use a toothpick or a very fine brush.
Apply a tiny amount of primer to the bottom of the chip. You’re filling the hole. Don’t paint outside the chip.
Let the primer dry completely. Check the product instructions for drying times. It might take 30 minutes or more.
Step 4: Apply the Color Coat
Now for the color. Shake your touch-up paint bottle very well. If using a pen, follow its instructions.
If using a small brush, pour a little paint into your small container. Use a toothpick or the fine brush. Dip it lightly into the paint.
Touch the tip to the chip. You want to fill the chip with paint. Build up thin layers.
Don’t try to fill it all at once. Let each layer dry slightly before adding another. It’s better to do 2-3 thin coats than one thick one.
The goal is to make the paint level with the surrounding paint. This takes patience. Overfilling can create a bump.
Underfilling leaves a low spot. Work slowly. Add paint little by little.
Let each coat dry for at least 20-30 minutes. You can use a bright light to see if the chip is filled. You want the color to match the rest of the car.
Step 5: Apply the Clear Coat
Once the color coat is fully dry, it’s time for the clear coat. This is important for protection and shine. Shake the clear coat bottle well.
Use the same method as the color coat. Apply thin layers of clear coat. You want to build it up.
It should be slightly higher than the color coat at first. This is because it will shrink a little as it dries.
The clear coat seals the color. It protects it from the elements. It also adds that glossy finish.
Let the clear coat dry completely. This can take several hours. For best results, let it cure overnight.
Step 6: Curing and Finishing
After the clear coat has dried, you might notice a slight bump. The paint might not be perfectly smooth. You can gently wet-sand it.
Use your fine-grit sandpaper again. Dip it in water. Gently sand the clear coat.
You’re trying to level it with the original paint. Be very careful not to sand through the clear coat or the color coat.
After sanding, clean the area again. Then, you can apply a polishing compound. Use a clean microfiber cloth.
This will bring back the shine. Finally, apply a coat of car wax. This adds extra protection.
It will make the repair blend in even better.
Quick Chip Repair Checklist
Before You Start:
1. Clean: Wash and dry the entire hood. Use alcohol on the chip area.
2. Prep: Remove loose paint. Gently sand rough edges if needed.
3. Prime: Apply thin primer layers into the chip if it’s deep.
4. Color: Fill the chip with thin layers of matching touch-up paint.
5. Clear Coat: Apply thin layers of clear coat over the color.
6. Finish: Let it cure. Gently wet-sand and polish if needed.
Dealing with Rust
What if you find rust when you inspect the chip? This is a more serious situation. Rust means the metal is already damaged.
You can’t just paint over rust. It needs to be removed first. If left untreated, it will spread.
It will eat away more metal. This can create holes.
For very small spots of rust, you might be able to handle it yourself. You’ll need a rust remover product. These are usually acidic.
They eat away at the rust. Follow the product instructions carefully. You’ll likely need to apply it.
Let it sit for a bit. Then, gently scrub the rust away. You might need to repeat this process.
After removing the rust, you must clean the area thoroughly. Any rust remover residue can cause problems. Rinse well.
Then, use alcohol or a wax and grease remover. You need to get down to bare, clean metal. Once clean, you must prime immediately.
Priming seals the bare metal. It prevents new rust from forming. You would then follow the steps for primer, color, and clear coat as usual.
If the rust is widespread or deep, it’s often best to go to a professional. A body shop can properly remove rust. They can use tools like wire brushes or even sandblasting for larger areas.
They can also repair any metal damage. Trying to fix severe rust yourself can be difficult. It might not last.
It could end up costing more in the long run.
When to Call a Professional
While DIY touch-up paint is great for small chips, some situations call for an expert. If the chips are very large, it’s harder to get a seamless repair. Small chips are easier to blend in.
Large ones can create noticeable patches.
Deep scratches that go along with the chip are also a sign to get professional help. If the scratch is more than just through the clear coat, it needs careful attention. A professional can properly fill and smooth these deep marks.
As we discussed, significant rust is a clear indicator. If the rust has spread under the paint or created holes, a body shop is needed. They have the tools and materials to repair the metal itself.
They can also ensure all traces of rust are gone.
If you’re not confident in your abilities, it’s okay to seek help. A professional auto body shop has the skills and equipment for a perfect finish. They can match your paint precisely.
They can also ensure the repair is durable and protects your car from future damage.
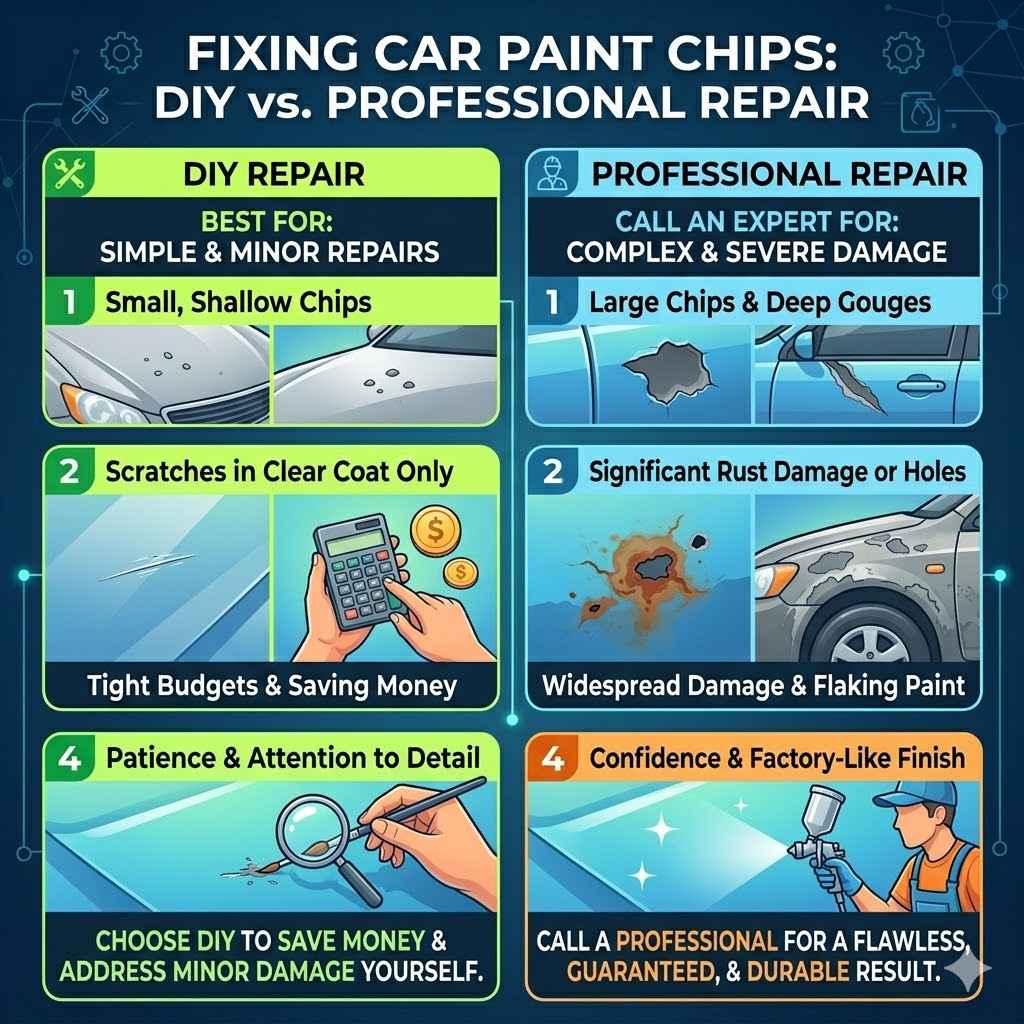
DIY vs. Professional Repair
DIY is best for:
- Small, shallow paint chips.
- Scratches that only go through the clear coat.
- When you want to save money on minor repairs.
- When you have patience and attention to detail.
Call a professional for:
- Large chips or deep gouges.
- Significant rust damage or holes in the metal.
- When the original paint is heavily damaged or peeling.
- When you want a flawless, factory-like finish.
- When you lack confidence or time for DIY.
Maintaining Your Car’s Paint
Fixing chips is great, but preventing them is even better. Taking good care of your car’s paint can reduce the number of chips you get. Regular washing is key.
It removes dirt and grit. These can scratch the paint or hide minor damage.
Waxing your car regularly is also very important. A good coat of wax adds a protective layer. This layer acts like a shield.
It can absorb some of the impact from small stones. It also makes the paint more resistant to environmental damage. Aim to wax your car at least twice a year.
More often is even better, especially if your car is exposed to harsh weather.
Be mindful when parking. Try to avoid parking too close to other cars. This reduces the risk of door dings.
Also, avoid parking under trees that drop sap or bird droppings. These can eat into your paint if not cleaned off quickly. If you notice sap or droppings, clean them off as soon as possible.
Consider paint protection film (PPF). This is a clear, thin film applied to high-impact areas. The front bumper, hood, and mirrors are common places.
It’s a more significant investment. But it offers excellent protection against stone chips and scratches. It’s almost invisible once applied.
Driving habits matter too. Try to avoid driving too close to trucks or other vehicles on the highway. They often kick up more debris.
Stick to the right lane when possible. Give yourself space. This small habit can save your paint from many impacts.
Frequently Asked Questions
What is the best way to match touch-up paint?
The absolute best way is to use your car’s specific paint code. This code is usually found on a sticker in the driver’s side doorjamb, under the hood, or in the glove box. You can then order touch-up paint online or at an auto parts store using this code.
If you can’t find the code, the dealership can usually look it up for you with your car’s VIN (Vehicle Identification Number).
Can I fix a chip if it has started to rust?
Yes, but it requires more work. First, you must remove all traces of rust. You can use a rust remover product or gently sand the rusted area down to clean metal.
Once the rust is gone and the area is clean, you need to apply primer immediately to protect the bare metal. Then, you can proceed with the color coat and clear coat as usual.
How many coats of touch-up paint do I need?
This depends on the depth of the chip. For most chips, 2 to 3 thin coats of color paint are usually enough to fill the chip and match the surrounding paint level. It’s always better to apply multiple thin coats than one thick coat.
Let each coat dry for at least 20-30 minutes before applying the next. This prevents runs and ensures a smooth finish.
Will the repair be invisible?
For very small, shallow chips, a careful DIY repair can be nearly invisible. However, it’s difficult to achieve a perfect, factory-like finish at home. Professional detailers and body shops have specialized tools and techniques to make repairs much less noticeable.
The goal of DIY is usually to prevent rust and improve the overall look, not necessarily to make the chip vanish completely.
How long does touch-up paint take to dry and cure?
Drying times vary by product and humidity. For touch-up paint and primer, expect at least 20-30 minutes between thin coats. The clear coat may need several hours to dry to the touch.
For the repair to fully cure and harden, it can take 24 hours or even longer. It’s best to let it cure for at least 24-48 hours before washing the car or waxing the area.
What’s the difference between touch-up paint and a spray can?
Touch-up paint, often in a pen or small bottle with a brush, is for very small, precise repairs like individual chips. Spray cans are for larger areas, like repainting a whole panel. For chips on your car hood, the touch-up pen or small bottle is usually the correct choice.
It gives you better control to avoid painting areas you don’t want painted.
Conclusion
Seeing a chip on your car hood can be disheartening. But remember, it’s usually a fixable problem. By understanding why chips happen and how to repair them, you can protect your car.
Taking care of these small issues prevents bigger ones, like rust. It also keeps your car looking great. Don’t let those chips spread.
With the right tools and a little effort, you can restore your car’s finish. It’s a small task that makes a big difference.