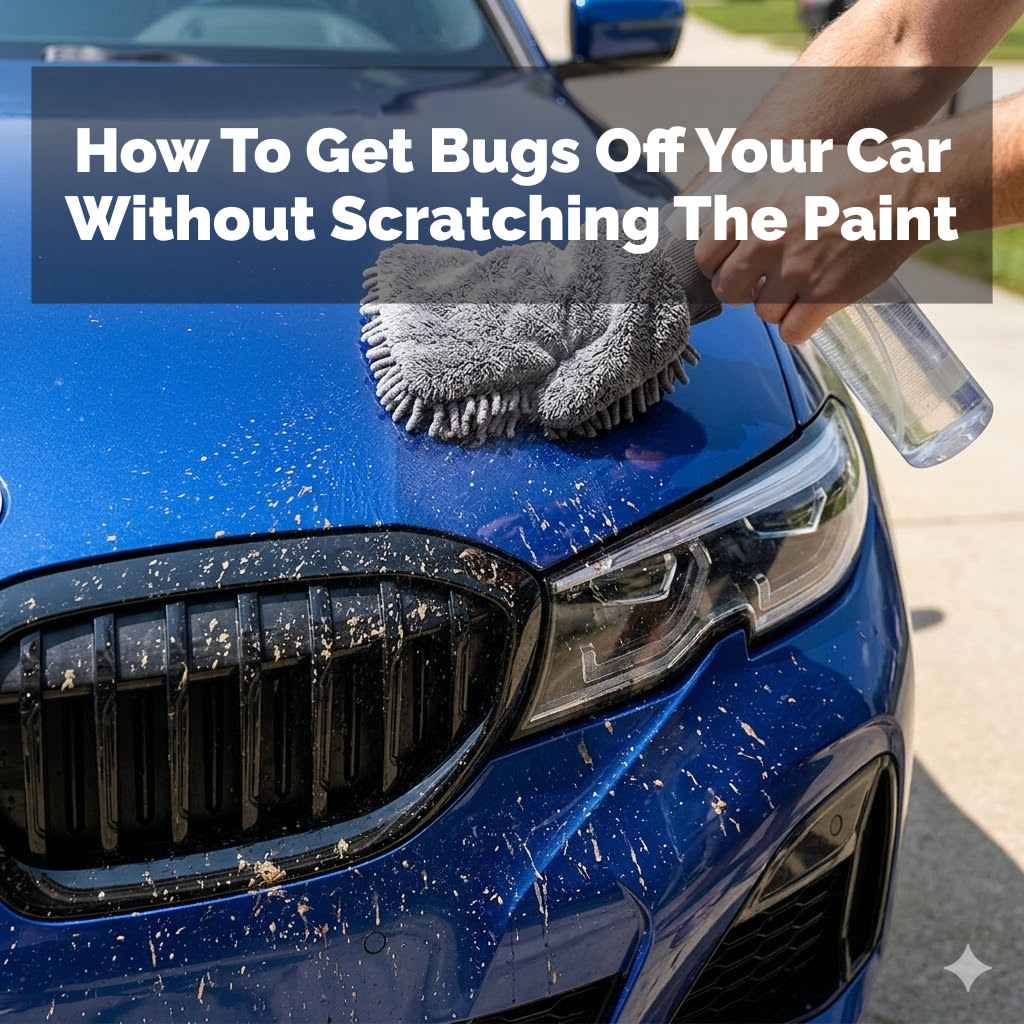
How To Get Bugs Off Your Car Without Scratching The Paint
It’s one of those things that just happens. You’re driving, maybe on a lovely country road, and then bam! Your car’s front end looks like a bug crime scene.
Those tiny splatters can be really tough to get off. Worse, many people end up scratching their car’s paint trying to clean them. That’s why understanding the right way to tackle bug splatter is super important for keeping your car looking its best.
Bug splatters on car paint are tough to remove without causing scratches. The best methods involve gentle cleaning, using the right tools and cleaning solutions, and working patiently to avoid damaging the clear coat.
What Are Bug Splatters and Why Are They So Stubborn?
Bug splatters are the unfortunate remains of insects that meet your vehicle while you’re driving. They are mostly made up of insect bodies and bodily fluids. These can include proteins, fats, and sugars.
When bugs hit your car at speed, they leave behind sticky residue. This residue hardens quickly, especially in warm weather.
The stubbornness comes from a few things. The sticky nature of the bug’s body helps it adhere to the surface. Heat from the sun bakes this residue onto the paint.
This makes it harder to lift off. Think of it like trying to remove dried-on food from a plate. The longer it sits, the tougher it gets.
Bug guts can also be acidic. This means they can start to etch into your car’s clear coat if left too long. This etching is what makes them so hard to just wipe away.
My Own Bug Battle: A Lesson Learned the Hard Way
I remember one spring road trip vividly. The windows were clean, the sky was blue, and I was feeling great. Then, we hit a stretch of highway known for its swarms of lovebugs.
By the time we reached our destination, my car looked like it had been attacked by a swarm of tiny, messy invaders. The front bumper, hood, and even the windshield were covered. I thought, “No big deal, a quick wash will fix this.”
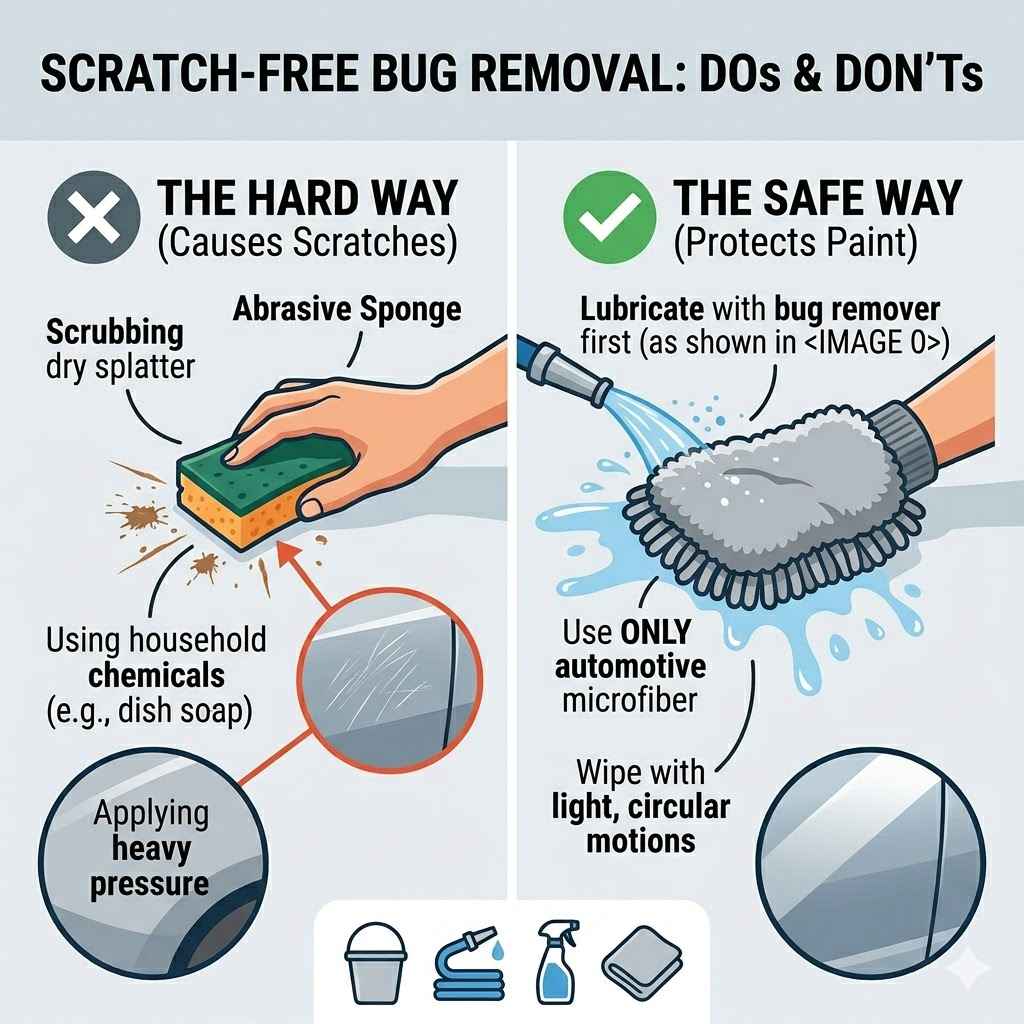
So, I grabbed a sponge and some dish soap. I started scrubbing pretty hard, trying to get those dried-on bug guts off. That’s when I noticed it.
Tiny, faint scratches appearing in the paint where I was scrubbing. My heart sank. I had just turned a bug problem into a paint problem.
The sponge was too harsh, and the dried bug residue was acting like sandpaper under it. It was a wake-up call. I learned that day that speed and brute force are not the answer for delicate car paint.
Patience and the right touch are key.
Understanding Bug Anatomy on Your Paint
What’s in a bug splatter?
- Exoskeleton bits: Tiny pieces of the bug’s outer shell.
- Proteins and Fats: These are sticky and hard to dissolve.
- Acids: Some insect fluids can be acidic.
- Dried sugars: These make the residue hard and crusty.
This mix is why a simple wipe often doesn’t work. It needs a specific approach.
The Gentle Approach: Why It Works Best
The main goal is to loosen and lift the bug residue without scrubbing. Harsh scrubbing can damage the paint. It can create swirl marks or deep scratches.
The clear coat, the protective layer on your car’s paint, is thin. It’s easily damaged by abrasive materials or aggressive cleaning.
A gentle approach uses the right cleaning agents. These agents break down the sticky proteins and fats. It also uses soft materials.
These materials lift the residue without scratching. Think of soaking something tough in water. The water softens it.
Then, it’s easier to remove. The same principle applies to bug splatters. You want to soften them up first.
Gathering Your Bug-Busting Arsenal
Before you even think about touching your car, gather the right supplies. Having everything ready makes the process smoother. It also ensures you have what you need to be gentle.
You’ll need a few key items. First, a good quality bug and tar remover. These are specifically designed to break down bug guts safely.
You can find them at auto parts stores. Next, plenty of soft microfiber towels. These are crucial.
They are much softer than sponges or regular rags. They trap dirt and grit, preventing scratches. A bucket of soapy water is also useful.
Use a pH-neutral car wash soap. This is different from dish soap. Dish soap can strip wax from your car.
A spray bottle with water can help. You might also want a bug sponge. This is a special sponge with a very soft, open-cell foam.
It’s designed to hold cleaning solution. And it’s gentle on paint. Lastly, a detailer spray.
This helps to rinse and add a bit of protection.
Essential Tools for Bug Removal
- Bug & Tar Remover: The star player.
- Microfiber Towels: Lots of them.
- pH-Neutral Car Wash Soap: For general washing.
- Two Buckets: One for soapy water, one for rinsing.
- Soft Bug Sponge (Optional): A gentle scrubber.
- Detailer Spray: For finishing.
- Spray Bottle with Water: For rinsing specific spots.
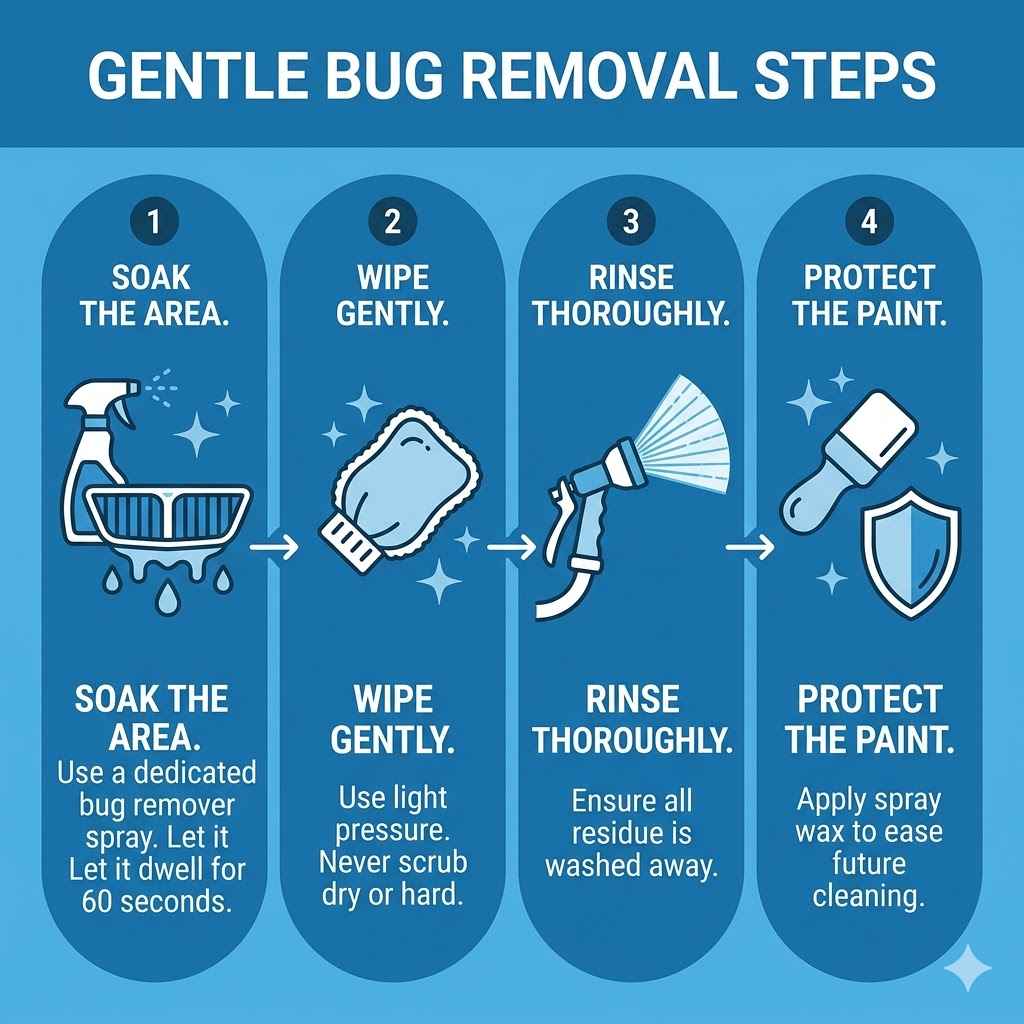
Step-by-Step: The Safe Way to Remove Bugs
Here’s how to tackle those pesky bug splatters without harming your car’s paint. Patience is key throughout this process.
1. Pre-Rinse Your Car
Start by giving your car a good rinse with plain water. This removes loose dirt and debris. This is important.
Any grit left on the surface could cause scratches during the next steps. A hose with a gentle spray is perfect for this. Don’t blast it with a pressure washer.
2. Apply Bug and Tar Remover
Now, spray the bug and tar remover directly onto the affected areas. Make sure the surface is cool. Don’t do this in direct sunlight.
The remover can dry too quickly. Let it sit for the time recommended on the product label. Usually, this is a few minutes.
This allows the chemicals to start breaking down the bug residue.
Pro Tip: If you don’t have bug remover, a 50/50 mix of Isopropyl alcohol and water can work in a pinch. Test it on an inconspicuous spot first. Some paint finishes might react to alcohol.
3. Gently Agitate
After the remover has had time to work, it’s time for gentle agitation. Use a damp microfiber towel or a specialized bug sponge. Lightly dab or wipe the bug splatters.
You’re not scrubbing hard. You’re letting the remover do the heavy lifting. If some bugs are still stuck, spray more remover.
Let it soak again.
Avoid circular motions. Instead, use back-and-forth or up-and-down strokes. This helps prevent creating swirl marks.
Rinse your sponge or towel often in your clean water bucket. This ensures you’re not rubbing grit back onto the paint.
4. Rinse Thoroughly
Once the bugs are removed, rinse the area thoroughly with clean water. Make sure all the bug remover and loosened residue are washed away. Any leftover remover could potentially harm the paint over time.
Use your hose to ensure a complete rinse.
5. Wash the Car
After treating the bug spots, it’s a good idea to wash the entire car. Use your car wash soap and the two-bucket method. One bucket has soapy water.
The other has clean rinse water. Dip your wash mitt into the soap. Wash a section.
Then, rinse the mitt in the clean water bucket. This prevents transferring dirt back onto the car. This gives your car a uniform clean look.
6. Dry Carefully
Drying is just as important as washing. Use clean, dry microfiber towels. Gently blot or glide the towel over the surface.
Don’t rub hard. Start from the top of the car and work your way down. This ensures water doesn’t drip onto already dried areas.
You might need several towels. Wring them out as they get damp.
Quick-Scan Bug Removal Checklist
| Step | Action | Why it’s Important |
| 1. Rinse | Spray car with water. | Remove loose dirt. |
| 2. Apply Remover | Spray bug remover on spots. | Loosen bug guts. |
| 3. Agitate Gently | Dab with soft towel/sponge. | Lift softened residue. |
| 4. Rinse | Wash away remover. | Prevent paint damage. |
| 5. Wash Car | Full wash with soap. | Uniform clean. |
| 6. Dry | Blot with microfiber. | Prevent water spots/scratches. |
What If Bugs Are Really Stuck?
Sometimes, bugs are baked on so hard they seem impossible to remove. Don’t despair. There are a few extra steps you can take.
The key is always more soaking time and less scrubbing force.
Extended Soaking: For very stubborn bugs, you might need to let the bug and tar remover sit for longer. Keep an eye on it. You don’t want it to dry out.
You can lightly mist it with water if needed. Some detailers even recommend using bug remover soaked towels or even paper towels. You place these directly on the bug splatters.
This keeps the remover active on the surface.
Bug Sponge Technique: A dedicated bug sponge has a very open cell structure. This means it holds a lot of cleaner. It also has a texture that helps lift residue.
When using it, use very light pressure. Let the sponge and the cleaner do the work. Imagine you are gently coaxing the bug off, not scraping it.
Clay Bar Treatment: If chemical removers and gentle wiping don’t work, a clay bar might be your next step. A clay bar is a synthetic polymer. It safely lifts contaminants from the paint surface.
You’ll need a clay lubricant too. This is usually a detailer spray. Work in small sections.
Glide the clay bar over the lubricated surface. It will pick up the bug residue. This method is very effective but requires care.
Always follow the clay bar with a wax or sealant to protect the paint.
Stubborn Bug Solutions
Challenge: Bugs baked on HARD.
Solutions:
- Longer Soak: Let bug remover work longer. Mist with water to keep it wet.
- Soaked Towels: Place wet towels on bug spots.
- Bug Sponge: Use with light pressure.
- Clay Bar: For very tough, etched-on spots. Requires lube.
Remember: More soaking, less scrubbing. Always re-protect paint after claying.
What to Absolutely Avoid
Some common mistakes can turn a simple bug cleaning into a paint disaster. Knowing these pitfalls can save you a lot of headaches and money.
Dish Soap: As mentioned, dish soap is designed to cut grease. It can also strip away your car’s wax or sealant. This leaves the paint unprotected.
Stick to dedicated car wash soaps. They are formulated to be safe for your car’s finish.
Abrasive Sponges or Scrapers: Never use kitchen sponges, steel wool, or plastic scrapers. These are far too harsh. They will scratch your paint.
Even a stiff brush can do damage. Always opt for soft microfiber materials.
Dry Wiping: Never try to wipe off dry bugs from a dry car. This is like dry-sanding your paint. You will create swirl marks.
Always use a liquid remover or plenty of water to lubricate the surface before wiping.
Automatic Car Washes with Brushes: Some automatic car washes use big brushes. These brushes can be abrasive and carry dirt from other cars. They are notorious for causing swirl marks and scratches, especially on darker paint colors.
If you must use an automatic wash, opt for touchless versions.
Wiping with Paper Towels: Paper towels are surprisingly abrasive. They can leave fine scratches. They also don’t hold moisture well, leading to dry wiping issues.
“Don’t Do This” List
- DO NOT use dish soap.
- DO NOT use abrasive sponges or brushes.
- DO NOT wipe dry bugs off a dry car.
- DO NOT use harsh scrapers or steel wool.
- DO NOT rely on aggressive automatic car washes.
Stick to gentle, approved methods.
When Bugs Turn into Etching: A Deeper Concern
Sometimes, bug residue can do more than just stick to your paint. It can start to eat into the clear coat. This is called etching.
Bug guts can be acidic. If left on the paint for too long, especially in hot weather, they can cause permanent damage. This looks like dull spots or rings on your paint.
The longer the bugs sit, the higher the risk of etching. This is why it’s important to remove them as soon as possible after you notice them. If you see dull spots after removing bugs, it means etching has occurred.
In this case, a simple wash won’t fix it. You might need a paint correction. This involves compounding and polishing the paint to remove the damaged layer.
This is where professional help might be needed.
Regular waxing or applying a ceramic coating helps protect your paint. It creates a barrier. This barrier makes it harder for bugs to stick.
It also makes them easier to wash off before they can etch. It adds a layer of defense against these common contaminants.
Etching vs. Simple Grime
Simple Grime: Sticky residue that can be wiped off with remover and gentle wiping.
Etching: Acidic damage that dulls or burns into the clear coat. Leaves a mark even after the bug is gone.
Prevention is Key: Keep paint protected with wax or sealant.
Preventing Bug Splatter Buildup
The best way to deal with bug splatters is to prevent them from becoming a major problem. A few simple habits can make a big difference.
Regular Washing
Washing your car regularly is the first line of defense. If you live in an area with lots of bugs, wash your car more often. Don’t let bugs sit on the paint for weeks.
A quick wash every week or two can prevent them from hardening.
Protective Coatings
Applying a good quality car wax or sealant is essential. These products create a smooth, slick barrier on your paint. Bugs have a harder time sticking to a slick surface.
They are also much easier to wash off. A ceramic coating offers even more protection and durability. These coatings last longer than traditional waxes.
Consider a spray wax or quick detailer for in-between washes. If you notice a few bugs after a drive, a quick spray and wipe with a microfiber towel can save you a lot of trouble later. Always make sure the towel is clean and damp.
Front-End Protection
Some drivers choose to use protective films. These are clear, urethane films applied to the most exposed parts of the car. This includes the front bumper, hood, and fenders.
This film acts as a sacrificial layer. Bugs hit the film, not your paint. The film can be cleaned or replaced if it gets too damaged.
Another simple option is a car bra or cover. However, some of these can trap dirt. This can cause scratches if not used carefully.
Research different options to find what works best for your car and lifestyle.
Bug Prevention Strategies
- Wash Often: Don’t let bugs bake on.
- Wax/Sealant: Create a slick, protective layer.
- Ceramic Coating: Long-lasting, robust protection.
- Quick Detailer: Wipe off fresh bugs immediately.
- Protective Film: Sacrificial layer on front end.
When to Seek Professional Help
Most bug splatters can be handled with the methods we’ve discussed. However, there are times when professional help is the best option. If you notice deep scratches or etching that you can’t fix, it’s time to call a detailer.
They have specialized tools and compounds. These can remove deeper damage from the paint surface.
If your car has a very delicate paint finish, like a matte or satin clear coat, you might want to be extra cautious. Professionals know how to handle these finishes without causing damage. They can also apply durable protective coatings like ceramic pro options.
Don’t let the fear of scratching your car prevent you from cleaning it. With the right knowledge and tools, you can keep your car looking its best. It’s all about being gentle and using products designed for the job.
Remember my lesson: patience and soft materials win the battle against bug splatter.
Frequently Asked Questions About Bug Removal
Can I use a pressure washer to remove bugs?
While pressure washers can be useful for rinsing, they should be used with caution. A high-pressure stream directly on bug splatters could potentially damage the paint or push debris into seals. It’s better to use a standard garden hose for rinsing and rely on cleaning solutions and soft materials for the actual bug removal.
How long can bugs stay on my car before they damage the paint?
This varies greatly. In cool, humid weather, bugs might not cause damage for several days. However, in hot, direct sunlight, bugs can start to etch into the clear coat within hours.
It’s always best to remove them as soon as you notice them to minimize any risk.
Is it safe to use bug and tar remover on my car’s plastic trim?
Most bug and tar removers are safe for painted surfaces and glass. However, they can sometimes dull or discolor unpainted plastic trim. It’s a good idea to test the remover on a small, inconspicuous area of the plastic first.
If you’re unsure, it’s better to avoid spraying it directly onto plastic trim.
My car is new. Should I still worry about bug splatters?
Yes, absolutely! Even new cars have paint that can be damaged by bug residue. New cars often have excellent paint, but it’s still susceptible to etching and scratching.
Keeping up with regular washing and protection from the start is crucial for maintaining its pristine condition.
Can I use household cleaners like Windex on bug splatters?
Windex and other glass cleaners are generally not recommended for removing bug splatters from paint. They are designed for glass and may contain ammonia or other chemicals that can harm your car’s clear coat or wax. Always use products specifically designed for automotive paint care.
What is the difference between a bug sponge and a regular car wash sponge?
A dedicated bug sponge usually has a much more open, porous cell structure. This allows it to hold a lot of cleaning solution and lift contaminants effectively. Regular car wash sponges can be denser and may trap dirt more easily, increasing the risk of scratching.
Always use the softest applicator possible.
Final Thoughts on Bug-Free Driving
Dealing with bug splatter might seem like a small annoyance. But it’s a common car care challenge. By using the right gentle methods and products, you can keep your car’s paint looking shiny.
Remember to always prioritize soft materials and gentle techniques. A little care now saves a lot of paint correction work later. Happy detailing!