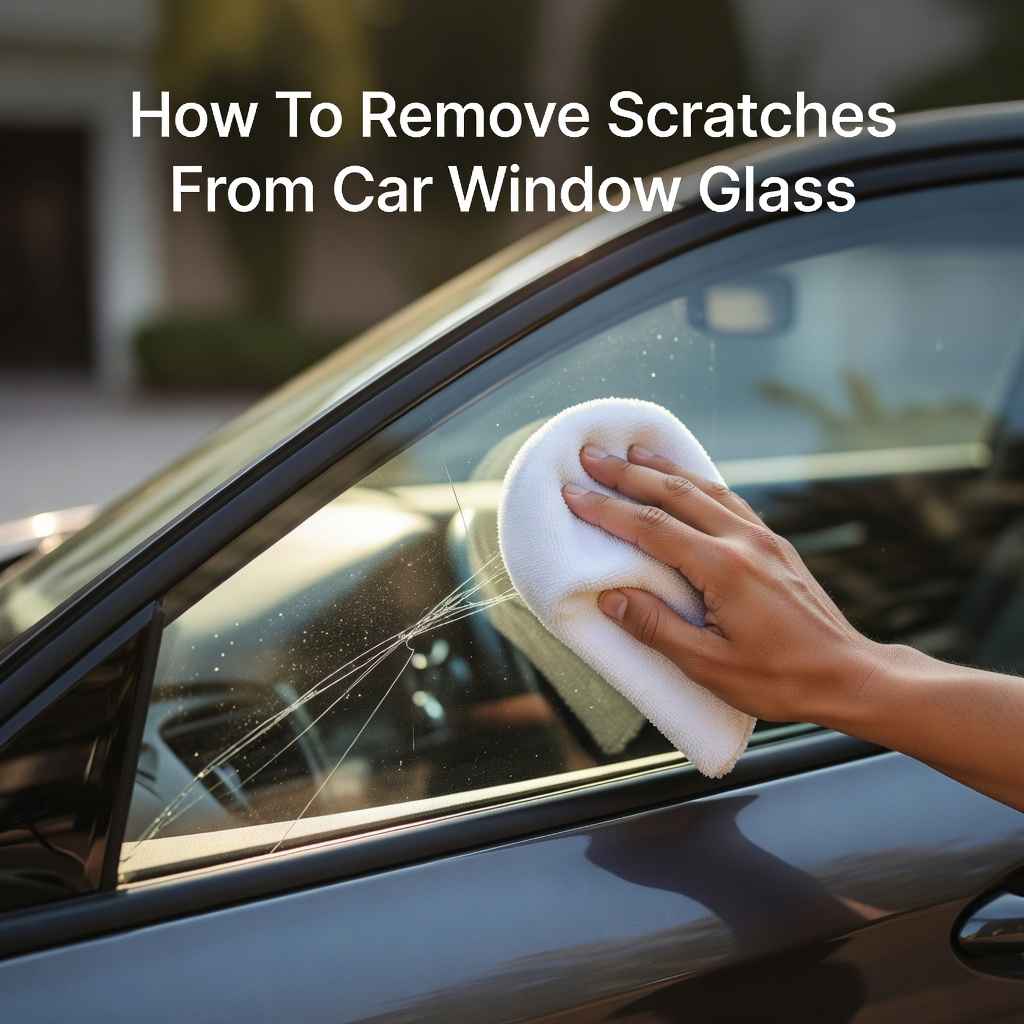
How To Remove Scratches From Car Window Glass
It’s frustrating when your car window gets scratched. These marks can be annoying to look at and sometimes even make it hard to see clearly. For many car owners, learning How to Remove Scratches from Car Window Glass can seem tricky, especially if you’ve never done it before.
Don’t worry! We’ll walk you through simple steps to fix those glass imperfections. You’ll be able to get your windows looking great again with easy-to-follow guidance.
Understanding Car Window Glass Scratches
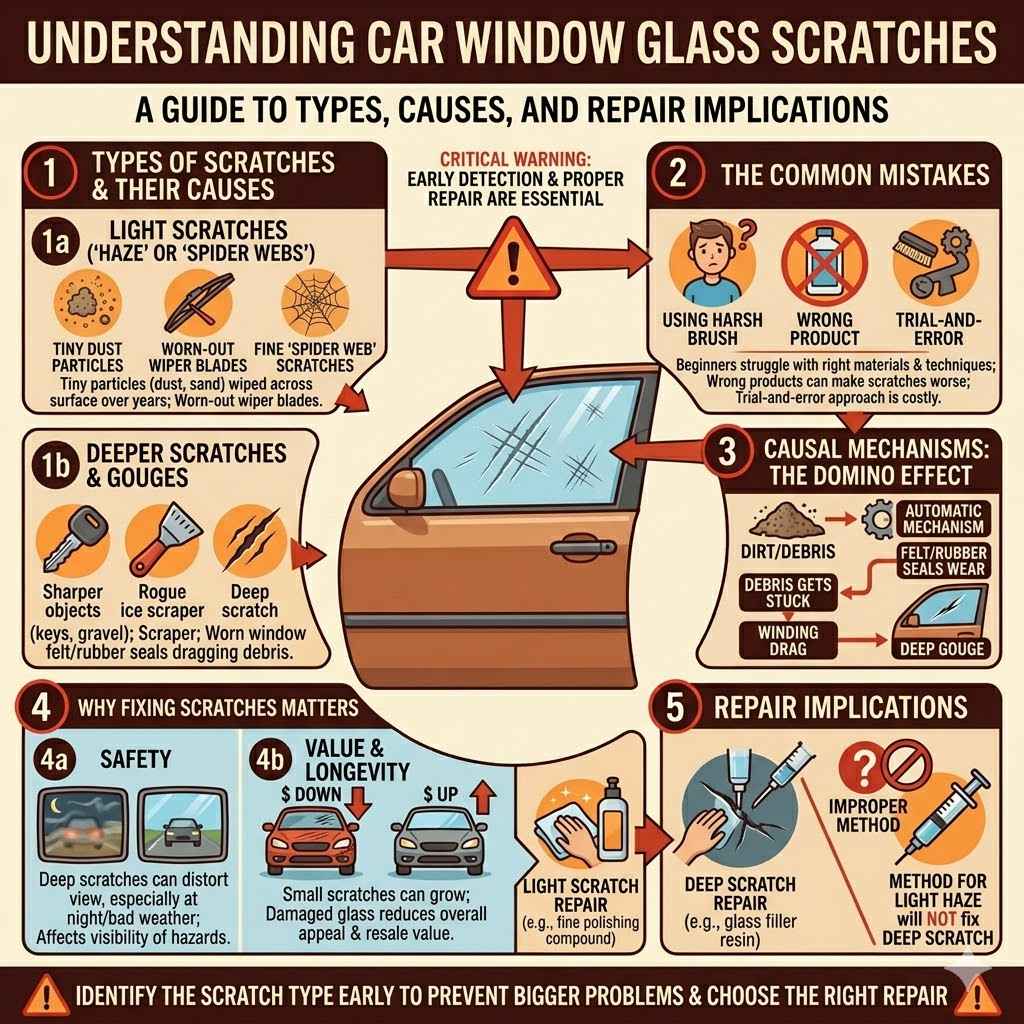
Car window glass scratches are marks or abrasions on the surface of your vehicle’s windows. They can range from very light hairline scratches to deeper gouges. These often happen from everyday use, like when automatic window mechanisms get dirt or debris stuck, or from improper cleaning.
Sometimes, a rogue ice scraper or even just a speck of grit can cause a scratch. The type and depth of the scratch will determine how easy it is to fix.
When you try to fix these, beginners often struggle because they don’t know the right materials or techniques. Using the wrong product could even make the scratch worse or damage the glass further. It’s like trying to fix a small tear in fabric with a huge needle; it just doesn’t work well.
This guide aims to simplify the process.
Types of Scratches and Their Causes
Car window scratches fall into a few main categories. Light scratches, often called “spider webs” or “haze,” are usually caused by years of tiny particles like dust and sand being wiped across the glass during cleaning or by a worn-out wiper blade. These are generally the easiest to repair.
Deeper scratches are more noticeable and feel rough to the touch. These can happen from sharper objects, like a key or a piece of gravel, accidentally hitting the glass. They can also result from a failing window regulator dragging a piece of dirt or metal across the glass.
Sometimes, the felt or rubber seals around the window can wear out, allowing grit to get in and cause damage.
Another common cause is the use of abrasive cleaning tools or chemicals. Using a harsh brush or a gritty cloth can create fine scratches over time. Even parking near construction sites can expose your car windows to airborne debris that might cause minor abrasions.
The challenge for beginners is identifying the scratch type and then picking the right repair method. A method that works for a light haze might not even touch a deeper scratch. This means a trial-and-error approach can be costly and frustrating.
Why Fixing Scratches Matters
Fixing scratches is not just about looks, though a clear window does make your car look much better. Safety is also a key reason. Deep scratches can distort your view, especially at night or in bad weather.
This can be dangerous, affecting your ability to see pedestrians, other vehicles, or road hazards clearly.
Furthermore, small scratches can sometimes grow or worsen over time if left untreated, especially if they are on the inside of the window where they are exposed to more friction from cleaning or from passengers’ hands. Addressing them early can prevent them from becoming bigger problems. It also protects the value of your car.
Nobody likes to see damaged glass, and it can detract from the overall appeal and resale value.
Common Scratch Removal Methods for Car Windows
There are several ways people try to fix scratches on car windows. Some are DIY methods using household items, while others involve specialized kits. The effectiveness of each method depends heavily on the depth and type of scratch.
For very light scratches, gentle polishing might be enough. This involves using a very mild abrasive to buff out the imperfection. However, if the scratch is too deep, this won’t work and could potentially make the surrounding glass hazy.
Many people turn to toothpaste. It contains mild abrasives that can sometimes help with surface scratches. Other common items include baking soda paste, metal polish, or even clear nail polish for tiny chips.
It’s important to note that these methods are usually only effective for very minor cosmetic damage.
Using Toothpaste for Light Scratches
Toothpaste can be a surprisingly effective tool for minor scratches on car windows. The key is to use a non-gel, white toothpaste. Gel toothpastes often lack the necessary fine abrasives.
Here’s how it works: The fine particles in the toothpaste act as a very gentle abrasive. When you rub it onto the scratch, these particles lightly polish the glass surface around the scratch. This can help to smooth out the edges of the scratch, making it less visible.
It essentially fills in the tiny imperfections with a polished layer of glass.
To use it, you’ll need a clean, soft cloth. Apply a small amount of toothpaste to the cloth and then gently rub it into the scratched area in a circular motion. Don’t press too hard.
After a minute or two, wipe away the excess toothpaste with a clean, damp cloth. You might need to repeat this process a few times for the best results.
It’s important to remember that this method is for very superficial scratches only. If you can feel the scratch with your fingernail, toothpaste is unlikely to help. It’s best for that hazy look or tiny scuffs that don’t go very deep into the glass.
Baking Soda Paste as a Mild Abrasive
Similar to toothpaste, baking soda is another common household item that can be used for mild scratch removal. Baking soda is a fine powder that, when mixed with water to form a paste, creates a mild abrasive solution.
The process is quite similar to using toothpaste. You mix baking soda with a little water until it forms a thick paste. This paste is then applied to a soft cloth and rubbed gently over the scratch.
The gentle abrasive action of the baking soda helps to buff out the very shallowest of imperfections in the glass.
After rubbing for a minute or two, you wipe away the paste with a damp cloth and then dry the area. For this method to be successful, the scratch must be very light, meaning you can’t feel it with your fingernail. It works by smoothing the surface of the glass, reducing the visibility of the scratch.
While effective for the most minor of issues, it’s crucial to understand that baking soda is a mild abrasive. Over-rubbing or using too much pressure can potentially create more micro-scratches or a slightly cloudy appearance on the glass, especially on newer or tinted windows. Always test in an inconspicuous area first if you’re unsure.
Metal Polish for Deeper Marks
When scratches are a bit more noticeable, a metal polish might be recommended by some DIY enthusiasts. Products like Brasso or similar metal polishes contain fine abrasives and chemicals that can sometimes buff out slightly deeper scratches than toothpaste or baking soda can handle.
The abrasive particles in metal polish are generally finer and more consistent than in toothpaste, allowing for a more controlled polishing action. The chemicals can also help to break down and lift away some of the abrasive material that causes the scratch.
Application usually involves applying a small amount of polish to a soft, lint-free cloth. The cloth is then used to rub the polish into the scratch in a circular motion, applying moderate pressure. After working the polish for a short period, you wipe away the residue with a clean cloth and then polish the glass to a shine with another clean cloth.
Metal polish can be more aggressive, so it’s vital to use it with caution. It’s best suited for glass that is not tinted, as it can potentially damage tinting films. Also, ensure the scratch isn’t so deep that it catches your fingernail significantly, as polish is not designed to fill deep gouges, only to abrade and smooth.
A real-life example comes from a car owner who had a cluster of light scratches on their driver’s side window from years of use. They tried toothpaste with little success. Switching to a mild metal polish, they carefully worked the area in small circles.
After several applications and buffing, the scratches became significantly less visible, improving their view without causing new damage.
Professional Scratch Removal and Prevention
While DIY methods can work for minor imperfections, sometimes you need more powerful solutions. Professional repair services offer a more reliable way to fix deeper scratches and prevent future damage.
These professionals use specialized tools and compounds that are far more effective than household items. They can often remove scratches that would be impossible to fix with simple polishing. Prevention is also key, and professionals can offer advice and treatments to keep your windows in top condition.
When to Call a Professional
You should consider calling a professional if the scratch is deep enough to catch your fingernail. This indicates that the glass has been significantly abraded, and DIY methods will likely not be sufficient. Trying to fix a deep scratch with a mild abrasive can actually make it worse by creating more hazing or micro-scratches around the damaged area.
Another sign is if you’ve tried DIY methods multiple times without seeing any improvement. This suggests the scratch is beyond the capabilities of simple polishes. Professionals have access to specialized abrasives and polishing compounds, as well as tools like glass polishing machines, which can effectively grind and polish the glass surface to remove the scratch.
Also, if the scratch is large or in your direct line of sight while driving, it’s worth getting it professionally repaired for safety reasons. A distorted view can be a serious hazard. Professionals can often restore the glass to near-original clarity.
They also have the expertise to handle different types of glass, including tinted or coated windows, without causing further damage.
Consider professional help if the window is tinted. DIY abrasives can easily damage the tint film, making the problem worse and more expensive to fix. Professionals can often work around or even repair tint damage in some cases, or replace the tint after repair.
The cost of professional repair is often less than replacing the entire window, making it a smart choice for significant damage.
Glass Polishing Compounds and Tools
Professional glass repair relies on advanced compounds and tools. These are designed to remove a thin layer of glass around the scratch, effectively leveling the surface. The most common abrasive used is cerium oxide.
This is a fine, powdery chemical compound that, when mixed with water and applied with a buffer, polishes glass to a clear finish.
Cerium oxide works by a combination of chemical and mechanical action. It creates a very smooth, uniform surface when used correctly. Professionals use specialized polishing pads, often made of felt or a similar material, attached to rotary or dual-action polishers.
These tools allow for consistent application of pressure and speed, which is critical for evenly removing glass without creating new distortion.
The process involves carefully applying the cerium oxide slurry to the scratched area. The polisher is then used at a controlled speed to work the slurry over the scratch. This process slowly grinds down the glass around the scratch until the surface is level again.
It requires skill and patience to avoid overheating the glass, which can cause further damage like star cracks or distortion.
Beyond cerium oxide, there are also diamond abrasive compounds available for very tough scratches or specific types of glass. These are typically used in industrial settings or by highly experienced technicians. The choice of abrasive and tool depends on the depth of the scratch and the type of glass being worked on.
A case study from a professional auto glass repair shop illustrates this. A customer brought in a car with a deep scratch on the windshield caused by a faulty wiper blade. The shop used a rotary polisher with a felt pad and a cerium oxide slurry.
After several hours of careful work, the scratch was completely removed, and the windshield was as clear as new. The customer saved the cost of a new windshield, which would have been several hundred dollars.
Preventing Future Scratches
Prevention is always better than cure. Protecting your car windows from scratches in the first place will save you time, effort, and money. One of the most effective ways to prevent scratches is by maintaining your wiper blades.
Wiper blades can become hardened and cracked over time, especially in extreme weather. When this happens, the rubber edge can become stiff and gritty, picking up dirt and sand that will then be dragged across your windshield every time you use them. Regularly inspect your wiper blades for damage and replace them at the first sign of wear, usually every 6-12 months.
Ensure they are sitting flush against the glass and wiping cleanly.
When cleaning your car windows, always use clean, soft cloths, like microfiber towels. Avoid using paper towels or abrasive sponges, as these can easily scratch the glass. Also, use a quality glass cleaner designed for automotive use.
Spray the cleaner onto the cloth, not directly onto the window, to prevent overspray from getting into other areas of the car.
Be careful when using ice scrapers in winter. Opt for plastic scrapers with rubber edges rather than metal ones. Never use a credit card or other hard objects to try and remove ice or debris, as these can easily scratch the glass.
If you park your car in an area prone to dust or debris, consider using a car cover when the vehicle is not in use.
Some car owners also opt for applying a protective film or coating to their windows. These can add a sacrificial layer that absorbs minor abrasions, protecting the actual glass underneath. These films are similar to paint protection films for your car’s body and can be quite effective for high-risk areas.
A statistic from an auto detailing survey found that approximately 60% of window scratches are caused by improper cleaning techniques or worn-out wiper blades. This highlights how simple preventative measures can make a significant difference.
DIY Scratch Repair Kits
For those who prefer a more structured DIY approach, numerous scratch repair kits are available. These kits typically contain a set of specialized compounds and tools designed to tackle scratches on glass.
The contents of these kits can vary, but they often include polishing pastes, abrasive pads, and application cloths. Some advanced kits might even include a small drill attachment or a manual polisher. The goal is to provide everything a car owner needs to attempt a repair at home.
What’s Inside a Typical Kit
A common DIY scratch repair kit for car windows will usually contain:
- Cerium Oxide Powder: This is the primary abrasive agent. It’s a fine white powder that, when mixed with water, creates a polishing slurry.
- Applicator Pads: These are often small felt or foam pads that attach to a drill or are used by hand. They help to evenly distribute the cerium oxide.
- Microfiber Cloths: For cleaning and buffing the glass before, during, and after the polishing process.
- Water Spray Bottle: To keep the polishing area moist and prevent the cerium oxide from drying out.
- Instructions: A guide on how to use the kit.
Some kits might also include a plastic scraper for removing stubborn residue, or a polishing compound that is less abrasive and meant for finishing. The quality of the components can vary greatly between brands, so it’s wise to read reviews before purchasing.
The instructions are usually step-by-step, guiding the user through cleaning the glass, mixing the cerium oxide, applying it with the pad, and polishing the scratch. The amount of cerium oxide and the duration of polishing will depend on the depth of the scratch. It’s a process that requires patience and a light touch.
How to Use a Repair Kit Effectively
Using a DIY scratch repair kit effectively involves careful preparation and execution. First, thoroughly clean the area around the scratch. Remove all dirt, dust, and debris.
This is crucial because any grit left behind can be ground into the glass, creating new scratches.
Next, mix the cerium oxide powder with water according to the kit’s instructions. You want a creamy paste, not too thin and not too thick. Apply a small amount of this paste to the applicator pad.
If you’re using a drill attachment, set it to a low to medium speed. Avoid high speeds, as this can generate too much heat and damage the glass.
Gently move the pad in overlapping circles over the scratch. Don’t apply excessive pressure. The polishing action will take time.
You’ll need to periodically wipe away the old slurry with a damp cloth and reapply fresh paste. Keep the area moist; if the paste dries out, it becomes less effective and can create more friction.
Continue polishing until the scratch is no longer visible. This might take a few minutes for a very light scratch, or much longer for a deeper one. It’s important to be patient and avoid over-polishing, which can create a low spot in the glass or distort the view.
Once the scratch is gone, clean the glass thoroughly to remove all residue.
A user scenario: Sarah had a visible scratch on her passenger side window. She bought a DIY kit. After cleaning the window, she mixed the cerium oxide.
She used the included pad with a cordless drill on a slow setting. She worked in small circles for about 15 minutes, re-applying paste and wiping clean as needed. The scratch was still slightly visible but much better.
She repeated the process for another 10 minutes. By the end, the scratch was barely noticeable, and she was happy with the result for a DIY fix.
Limitations of DIY Kits
Despite their usefulness, DIY kits have limitations. They are generally not effective for deep scratches that you can easily feel with your fingernail. These scratches have removed a significant amount of glass, and a DIY kit may not have the abrasive power or the necessary tools to remove enough surrounding glass to level the surface.
Overuse or improper use of DIY kits can also lead to unintended consequences. Polishing too aggressively or for too long can create a noticeable distortion in the glass, especially on curved surfaces like car windows. This distortion can be more bothersome than the original scratch, particularly in your line of sight while driving.
It can cause a “wavy” or “fisheye” effect.
Tinted windows are another challenge. Most DIY polishing compounds are abrasive and can easily damage or remove the tint film. If your windows are tinted, it’s usually best to avoid DIY kits or to test them in a very small, inconspicuous area first to see how they affect the tint.
In many cases, professional tint removal and reapplication after scratch repair might be necessary.
Finally, results can be inconsistent. The effectiveness depends on the user’s skill, the type of scratch, and the quality of the kit. For a perfect, invisible repair, especially on critical glass like the windshield, professional intervention is often the best route.
A poorly executed DIY repair can sometimes make the situation worse, leading to more costly professional repairs down the line.
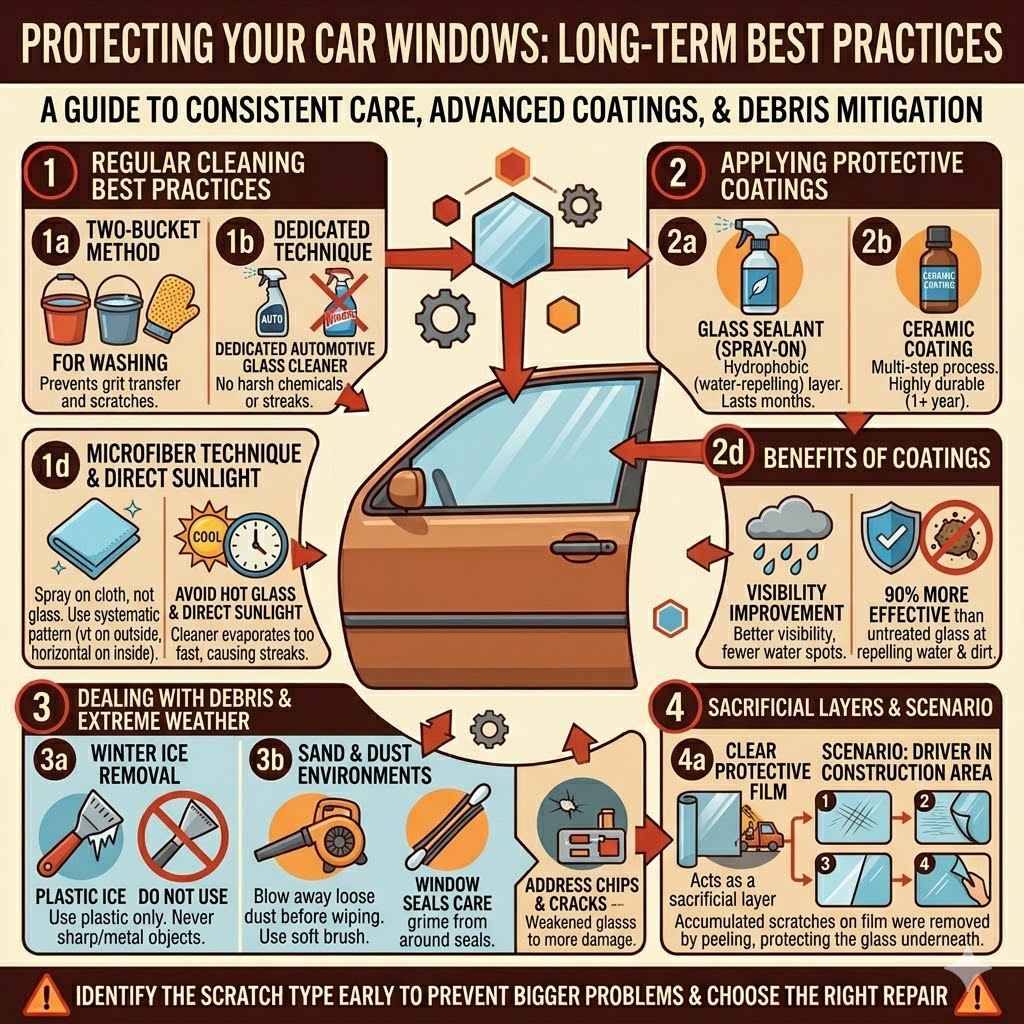
Protecting Your Car Windows Long Term
Keeping your car windows pristine involves more than just fixing scratches. It requires a consistent approach to cleaning and protection. Implementing simple habits can significantly extend the life and clarity of your car’s glass.
Consider the environment your car is usually in. Parking in covered areas or garages whenever possible can shield windows from harsh weather, bird droppings, and airborne debris. These elements, while seeming minor, can contribute to the slow degradation of glass surfaces over time.
Regular Cleaning Best Practices
Consistent, proper cleaning is your first line of defense. Always use two buckets when washing your car: one for soapy water and one for rinsing your wash mitt. This prevents dirt from being transferred back onto the paint or glass, which causes scratches.
For window cleaning, start with a dedicated automotive glass cleaner. Never use household cleaners like Windex, as they can be too harsh or leave streaks. Spray the cleaner onto a clean microfiber cloth, not directly onto the glass.
This controls the amount of product and prevents overspray onto paintwork, which can leave streaks.
Wipe the glass in a systematic pattern. For example, use horizontal strokes on the inside and vertical strokes on the outside. This makes it easy to identify which side a streak is on.
Buff the glass dry with a separate, clean, dry microfiber towel for a streak-free finish.
Avoid cleaning windows in direct sunlight or when the glass is hot. This causes the cleaner to evaporate too quickly, leaving streaks. The best time to clean is in the shade or on a cooler day.
Regularly inspect your microfiber cloths for any embedded grit; wash them separately from other laundry items.
Applying Protective Coatings
For an extra layer of defense, consider applying a protective coating to your car windows. These coatings create a barrier that repels water, dirt, and other contaminants, making them easier to clean and offering some resistance to minor abrasions.
One popular option is a glass sealant. These are typically spray-on products that bond to the glass surface, creating a hydrophobic (water-repelling) layer. They can last for several months and significantly improve visibility in rain, as water beads up and rolls off the window.
This also helps to prevent water spots and makes it harder for dirt to stick.
Another option is a ceramic coating specifically designed for glass. These are generally more durable than sealants and can last for a year or more. They provide a harder, more resilient surface that can offer better protection against light scratches and chemical etching.
Application usually involves a multi-step process similar to ceramic coatings for paint.
Some people also opt for a window film or a clear bra for their car windows. While primarily used for UV protection or security, these films can also act as a sacrificial layer against scratches. The film takes the brunt of any abrasion, protecting the actual glass underneath.
A study on automotive glass coatings showed that treated windows repelled water up to 90% more effectively than untreated glass. This not only improves driving visibility but also reduces the effort needed for cleaning by preventing contaminants from adhering strongly.
Dealing with Debris and Extreme Weather
Extreme weather and debris pose significant threats to car windows. During winter, ice can cause scratches if removed improperly. Always use a plastic ice scraper and ensure it’s free of debris.
Never use sharp objects like keys or metal scrapers, as they will surely scratch the glass.
In sandy or dusty environments, be extra cautious. Windblown sand can act like sandpaper on your windows when you try to wipe them. Consider using a blower to remove loose dust and debris before wiping, or use a very soft brush attachment on your vacuum cleaner for dusting.
When washing your car, pay attention to areas where dirt can accumulate, like around the window seals. Use a soft brush or a detailing swab to gently clean these areas. This prevents grit from being dragged across the glass during washing or drying.
If you notice small chips or cracks, address them as soon as possible. While this article focuses on scratches, chips can weaken the glass and make it more susceptible to damage from other sources, including the stress of temperature changes or impacts. Many repair services can fix small chips before they spread.
Scenario: A driver lives in an area with heavy construction. To protect their car, they installed a clear protective film on their side windows. Over a few months, the film accumulated numerous fine scratches from airborne dust.
When the film started looking too worn, they peeled it off, revealing the original, unscratched glass underneath. They then applied a new film, effectively protecting their car’s windows.
Frequently Asked Questions
Question: Can I really remove scratches from my car window glass myself
Answer: Yes, for very light, superficial scratches, DIY methods like using toothpaste or baking soda paste can sometimes work. For deeper scratches, you might need a specialized DIY kit or professional help.
Question: What is the best way to clean car windows without scratching them
Answer: Always use clean microfiber cloths and a quality automotive glass cleaner. Spray the cleaner onto the cloth, not the window. Wash in the shade, not direct sunlight, and use a two-bucket method when washing your car.
Question: How deep can a scratch be before I need professional repair
Answer: If you can feel the scratch with your fingernail, it’s likely too deep for most DIY solutions. Professionals have specialized tools to handle these more significant damages.
Question: Will metal polish scratch my car window
Answer: Metal polish contains abrasives. While it can help with some scratches, it should be used with caution. Overuse or using it on tinted windows can cause damage.
Always test in a small area first.
Question: How long does a car window scratch repair typically last
Answer: DIY repairs for light scratches can last a long time if the glass is then protected. Professional repairs, especially for deeper scratches, are generally permanent as they actually level the glass surface.
Wrap Up
Dealing with car window scratches is manageable. For minor marks, simple items like toothpaste or baking soda can make a difference. More noticeable scratches might need a DIY kit with cerium oxide, or professional help for deep gouges.
Always clean carefully with microfiber cloths and quality cleaners to prevent new scratches. Protecting your windows with sealants or coatings offers lasting clarity and reduces future issues.