How To Safely Disconnect A Car Battery Step By Step
Dealing with a car battery can feel a bit daunting, right? You might need to swap out an old one, do some electrical work, or just disconnect it for safety. Whatever the reason, knowing how to do it the right way is super important.
Doing it wrong can cause sparks, damage your car’s electronics, or even lead to a shock. We’ve all been there, feeling that little knot of worry when messing with car parts. This guide is here to walk you through disconnecting your car battery safely and simply, step by step.
We’ll make sure you feel confident when you’re done.
To safely disconnect a car battery, first gather your tools and wear safety gear. Then, locate the battery and identify the positive (+) and negative (-) terminals. Loosen the nut on the negative terminal clamp first, then remove it.
Next, loosen and remove the positive terminal clamp. Keep both clamps from touching metal parts of the car. Reconnecting is the reverse, positive first.
Understanding Why You Need to Disconnect Your Car Battery
There are several good reasons why you might need to disconnect your car battery. It’s not usually something you do for fun. It’s often a necessary step for other tasks.
Think about replacing a worn-out battery. Old batteries can leak or stop holding a charge. You need to disconnect the old one to get it out and put a new one in.
Maybe you’re installing a new stereo system or an alarm. Working with the car’s electrical system requires a power source to be off. This prevents short circuits and protects sensitive components from damage.
Sometimes, a car sits for a long time. Disconnecting the battery stops it from draining slowly. This is especially true if there’s a small leak in the electrical system.
For basic car maintenance, like changing a light bulb that’s near the battery, disconnecting it adds a layer of safety.
It’s also a common step before any serious automotive repair. Mechanics often disconnect the battery as a first step. This ensures no accidental power surges occur while they work.
Even for simple things like cleaning battery corrosion, disconnecting it is a smart move. It stops any random electrical flow. It’s about preventing surprises and keeping yourself and your car safe.
Understanding these reasons helps you appreciate why each step in the process is important. Each connection and disconnection has a purpose.
Essential Tools and Safety Gear
Before you even think about touching your car’s battery, you need to get your tools and safety gear ready. This isn’t a job for bare hands and a random wrench. Having the right items makes the job much easier and, more importantly, much safer.
So, what do you need? First, you’ll need a wrench set or a socket wrench with the right size socket. Most car batteries have bolts that are around 10mm or 13mm.
You’ll want one that fits snugly on the nuts holding the terminal clamps in place. A loose wrench can slip, causing a spark or damaging the nut.
Gloves are a must. Not just any gloves, though. You want thick, insulating gloves, like rubber or nitrile ones.
This protects your hands from corrosion and prevents any accidental shocks. Eye protection is also critical. Safety glasses or goggles are non-negotiable.
Battery acid can spray if a short circuit happens. Sparks can fly. Protecting your eyes is one of the most important safety rules.
You might also want a wire brush or a battery terminal cleaner. This helps remove any crusty, white or blue corrosion that builds up on the terminals. This corrosion can prevent a good connection later and looks messy.
Finally, some people like to have a small piece of cloth or rag handy. This is for wiping up any spilled acid or cleaning off tools.
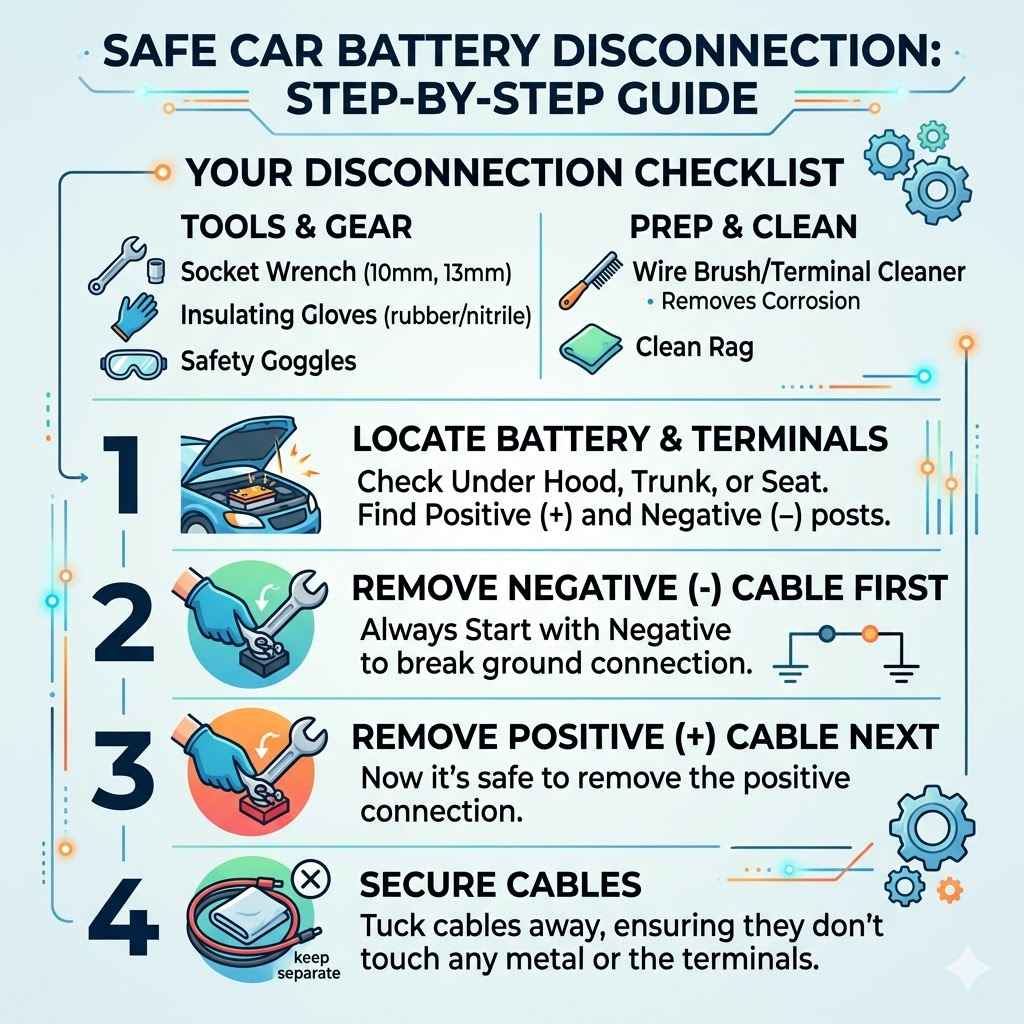
Your Battery Disconnection Checklist
Tools:
- Socket wrench or adjustable wrench (usually 10mm or 13mm)
- Gloves (rubber or nitrile)
- Safety glasses or goggles
Cleaning & Prep:
- Wire brush or battery terminal cleaner
- Clean rag
Safety First:
- Work in a well-lit, open area.
- Ensure no open flames nearby.
- Keep metal objects away from terminals.
Locating Your Car Battery
The first physical step is finding the battery. For most cars, the battery is located under the hood. Open the hood release lever inside your car.
Then, go to the front of your car and find the secondary latch to lift the hood fully. You might need to use the hood prop rod to hold it up securely. Look towards the front of the engine compartment, usually on one side or the other.
It’s a rectangular box, typically black or sometimes with a different color casing depending on the brand.
Some car manufacturers hide the battery in different spots to save space or improve weight distribution. You might find it in the trunk, under a seat, or even in the fender well. If you can’t find it under the hood, check your car’s owner’s manual.
It will show you the exact location. Once you’ve found the battery, take a moment to look at it. You’ll see two posts sticking up.
These are the terminals. One is usually marked with a plus sign (+). The other is marked with a minus sign (-).
These markings are crucial for the next steps.
Identifying the Positive and Negative Terminals
This is perhaps the most critical part of the entire process. Mixing up the positive and negative terminals can cause serious damage to your car’s electrical system. It can fry expensive computers and other sensitive parts.
So, pay close attention here. The terminals are almost always clearly marked. Look for a red or black plastic cap on top of the battery.
Underneath this cap, you’ll see the metal posts. One post will have a plus symbol (+) next to it.
This is the positive terminal. It’s often associated with red battery cables. The other post will have a minus symbol (–) next to it.
This is the negative terminal. It’s usually connected to black battery cables. Sometimes, instead of a symbol, the terminals might have the words “POS” or “NEG” stamped into the plastic casing of the battery.
Always trust the symbols first. If there’s any doubt, consult your owner’s manual. The cables are also color-coded: red for positive, black for negative.
But relying solely on cable color can be risky as older vehicles might have had different wiring. The markings on the battery itself are the most reliable indicator. Double-check these markings.
Ensure you know which is which before you proceed.
The Correct Order: Negative Terminal First
Here comes the actual disconnection. The most important rule of thumb is: always disconnect the negative (–) terminal first. Why?
When you disconnect the negative cable, you are breaking the connection to the car’s chassis and frame. This is usually grounded to the car’s metal body. If you were to touch the positive terminal with your wrench while the negative cable is still attached, and that wrench touched the car’s metal body, you would create a direct short circuit.
This could cause sparks, damage tools, and potentially injure you. Disconnecting the negative terminal first removes this risk. It makes the rest of the process much safer.
So, take your wrench. Fit it onto the nut on the clamp that’s attached to the negative (-) terminal. Turn the nut counter-clockwise.
You don’t need to remove the nut completely. Just loosen it enough so that the clamp can be wiggled off the battery post. Once it’s loose, gently twist and pull the clamp upwards.
It should lift straight off the post. Set this cable aside, making sure it cannot accidentally touch the battery terminal or any metal parts of the car. Tuck it away safely.
You might want to wrap it in a rag or position it so it stays clear.
Disconnecting the Positive Terminal
Now that the negative terminal is safely disconnected, you can move on to the positive (+) terminal. This step is similar but carries less immediate risk of a short circuit because the negative path to ground is already broken. Take your wrench and fit it onto the nut of the clamp attached to the positive (+) terminal.
Again, turn the nut counter-clockwise to loosen it. You’ll want to loosen it enough so that the clamp can be removed from the post. Be gentle.
Once the clamp is loose, carefully twist and pull it upwards off the battery post. Just like with the negative cable, set this clamp aside. Make sure it doesn’t touch any metal on the car.
It’s a good idea to position it so it’s clearly separated from the battery. If you have plastic caps for your battery posts, now is a good time to put them back on if you removed them. This adds another layer of protection.
Some people even use a piece of rubber or plastic to cover the positive terminal once it’s disconnected. This is just an extra precaution.
Why Negative First? A Simple Analogy
Imagine you’re building a complex Lego castle. You have lots of pieces and you’re connecting them. One crucial connection is like the negative terminal.
If you remove that one last, and you accidentally bump a different part, the whole castle might shift or fall. But if you remove that main support piece first, other connections become less critical for stability.
In your car, the negative terminal connects to the car’s metal frame, which is a big conductor. Removing it first breaks that main path. So, if your wrench slips later when you’re dealing with the positive side, it’s less likely to cause a big spark because it can’t complete a circuit back to the car’s body.
What to Do With the Cables
Once both battery cables are disconnected, it’s important to manage them properly. They shouldn’t just hang there loosely. The goal is to prevent them from accidentally reconnecting or touching anything they shouldn’t.
For the negative cable, which is typically black, ensure it is secured away from the battery and any metal components. You might be able to use a zip tie or simply position it so it rests on a non-conductive surface. Some people tuck it back into its original position if possible, but ensure it’s not straining or touching the battery posts.
The positive cable, usually red, needs even more care. Because it still holds a residual charge, it’s crucial that it does not come into contact with any metal parts of the car’s chassis, engine, or body. This could cause a short circuit, leading to sparks or damage.
Many battery terminals have plastic covers that can be snapped back into place over the posts. If yours don’t, or if they are damaged, consider using a piece of thick rubber or plastic to cover the positive terminal. Some mechanics will even use a dedicated battery terminal cover or wrap the end of the cable in electrical tape as an extra layer of protection.
The key is to keep it isolated and secure.
What if You See Corrosion?
Battery corrosion is a common sight, especially on older vehicles. It looks like a white, blue, or greenish powdery substance around the battery terminals and cable clamps. This corrosion is a chemical reaction between the battery acid and the metal.
It can interfere with the electrical connection, making it harder for your car to start or causing electrical issues. If you see it, you’ll want to clean it before or during the disconnection process. You can use a wire brush or a dedicated battery terminal cleaning tool.
Some people mix a paste of baking soda and water to neutralize the acid before brushing. Be careful when cleaning. Wear your gloves and eye protection.
The baking soda and water mixture can bubble up as it reacts with the acid. After brushing, wipe away the residue with a damp rag. If the corrosion is very heavy, you might need to repeat the process.
Once cleaned, you can proceed with disconnecting the terminals. Ensuring clean terminals is vital for a good connection when you reconnect the battery later. It also helps prevent future problems.
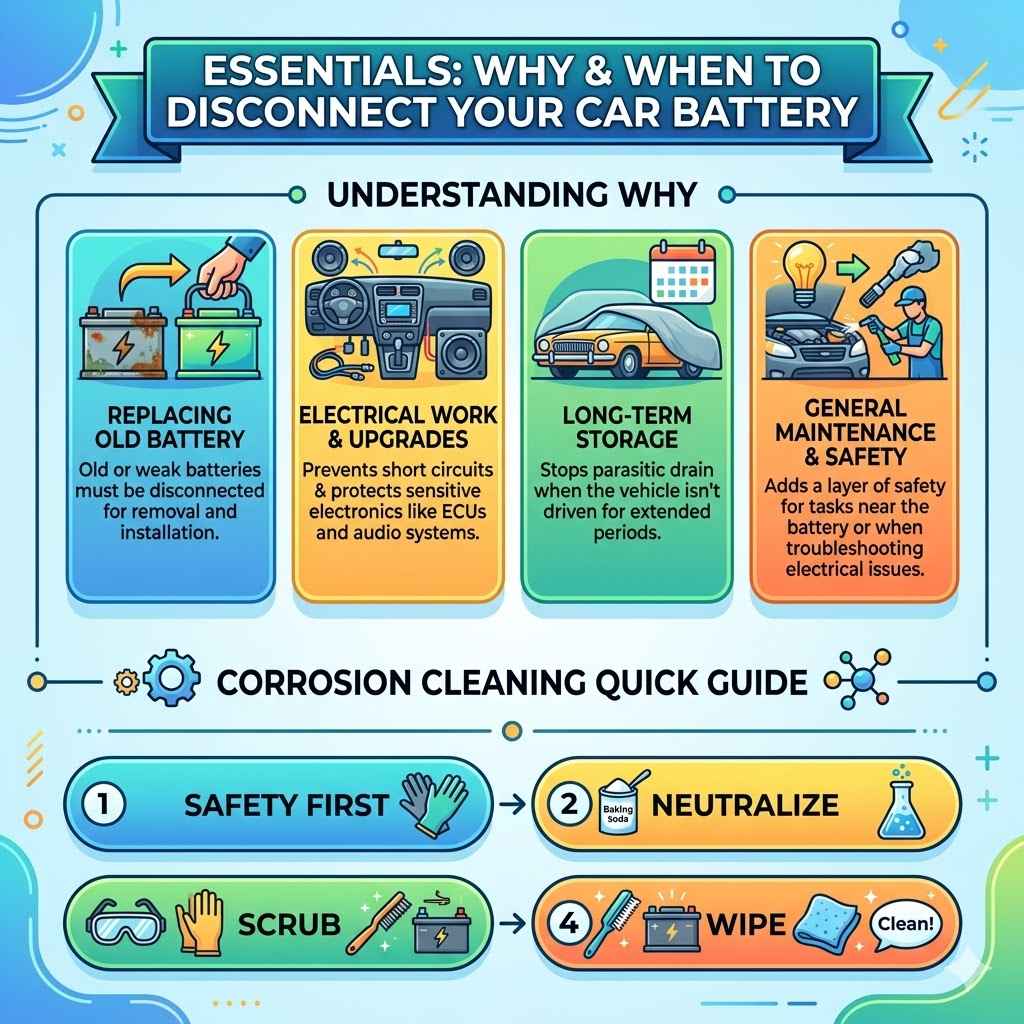
Corrosion Cleaning Quick Guide
- Safety First: Wear gloves and eye protection.
- Neutralize: Mix baking soda and water into a paste. Apply to terminals.
- Scrub: Use a wire brush or terminal cleaner to scrub away corrosion.
- Wipe: Clean with a damp cloth.
- Rinse (Optional): Lightly rinse with clean water and dry thoroughly.
- Inspect: Check for any damage to the terminals or clamps.
When is Disconnecting the Battery Necessary?
So, when do you actually need to go through this process? It’s not an everyday task. One of the most common reasons is replacing a dead or failing battery.
Car batteries have a lifespan, usually around 3 to 5 years. When yours starts to show signs of weakness, like slow cranking or dimming lights, it’s time for a change. Disconnecting the old battery is the first step before you can remove it.
If you’re doing any significant electrical work on your car, it’s absolutely essential. This includes installing a new sound system, adding an alarm, upgrading headlights, or even doing some basic wiring repairs. Disconnecting the battery prevents accidental shorts that could damage sensitive electronic modules, like the car’s computer (ECU) or the infotainment system.
Even for smaller tasks, like cleaning the battery terminals or replacing a fuse block near the battery, disconnecting it adds a layer of safety.
Another reason is when a car is going to be stored for an extended period. If a vehicle sits for months without being driven, the battery can slowly drain. This is sometimes called parasitic drain.
Disconnecting the battery prevents this slow drain, ensuring that when you’re ready to start the car again, the battery still has enough power. It’s a preventative measure for long-term storage. Finally, if you suspect a short circuit or an electrical issue that’s draining your battery, disconnecting it can be a diagnostic step.
Situations Calling for Battery Disconnection
- Battery Replacement: Swapping out an old for a new one.
- Electrical Modifications: Installing stereos, alarms, lights, etc.
- Major Repairs: When working on other car systems that involve wiring.
- Long-Term Storage: Preventing battery drain on unused vehicles.
- Troubleshooting: Diagnosing electrical issues or parasitic drain.
- Cleaning: Safely cleaning battery terminals and posts.
Can You Leave a Battery Disconnected?
It’s generally not recommended to leave a car battery disconnected for extended periods without a good reason. Your car’s computer systems and memory settings are designed to have constant power. When you disconnect the battery, these settings can be lost.
This includes things like your radio presets, clock, and even engine control module (ECM) learning parameters. Some modern cars have small backup batteries or capacitors to maintain these settings, but it’s not always foolproof.
When you reconnect the battery after a long disconnect, you might notice a few things. The car’s idle might be a bit rough for a short while as the ECM relearns its parameters. The engine might feel less responsive initially.
You’ll definitely have to reset your clock and radio stations. For most cars, it’s best to reconnect the battery once you’ve completed the work or task that required its disconnection. If you’re storing the car, a battery tender or trickle charger is a better option than just leaving it disconnected.
These devices maintain a low, constant charge without overcharging.
Reconnecting the Battery: The Reverse Process
Reconnecting the battery is essentially the reverse of disconnecting it, but with one crucial difference in order. You want to connect the positive (+) terminal first. This is the opposite of how you disconnected it.
So, take the positive cable clamp and slide it back onto the positive (+) battery post. Make sure it’s seated correctly. Then, use your wrench to tighten the nut securely.
You want it snug, but don’t overtighten, as you could damage the clamp or the post.
Once the positive terminal is connected and tightened, you can move on to the negative (-) terminal. Take the negative cable clamp and slide it onto the negative (-) battery post. Again, ensure it’s seated properly.
Use your wrench to tighten the nut firmly. Double-check that both clamps are secure and have no wiggle room. Give them a gentle tug to make sure they won’t come loose.
After reconnecting, you’ll need to reset your car’s clock and radio presets. The car’s computer might also need a short drive to relearn its settings, so don’t be alarmed if it idles a bit differently at first.
Common Mistakes to Avoid
Even with clear instructions, mistakes can happen. One of the most common is reversing the order of disconnection. If you remove the positive terminal first, you risk creating a short circuit by touching the wrench to the car’s metal body while the negative terminal is still connected.
Always, always, always disconnect the negative terminal first.
Another mistake is not loosening the clamp enough. If the clamp isn’t loose enough, you might end up forcing it off, potentially damaging the battery post or the clamp itself. This can also lead to a poor connection later.
Conversely, overtightening the clamp when reconnecting can damage the terminal. You want a secure fit, not one that’s going to crack the plastic or deform the metal.
Forgetting to keep the disconnected cables away from metal is also a big one. If the positive cable, especially, touches the car’s frame, you’ll get sparks. This can be startling and potentially dangerous.
Finally, trying to use the wrong tools can be a problem. A wrench that’s too large or too small can strip the nut, making it impossible to remove or tighten properly. Always use the correct size wrench and ensure it fits snugly.
Mistake Watch: What NOT To Do
- Mistake: Removing the positive terminal first. Fix: Always remove the negative terminal first.
- Mistake: Not loosening the clamp enough. Fix: Loosen the nut until the clamp easily slides off.
- Mistake: Letting cables touch metal. Fix: Secure disconnected cables away from the car’s body.
- Mistake: Overtightening clamps on reconnection. Fix: Tighten until secure, but don’t force.
- Mistake: Using the wrong size wrench. Fix: Use the correct size socket for the terminal nuts.
Safety Tips for Working with Car Batteries
Car batteries contain sulfuric acid, which is corrosive. They also produce flammable hydrogen gas. So, safety is paramount.
Always wear safety glasses and gloves. Work in a well-ventilated area. Avoid smoking or having open flames near the battery.
The hydrogen gas can ignite very easily. Never try to charge a frozen battery; it can explode.
If battery acid gets on your skin or in your eyes, wash it immediately with plenty of water. For skin, flush for at least 15 minutes. For eyes, flush and seek immediate medical attention.
If you swallow battery acid, do NOT induce vomiting. Drink water and get medical help right away. Keep children and pets away from the work area.
Batteries are heavy, so lift with your legs, not your back, if you need to remove the battery itself.
Can You Jump-Start a Car with a Disconnected Battery?
No, you cannot jump-start a car with a completely disconnected battery. Jump-starting involves connecting a set of jumper cables from a working battery to the dead battery. The dead battery needs to be connected to the car’s electrical system for the jump-start to provide power.
If the battery is fully disconnected, there is no circuit for the power from the other car to flow into your car’s system. It’s like trying to fill a bucket with no bottom.
However, if you’ve only disconnected one terminal, for example, the negative one, and the positive terminal is still connected, you might be able to jump-start it. But this is generally not advised and can be risky. The correct way to jump-start is always with both battery terminals connected to the car.
If your battery is dead and needs a jump, ensure it’s properly connected before attaching jumper cables. Trying to jump-start a car with a disconnected battery won’t work and could cause damage.
What Happens When the Battery is Reconnected?
When you reconnect the battery, your car’s systems will power up again. As mentioned, you’ll likely need to reset your clock and radio stations. Many cars have a feature called “adaptive learning” for the engine control module (ECM).
This system learns your driving habits to optimize performance and fuel economy. After a battery disconnect, the ECM resets to a default state. It needs to relearn your driving style.
This means that for the first few drives, your car might feel a bit different. The acceleration might not be as smooth, or the idle might be a little higher or lower than usual. This is perfectly normal.
After about 50-100 miles of driving, the ECM should have relearned enough to bring performance back to normal. Some newer cars might have more sophisticated memory systems that retain more settings, but it’s always a good idea to be prepared to reset your preferences.
When to Call a Professional
While disconnecting and reconnecting a car battery is a task most car owners can learn to do, there are times when it’s best to call in a professional. If you’re uncomfortable working with car parts or electricity, don’t force yourself. There’s no shame in admitting you need help.
If you’ve tried to disconnect the battery and encountered unexpected problems, like stubborn terminals that won’t budge, or if you notice signs of significant damage to the battery or cables, it’s time to stop and call a mechanic or roadside assistance.
Also, if you’ve disconnected the battery and your car still won’t start or behaves strangely afterward, it might indicate a more complex electrical issue that requires professional diagnosis. Sometimes, the problem isn’t with the battery itself, but with the charging system, starter, or other electronic components. A qualified technician has the specialized tools and knowledge to pinpoint and fix these issues safely and efficiently.
For your peace of mind and the safety of your vehicle, sometimes professional help is the smartest choice.
Frequently Asked Questions
How long can a car battery be disconnected?
A car battery can typically be disconnected for a few weeks without causing major issues. However, for longer periods, especially more than a month, it’s best to use a battery tender or trickle charger. Disconnecting for extended durations can cause the car’s computer systems to lose settings and potentially affect engine performance until they relearn.
Will disconnecting the battery reset my car’s computer?
Yes, disconnecting the car battery will reset the car’s computer modules. This includes the engine control module (ECM), which manages engine performance and fuel efficiency. You will likely need to reset your clock, radio presets, and allow the car to relearn its idle and driving parameters after reconnecting the battery.
What tools do I need to disconnect a car battery?
You will need a wrench or socket set (commonly 10mm or 13mm) to loosen the terminal nuts. It’s also highly recommended to wear safety glasses and insulating gloves to protect yourself from corrosion and potential sparks.
Can I disconnect the positive terminal first?
No, you should never disconnect the positive terminal first. Always disconnect the negative (-) terminal first to avoid creating a short circuit. This is a critical safety step to prevent damage to your car’s electronics and potential injury.
What if the battery terminal is stuck?
If a battery terminal clamp is stuck, try wiggling it gently while applying steady upward pressure. You can also try spraying a small amount of penetrating oil around the clamp and let it sit for a few minutes. Using a battery terminal puller tool can also be effective.
Always wear safety gear as forcing it can cause damage.
Do I need to disconnect the battery for a simple oil change?
Generally, no. A simple oil change does not involve working directly with the electrical system in a way that would require disconnecting the battery for safety. However, if you are performing other maintenance tasks alongside the oil change that involve electrical components, it’s a good idea to disconnect it.
Final Thoughts on Battery Safety
Taking the time to learn how to safely disconnect and reconnect your car battery is a valuable skill. It’s a straightforward process, but one that requires attention to detail, especially regarding the order of operations. Remember, negative first when disconnecting, positive first when reconnecting.
Always wear your safety gear, use the right tools, and keep those cables away from metal. By following these steps, you can perform this task with confidence, protecting yourself and your vehicle’s sensitive electronics. Happy motoring!