Proven Way to Clean Car Battery Connections
Keep your car running smoothly by cleaning its battery connections with a simple baking soda and water paste, a wire brush, and some protective grease. This easy DIY fix prevents corrosion and ensures a strong electrical flow, boosting performance and preventing starting issues.
Ever notice your car struggling to start, or have lights flicker unexpectedly? Often, the culprit is a simple case of corrosion on your car battery terminals. It might sound complex, but cleaning these connections is a straightforward task that almost anyone can do at home. Don’t let a dirty battery terminal leave you stranded!
This guide will walk you through exactly how to clean your car battery connections safely and effectively. We’ll cover everything you need, from the essential tools to the step-by-step process. By the end, you’ll have the confidence to tackle this common car maintenance issue and keep your vehicle running reliably.
Why Cleaning Car Battery Connections Matters
Your car battery is the heart of your vehicle’s electrical system. It provides the power needed to start the engine and run all the car’s accessories, from the headlights to the radio. The connections between the battery terminals and your car’s cables are crucial for this power to flow. Over time, a white or bluish powdery substance, known as corrosion, can build up on these terminals.
This corrosion acts like an insulator, significantly hindering the flow of electricity. It’s like trying to talk through a wall – the message just doesn’t get through clearly. When corrosion becomes severe, it can:
- Make it difficult to start your car.
- Cause flickering headlights or dashboard lights.
- Lead to electrical system malfunctions.
- Prevent the battery from charging properly.
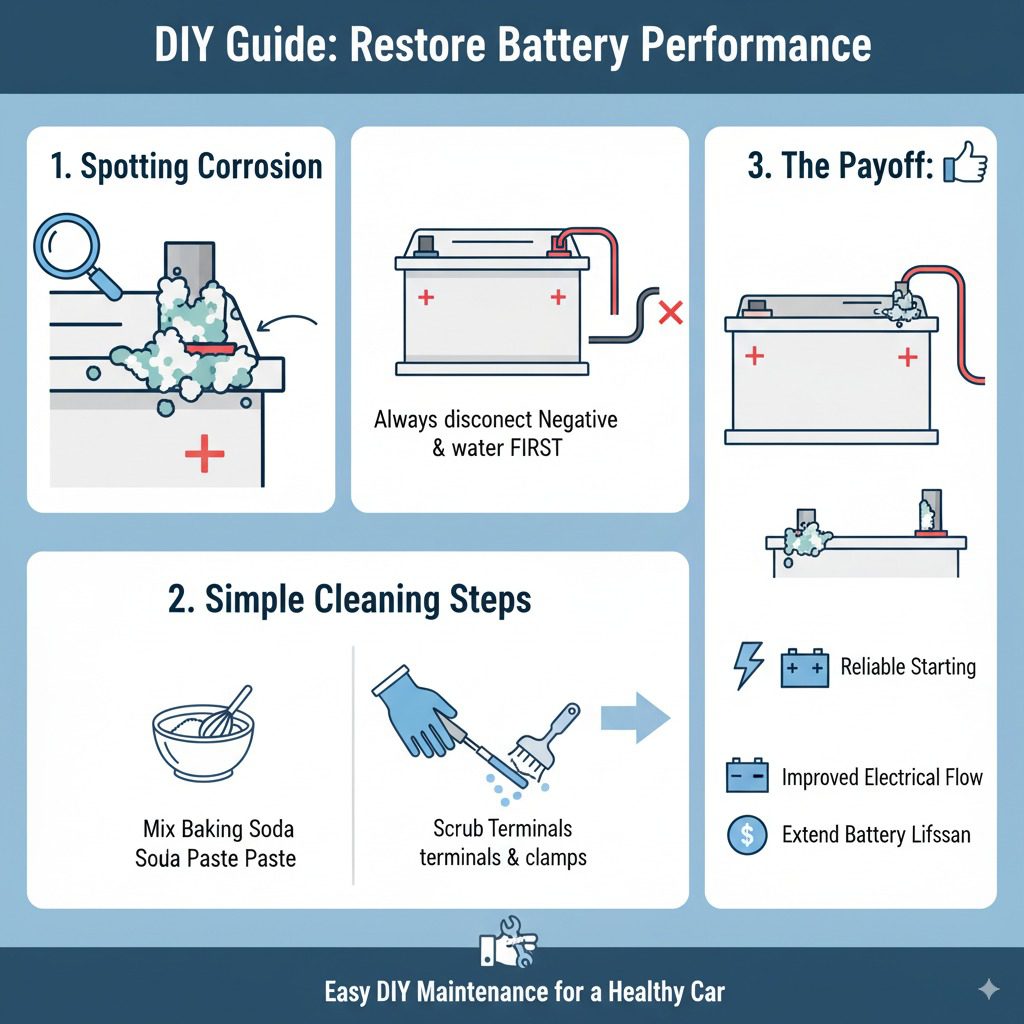
By keeping your battery connections clean, you ensure optimal electrical performance, prevent potential starting problems, and extend the life of your battery and electrical components. It’s a small maintenance task that pays off big in reliability.
Understanding Battery Corrosion
Battery corrosion isn’t just unsightly; it’s a chemical reaction. When battery acid (sulfuric acid) escapes and mixes with the air, it reacts with the lead terminals and copper cables to form lead sulfate. This is the powdery substance you see. Several factors can contribute to corrosion:
- Gases from charging: During the normal charging process, lead-acid batteries can release small amounts of hydrogen gas. If these gases escape the battery and come into contact with the terminals, they can react.
- Overfilling battery (older batteries): Older battery designs sometimes allowed for adding distilled water. Overfilling could cause electrolyte to spill onto the terminals.
- Damage to the battery case: Cracks or leaks in the battery casing can allow acid to escape.
- Age of the battery: As batteries age, they can become less efficient and more prone to leakage.
The color of the corrosion can sometimes offer a clue to its source, though it’s not always a definitive diagnostic tool:
| Corrosion Color | Likely Cause | Notes |
|---|---|---|
| White/Gray powder | Lead sulfate; common result of battery gassing or minor leakage. | Most typical form. |
| Bluish/Greenish powder | Copper sulfate; indicates copper cables are reacting. | Less common, often seen with older or damaged cables. |
Regardless of the color, any significant accumulation of corrosion needs to be addressed to ensure your car’s electrical system functions correctly.
Tools and Materials You’ll Need
Gathering the right tools before you start makes the process smooth and safe. Fortunately, you probably have most of these items around your home or can easily pick them up from an auto parts store.
- Safety Glasses: Essential to protect your eyes from corrosive residue and debris.
- Rubber Gloves: To protect your hands from battery acid.
- Baking Soda: A mild abrasive and a base that neutralizes battery acid.
- Water: To create a cleaning paste with baking soda.
- Wire Brush: A stiff brush (often brass or steel) for scrubbing terminals and cable ends. A dedicated battery terminal brush with a cleaning tool on the end for the inside of the cable clamps is ideal.
- Rag or Paper Towels: For wiping away residue and cleaning up spills.
- Short Wrench or Pliers: To loosen and remove the battery cable clamps. The size will depend on your battery’s terminal nuts.
- Terminal Protector or Dielectric Grease: A special grease (often red or blue) applied after cleaning to prevent future corrosion. This is highly recommended.
- Optional: Battery Terminal Cleaner Spray: Commercially available sprays can also be used for cleaning.
Having these items ready will ensure you can complete the job efficiently and safely.
Step-by-Step Guide: How to Clean Car Battery Connections
Cleaning your car battery connections is a satisfying DIY task. Follow these steps carefully:
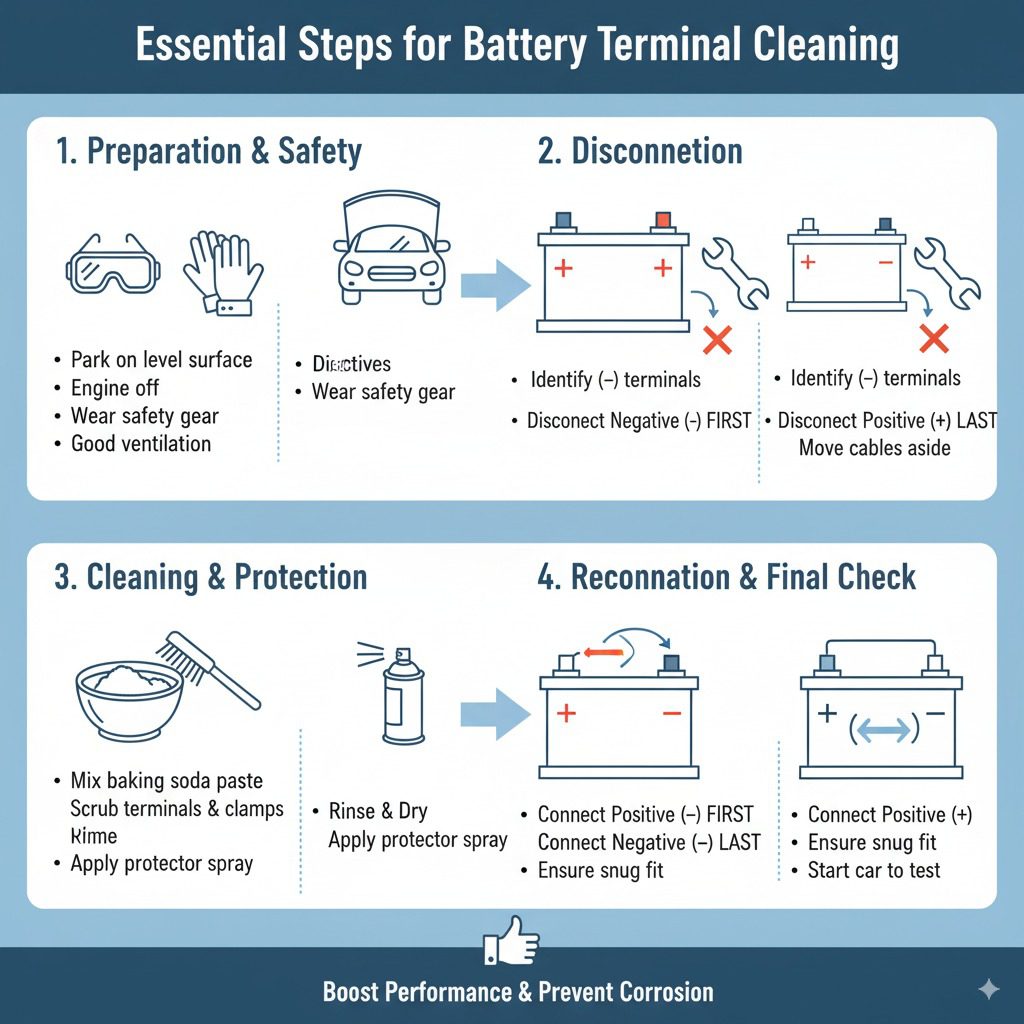
Step 1: Safety First – Prepare Your Workspace
Before you do anything, ensure your car is parked on a level surface and the engine is off. Open the hood to access the battery. It’s a good idea to wear your safety glasses and gloves. Ensure good ventilation. If your battery looks damaged, swollen, or is leaking, do not attempt to clean it yourself. Contact a professional or your local recycling center for safe disposal and replacement.
For a comprehensive understanding of battery safety, the U.S. Department of Energy’s Office of Energy Efficiency & Renewable Energy offers valuable insights into battery technology and handling.
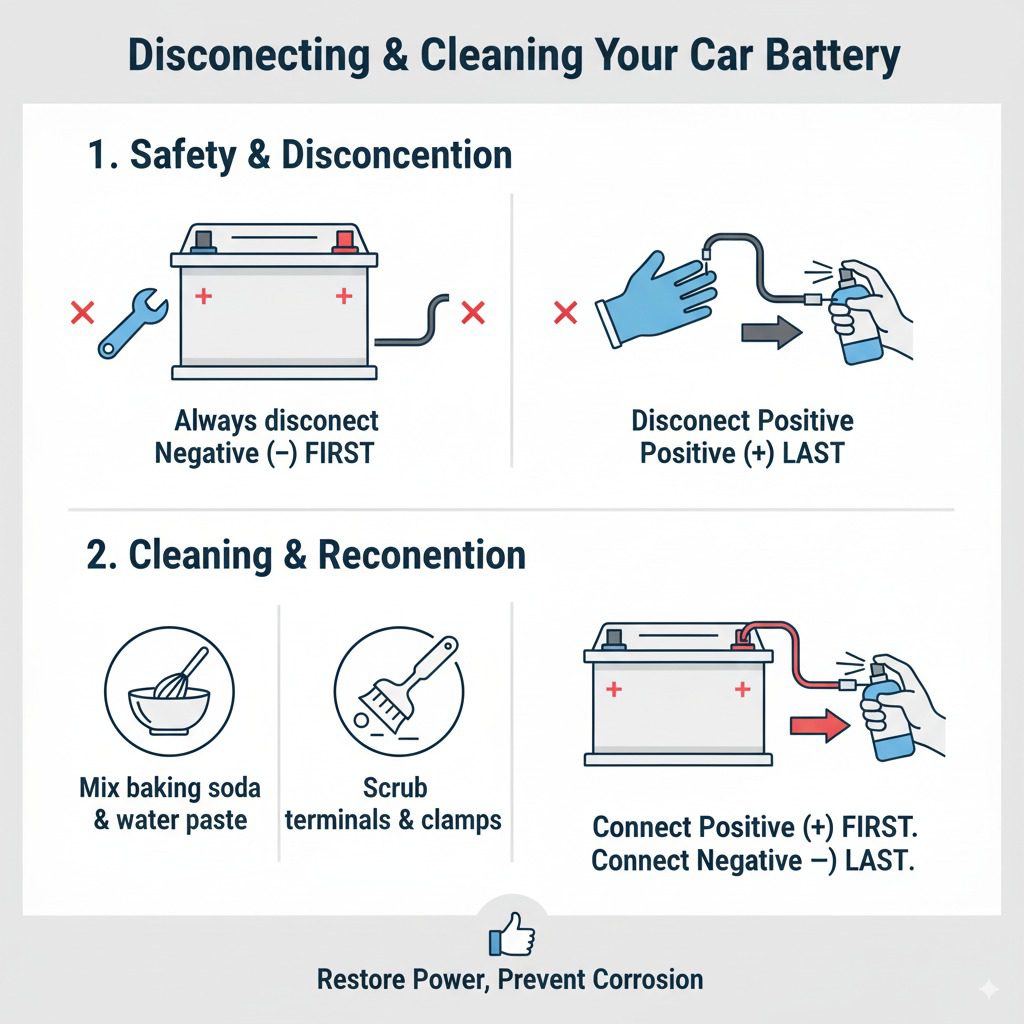
Step 2: Disconnect the Battery Cables
This is a critical safety step. You must disconnect the battery cables before cleaning.
- Identify the Terminals: The battery has two terminals. One is positive (+) and the other is negative (-). The positive terminal is usually marked with a red cover or a plus sign, and the negative terminal is typically marked with a black cover or a minus sign.
- Disconnect the Negative Cable First: Always disconnect the negative (-) cable first. This prevents accidental short circuits if your tool touches the car’s metal frame. Use your wrench or pliers to loosen the nut on the negative terminal clamp. Once loose, twist and pull the cable off the terminal. Move it aside so it cannot accidentally touch the terminal.
- Disconnect the Positive Cable: Now, loosen the nut on the positive (+) terminal clamp. Twist and pull the cable off the terminal and move it aside.
Step 3: Make the Cleaning Solution
In a small container, mix a tablespoon or two of baking soda with enough water to create a thick paste. This paste is perfect for neutralizing acid and gently scrubbing away corrosion.
Step 4: Clean the Battery Terminals
Apply the baking soda paste directly to the battery terminals. Use your wire brush to scrub them thoroughly. The paste will help lift the corrosion. You can also use the wire brush designed for the inside of the cable clamps, which fits over the battery posts. Ensure you scrub until the terminals are shiny and free of any powdery residue.
Step 5: Clean the Cable Clamps
Once the terminals are clean, apply some paste to the inside of the cable clamps (the part that connects to the battery posts). Use the wire brush to scrub these areas clean as well. You want a good, metallic contact surface on both the battery posts and the inside of the clamps.
Step 6: Rinse and Dry
After scrubbing, you can lightly rinse the terminals and cable clamps with a small amount of clean water to wash away the baking soda residue. Immediately dry them thoroughly with a clean rag or paper towels. It’s important to ensure everything is completely dry before reconnecting.
Step 7: Apply Terminal Protector
This is an important step to prevent corrosion from returning quickly. Apply a thin, even layer of dielectric grease or a battery terminal protector spray onto the battery terminals and the inside of the cable clamps. This grease creates a barrier against moisture and air, which are the main causes of corrosion. You can purchase terminal protector grease at most auto parts stores.
Step 8: Reconnect the Battery Cables
Now, reconnect the cables.
- Connect the Positive Cable First: Place the positive (+) cable clamp back onto the positive (+) battery terminal. Tighten the nut securely with your wrench or pliers.
- Connect the Negative Cable Last: Place the negative (-) cable clamp back onto the negative (-) battery terminal. Tighten the nut securely.
Ensure both cables are snug and won’t wiggle loose. Giving them a gentle tug is a good way to check.
Step 9: Final Check and Cleanup
Close the hood. Start your car to ensure everything is working correctly. Wipe down any tools and dispose of used rags and gloves properly. You’ve successfully cleaned your car battery connections!
When to Seek Professional Help
While cleaning battery connections is a manageable DIY task, there are times when it’s best to let a professional handle it. If you encounter any of the following, consider taking your car to a mechanic:
- Damaged Battery: If the battery case is cracked, swollen, or leaking, it can be dangerous to handle. Damaged batteries should be replaced by professionals.
- Severely Corroded or Damaged Cables: If the battery cables themselves are frayed, brittle, or heavily corroded internally, they may need to be replaced.
- Difficulty Removing Cables: If the cable clamps are seized onto the terminals and won’t budge, forcing them could damage the battery or cables.
- Uncertainty or Lack of Confidence: If you’re not comfortable performing the task or are unsure at any step, it’s always safer to seek professional assistance.
- Persistent Problems: If cleaning the terminals doesn’t resolve your car’s starting or electrical issues, there might be a deeper problem with the battery, alternator, or wiring that requires professional diagnosis.
A qualified mechanic can diagnose and repair battery and electrical system issues safely and efficiently.
Comparing Cleaning Methods
While the baking soda and water paste is a highly effective and recommended method, other options exist:
| Cleaning Method | Pros | Cons | Best For |
|---|---|---|---|
| Baking Soda Paste | Economical, readily available ingredients, neutralizes acid effectively. | Requires mixing, can be slightly messy. | Beginners, general maintenance, mild to moderate corrosion. |
| Battery Terminal Cleaner Spray | Convenient, fast-acting formulas, often formulated with rust inhibitors. | Costs more, needs to be purchased specifically. | Quick cleanings, convenience, moderate corrosion. |
| Specialized Battery Cleaning Tools | Designed for the task, often includes internal and external cleaning. | Requires purchase of specialized tool. | Frequent car maintenance, thorough cleaning. |
| Wire Brush (No Paste) | Simple, requires minimal materials. | Less effective at neutralizing acid, may scratch terminals if too harsh. | Very light corrosion, as a preliminary step. |
For most car owners, the baking soda and water paste method offers the best balance of effectiveness, cost, and accessibility. It’s a trusted solution that has been used for years.
FAQs: Your Car Battery Connection Questions Answered
What happens if I don’t clean my car battery connections?
If you don’t clean corroded battery connections, the corrosion will worsen over time. This hinders electrical flow, making it harder for your car to start, causing flickering lights, and potentially leading to complete electrical system failure or a dead battery. It significantly reduces the reliability and performance of your vehicle.
Can I clean my car battery connections while the battery is still in the car?
Yes, as long as you disconnect the battery cables first. It is crucial to disconnect the negative terminal first, then the positive. Always ensure the engine is off and never have both cables connected when cleaning to avoid short circuits and potential injury.
How often should I check and clean my car battery connections?
It’s a good practice to check your battery connections at least once or twice a year, perhaps during your routine oil changes or tire rotations. If you live in a humid climate or frequently drive in harsh conditions, checking more often is recommended. Clean them only when you notice signs of corrosion or if you experience starting issues.
What is the best way to prevent battery corrosion?
The best way to prevent battery corrosion is by applying a dielectric grease or a battery terminal protector to the clean terminals and cable clamps. This creates a barrier that repels moisture and air, preventing the chemical reactions that cause corrosion. Ensuring your battery is properly secured also helps prevent vibrations that can loosen connections and lead to issues.
Is it okay to use a metal file to clean battery terminals?
While a metal file can remove corrosion, it’s generally not recommended for battery terminals. Files can remove too much metal, thinning the terminals, and they can leave behind conductive debris that could cause problems. A wire brush is a safer and more effective tool for cleaning battery terminals and clamps.
Can I use Coca-Cola to clean battery terminals?
Yes, some people use Coca-Cola or other acidic soft drinks for cleaning battery terminals because the phosphoric acid in them can help break down corrosion. However, baking soda paste is typically more effective at neutralizing the acid and is a safer, more recommended household solution. Plus, Coca-Cola can be sticky if not rinsed thoroughly.
What happens if I accidentally connect the cables in the wrong order?
Connecting the battery cables in the wrong order can cause a short circuit. If you connect the positive cable first, and then touch the negative cable to the car’s metal frame, you can create a spark. This can damage the battery, your vehicle’s electrical systems, and potentially cause injury. This is why disconnecting the negative cable first and reconnecting it last is so important.
Conclusion
Keeping your car’s battery connections clean is a fundamental part of ensuring your vehicle runs reliably and efficiently. This simple maintenance task, which you can easily perform yourself with common household items, can prevent frustrating starting issues and protect your electrical system from damage.
By following the step-by-step guide—prioritizing safety, disconnecting cables properly, using a baking soda paste for cleaning, and applying terminal protector—you’re investing in your car’s health and your peace of mind. Remember, a little effort now can save you a lot of trouble down the road. So, next time you hear about battery problems, you’ll know exactly what to do!