How To Get Salt Stains Out Of Car Carpet (Works Fast)
Salt stains on car carpets are a common winter problem. They come from road salt used to melt ice. Removing them requires patience and the right approach. Simple cleaning solutions and tools often work best to lift the salt and its residue, leaving your car’s interior fresh and clean.
Understanding Those Stubborn Salt Stains
Those white, powdery marks you see on your car’s carpet are not just dirt. They are actually salt crystals mixed with dirt and grime. Road salt is a mixture of chemicals.
Sodium chloride (table salt) is common. Magnesium chloride and calcium chloride are also used. These salts are great for melting ice.
But they stick to your car’s tires and undercarriage. Then, they get tracked into your car.
When salt gets wet, it dissolves. It soaks into your carpet fibers. As the water evaporates, the salt crystals are left behind.
They dry out. This leaves that familiar white residue. It looks fuzzy or crusty.
It can also make your carpet feel stiff. Sometimes, the salt can even damage the carpet fibers over time. It’s a cycle that repeats all winter long.
The sticky nature of the salt also traps dirt. So, it’s not just salt. It’s salt mixed with mud, sand, and other road debris.
This makes the stain even harder to remove. It’s like a tough glue holding onto all the grime. Because it’s so common, many people wonder if it’s even possible to get rid of it completely.
The good news is, yes, it is.
My Own Salt Stain Struggle
I remember one winter vividly. We had a huge snowstorm, followed by lots of icy days. My car was covered in salt.
I thought I had cleaned it pretty well after a long drive. A few days later, I noticed it. White lines appeared on my driver’s side floor mat.
They seemed to spread. I tried a generic carpet cleaner I had. I sprayed it on and scrubbed with a brush.
It looked a little better at first. But then, as it dried, the white marks came back. I felt so frustrated.
My car felt messy. I spent a weekend trying different things. I even tried a strong degreaser.
It just made the carpet smell weird and didn’t fully remove the salt.
I was starting to think I’d have to live with it. Or maybe buy new floor mats. That seemed like a waste.
I almost gave up. Then, I remembered a tip from an old car detailing book. It involved using something very simple.
I was skeptical, but I decided to try it. I grabbed a spray bottle and mixed some white vinegar with water. I sprayed it onto the stained area.
Then, I gently blotted it with a clean cloth. I was amazed. The white marks started to disappear.
I did a second pass. The carpet looked almost new again. It didn’t smell like chemicals.
It just smelled clean. That was the moment I learned that sometimes, the simplest solutions are the best.
Why Regular Cleaning Might Not Work
Problem: Just vacuuming or using a standard carpet cleaner often isn’t enough. These methods might lift some dirt but don’t fully break down the salt. The salt residue stays hidden.
Result: The stains reappear quickly, especially when conditions are humid or wet. The salt dissolves again and then dries back on the carpet.
What’s Missing: A cleaner that can dissolve the salt itself. This is key to preventing its return.
The Power of Simple Ingredients
You don’t need fancy products to fight salt stains. Some of the best cleaners are already in your pantry. White vinegar is a star player here.
It’s acidic. This acidity helps to break down the salt crystals. It neutralizes the salt.
It also helps lift the grime that gets stuck to the salt.
Another helpful item is baking soda. Baking soda is a mild abrasive. It can help scrub away stubborn dirt.
It also absorbs odors. This is great for getting rid of that damp, salty smell. Sometimes, even just plain water can help.
Warm water can loosen the salt. Then, you can blot it up. But it’s usually the vinegar that does the heavy lifting.
We’ll also use microfiber cloths. These are super absorbent. They are gentle on carpet fibers.
They help lift dirt and moisture without pushing it deeper. You’ll also want a stiff brush. Not a metal one.
A plastic scrub brush works well. It helps agitate the carpet fibers. This loosens the salt and dirt.
Think of it like this: the salt acts like a glue. It holds dirt and makes the carpet stiff. The vinegar is like a solvent that dissolves the glue.
The brush helps scrub away the loosened dirt. The microfiber cloth then wipes it all away. It’s a simple system that works wonders.
Gather Your Cleaning Supplies
- White Vinegar
- Water
- Spray Bottle
- Microfiber Cloths (at least 3-4)
- Stiff Scrub Brush (plastic bristles)
- Optional: Baking Soda
- Optional: Wet/Dry Vacuum (if available)
Step-by-Step: Your Salt Stain Removal Plan
Let’s break this down into easy steps. The goal is to be thorough but gentle. We want to remove the salt without harming your car’s carpet.
It’s important to work in a well-ventilated area. Maybe open your car doors and windows. This helps with drying and airing out any vinegar smell.
Step 1: Dry Removal
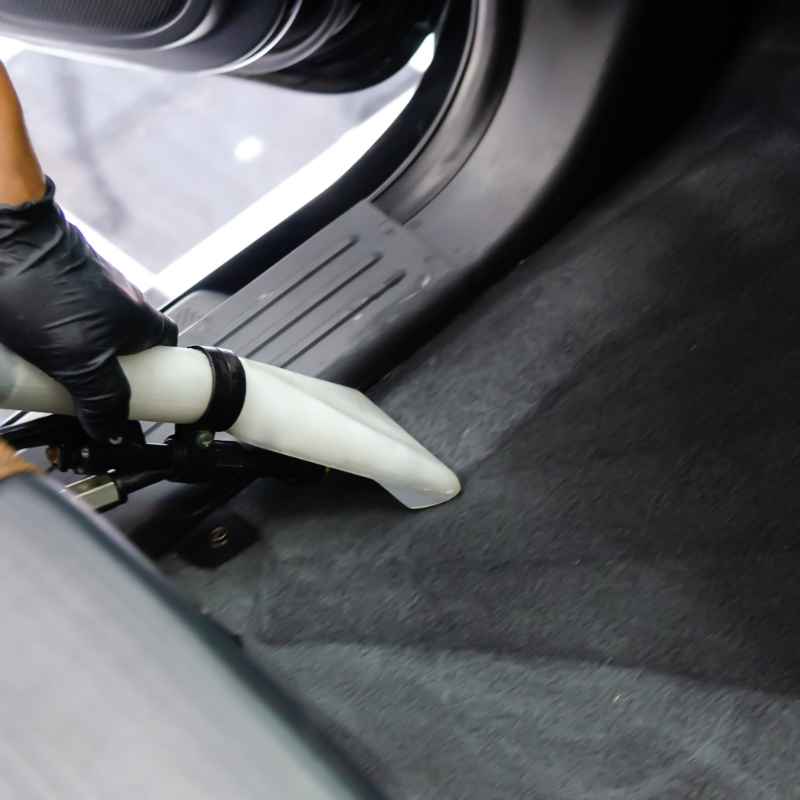
First, you need to remove as much loose salt and dirt as possible. Start by vacuuming the carpet thoroughly. Pay close attention to the areas with visible salt stains.
Use the crevice tool to get into tight spots. If you have a wet/dry vacuum, it can be even more effective. It can suck up both loose debris and any lingering moisture.
This initial step is crucial. It removes the surface layer. It prevents you from just pushing more dirt around when you add liquid cleaner.
Imagine trying to clean a muddy floor with a wet mop. It just makes a bigger mess. This first step is like sweeping up the big chunks of mud.
Sometimes, you might see large salt clumps. You can even try to gently scrape these off with your hand or a dull edge, like a plastic scraper. Be careful not to snag the carpet fibers.
The goal here is simply to get rid of the bulky stuff before we get to the wet cleaning.
Step 2: Prepare Your Cleaning Solution
Now, it’s time to make your cleaning solution. This is where the magic happens. Get a clean spray bottle.
Mix equal parts white vinegar and cool water. So, if you use one cup of vinegar, add one cup of water. A 1:1 ratio is usually perfect.
Some people like to use a stronger mix, but starting with 1:1 is safer for your carpet.
Make sure you use white vinegar. Other types, like apple cider vinegar, might stain your carpet. White vinegar is clear.
It has the right kind of acid to dissolve salt. It’s also a natural deodorizer. This will help get rid of any stale smells trapped in the carpet.
You can also add a teaspoon of dish soap to this mixture if the stains are very oily or greasy. But for most salt stains, the vinegar and water are enough. Keep the spray bottle handy.
You’ll be using it quite a bit.
Step 3: Apply the Solution
Lightly spray the vinegar and water solution onto the salt-stained areas. You don’t want to soak the carpet. Just make it damp.
The idea is to let the solution work on dissolving the salt. Let it sit for about 5 to 10 minutes. This gives the vinegar time to break down the salt crystals.
During this time, you might see some fizzing. That’s the vinegar reacting with the salt. It’s a good sign.
It means the solution is doing its job. If you are treating a large area, work in smaller sections. This way, the solution doesn’t dry out before you can work on it.
Focus on the spots where the white salt lines are most visible.
Don’t spray too much. Too much liquid can lead to longer drying times. This can cause mildew or mold to form.
It can also make the carpet backing damp. A light mist is all you need to start. You can always reapply if needed.
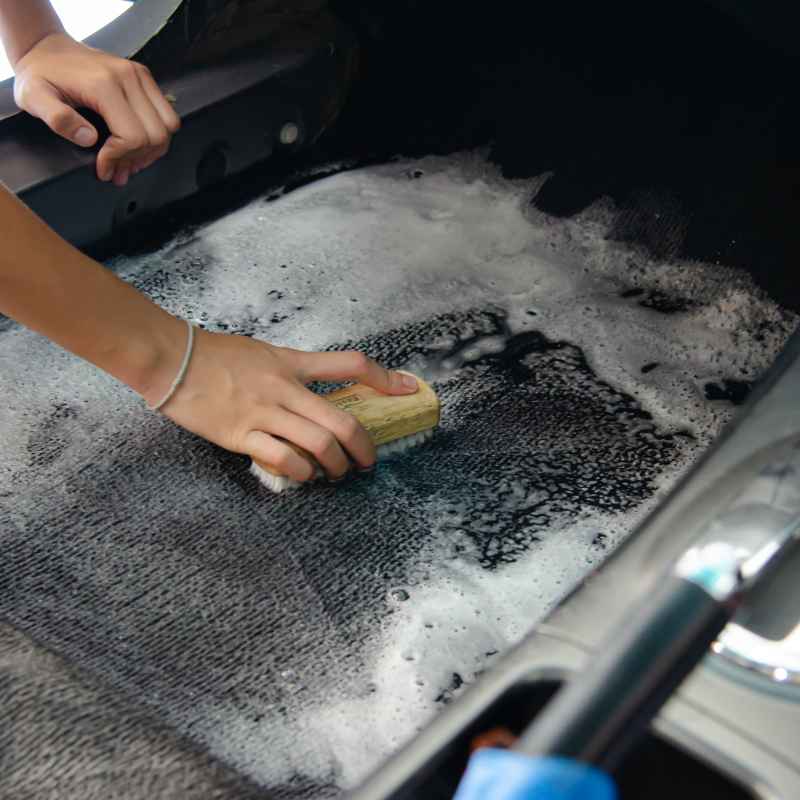
Step 4: Gentle Scrubbing
After letting the solution sit, it’s time to scrub. Use your stiff plastic scrub brush. Work in gentle, circular motions.
Scrub the stained areas. The brush will help lift the salt and dirt that the vinegar has loosened. Be firm but not aggressive.
You don’t want to fray or damage the carpet fibers.
Focus on the direction of the carpet pile if you can. Scrubbing against the grain can help lift more dirt. But avoid excessive force.
Think of it as a massage for the carpet. You’re coaxing the dirt out, not beating it into submission. If you see stubborn spots, you can spray a little more solution and scrub again.
This is where the real cleaning power comes in. The combination of the acidic vinegar and the physical action of the brush will tackle the salt. You should start to see the white residue lifting.
It might look like a dirty paste. That’s exactly what you want. It means the salt is coming out of the carpet.
Step 5: Blotting and Rinsing
Now, grab your clean microfiber cloths. Use one to blot the area you just scrubbed. Press down firmly.
The cloth will absorb the dirty liquid. You should see the salt residue transferring to the cloth. Keep using a clean section of the cloth.
Or switch to a fresh cloth as needed.
Once you’ve blotted up most of the dirty liquid, it’s time to rinse. Mix a new batch of solution with just cool water in your spray bottle. Lightly spray the area again.
This is your rinse. It helps remove any remaining vinegar solution or loosened dirt.
After spraying with water, blot again with another clean microfiber cloth. Repeat this rinsing and blotting process until the carpet feels clean. You can tell it’s clean when the cloth isn’t picking up much dirt.
This step is important to remove all the cleaning residue. Leftover cleaner can attract dirt later.
Step 6: Drying
Proper drying is very important. Open all car doors and windows. Let the air circulate.
This helps the carpet dry faster. If you have a fan, you can use it to speed up the drying process. Aim it at the damp areas.
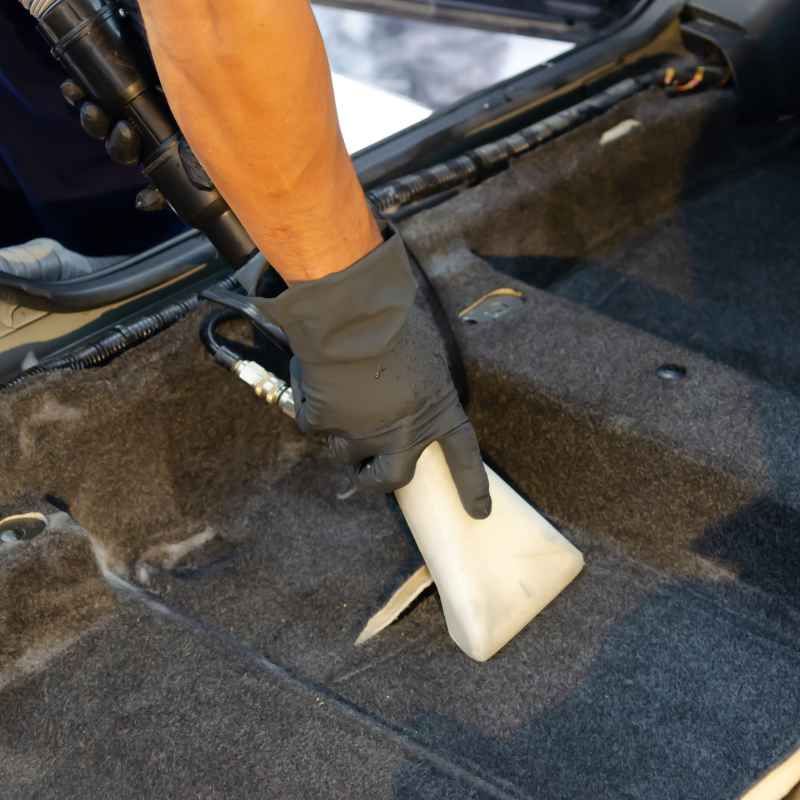
You can also use a wet/dry vacuum to suck out as much moisture as possible after the final blot.
Avoid putting anything on the floor mats or carpet until they are completely dry. Walking on damp carpet can re-soil it quickly. It can also compress the fibers and make them stiff.
Patience here pays off. Depending on humidity and how damp it got, this could take a few hours to overnight.
If possible, let the car air out in the sun for a bit. Sunlight can help kill any lingering bacteria and dry the carpet effectively. Just make sure the sun isn’t too harsh if you have delicate interior materials.
The key is good airflow and time.
Quick Scan: The Vinegar Method
Step 1: Vacuum thoroughly to remove loose salt and dirt.
Step 2: Mix 1:1 white vinegar and water in a spray bottle.
Step 3: Lightly spray stained areas. Let sit 5-10 minutes.
Step 4: Gently scrub with a plastic brush.
Step 5: Blot with clean cloths. Rinse with water, then blot again.
Step 6: Ensure carpet dries completely with good ventilation.
Alternative Methods and Tips
While the vinegar method is very effective, there are other things you can try. Or steps you can add. These can be helpful for tougher situations or if you don’t have vinegar on hand.
Using Baking Soda
If the salt stains are old or very stubborn, you can add baking soda. After you scrub with the vinegar solution, sprinkle a generous amount of baking soda over the damp area. Let it sit for a few hours.
It will absorb moisture and odors. Then, vacuum it up. You might need to repeat the scrubbing and blotting steps afterward.
Commercial Carpet Cleaners
If you prefer a commercial product, look for one designed for automotive carpets. Some are specifically formulated to tackle tough stains like salt. Always test any cleaner in an inconspicuous spot first.
Follow the product instructions carefully. Some might require rinsing, while others are no-rinse.
When using a store-bought cleaner, ensure it’s safe for your car’s carpet material. Read the labels. Look for keywords like “stain remover” or “carpet cleaner.” Some enzyme cleaners can also be effective at breaking down organic matter mixed with salt.
Steam Cleaning (For Deep Cleaning)
For very deep-set stains or a thorough refresh, a portable carpet cleaner or steam cleaner can be a great tool. These machines use hot water and cleaning solution to deep clean fibers. They also have a powerful vacuum to extract the dirty water.
If you have access to one, it can be very effective. Make sure to use the appropriate cleaning solution for the machine and your car’s carpet.
Using a steam cleaner on salt stains can be very efficient. The heat helps to break down the salt and grime. The strong suction removes it.
This method requires less manual scrubbing. It can leave your carpet looking and feeling like new.
Protecting Your Carpet
Once your carpet is clean, think about prevention. Consider using all-weather floor mats. These rubber mats are easy to clean.
They catch snow, salt, and mud. This protects your car’s carpet underneath. You can also try to wipe your feet extra well before getting into the car.
Real-World Context: When Salt Gets Everywhere
It’s not just the floor mats. Salt can get into all sorts of places. Think about the edges of your carpets.
The seams where the carpet meets the door panels. Even the cargo area in SUVs or hatchbacks can accumulate salt. This happens as snow and ice melt from groceries or gear.
The undercarriage of your car is also a major salt collector. When you drive, salt spray can get onto the wheel wells. It can cling to the chassis.
This is why regular car washes, especially during winter, are important. Many car washes offer undercarriage sprays. This helps wash away the salt that can cause rust and damage.
In my experience, the driver’s side floor mat is always the worst. It gets the most foot traffic. People are often in a rush.
They don’t take the time to wipe their feet. The salt from shoes, boots, and even wet umbrellas can transfer. This makes the driver’s area a prime spot for those stubborn white marks.
Consider the types of salt used. Some are more aggressive than others. Calcium chloride, for instance, is very effective at melting ice.
But it can be more corrosive. It can also leave a stronger residue. Knowing this helps you understand why some stains are tougher than others.
It’s not just a simple salt deposit; it’s a mix of chemicals and grime.
What This Means for Your Car’s Interior
Seeing salt stains can make you feel like your car is less valuable. It looks neglected. But it’s a sign of harsh weather, not poor care.
Once you know how to remove them, you can restore that clean feeling. It makes driving more enjoyable. It also helps maintain the car’s resale value.
A clean interior is always a plus.
When is it normal to see salt stains? Pretty much any time after driving in winter conditions where salt is used. If you live in a region that gets snow or ice, it’s almost inevitable.
What’s concerning is if the stains are so bad they cause damage. Or if they return immediately after cleaning, suggesting the salt hasn’t been fully neutralized.
A simple check is to feel the carpet. If it feels stiff and crusty even after cleaning, there might still be salt present. Or the salt may have damaged the fibers.
If you notice any discoloration or fraying of the carpet, that’s a sign of damage. But usually, with the right cleaning, the salt can be removed.
Think about your habits. Do you bring wet umbrellas or snow-covered boots inside your car regularly? If so, consider keeping a towel or a small mat in the trunk.
This can catch moisture and salt before it spreads. Small habits can make a big difference in keeping your car clean year-round.
Quick Tips for Salt Stain Removal
Here are some quick reminders to help you remember the key points.
- Act Fast: The sooner you treat salt stains, the easier they are to remove.
- Dry First: Always vacuum up loose debris before wetting the carpet.
- Vinegar is Your Friend: A 1:1 mix of white vinegar and water is a powerful, natural cleaner.
- Gentle Scrubbing: Use a plastic brush. Don’t be too harsh.
- Blot, Don’t Rub: Blotting lifts the stain. Rubbing can spread it.
- Rinse Well: Remove all cleaning residue to prevent future dirt attraction.
- Dry Thoroughly: Good ventilation is key to prevent mold and mildew.
- Protect: Use all-weather mats to prevent future stains.
Frequently Asked Questions
How long does it take to remove salt stains?
The time can vary. For light stains, it might take 30-60 minutes. For tougher, older stains, it could take a couple of hours, including drying time.
This includes vacuuming, cleaning, blotting, rinsing, and drying.
Can I use a pressure washer on my car’s carpet?
It’s generally not recommended to use a high-pressure washer directly on car carpet. The intense pressure can damage the fibers and padding. It can also force water deep into the carpet backing, making it hard to dry.
A steam cleaner or a carpet extractor is a much safer option.
Will the vinegar smell linger?
The vinegar smell is usually temporary. Once the carpet is completely dry, the smell should dissipate. Leaving car doors and windows open helps speed this up.
If a slight smell remains, you can place an open box of baking soda in the car overnight to absorb odors.
Are salt stains permanent?
Most salt stains are not permanent if treated properly. The key is to neutralize the salt and lift the residue. Very old or neglected stains might have already caused some damage to the carpet fibers.
But the visible white residue can usually be removed.
What if I don’t have white vinegar?
If you don’t have white vinegar, you can try a solution of club soda. It can help lift some stains. Another option is a dedicated automotive carpet cleaner.
Always test any cleaner on a hidden spot first to ensure it doesn’t discolor the carpet.
How often should I clean salt stains?
It’s best to clean salt stains as soon as you notice them. If you live in an area with frequent snow and ice, a good cleaning after a major snow event is wise. Regular vacuuming throughout the winter also helps.
A deep clean with a carpet cleaner or vinegar solution might be needed a few times per season.
Final Thoughts on a Clean Car Interior
Tackling salt stains on your car carpet doesn’t have to be a losing battle. With a few simple household items and a little patience, you can bring back the clean. Remember to start with dry removal.
Then, use your vinegar solution. Scrub gently, blot well, and let it dry completely. Your car will feel fresh and look much better.
Happy cleaning!