How to Remove a Dent from Car: A Diagnostic Guide That Actually Works
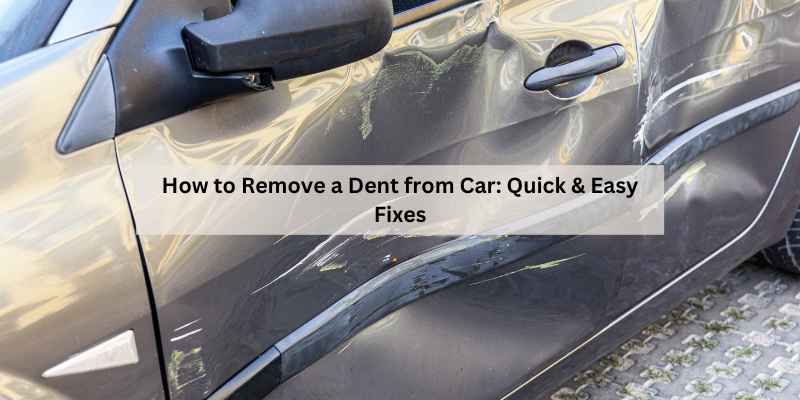
You walk out to the parking lot and there it is—a fresh dent on the door, right at eye level. Your stomach drops. You run a finger over it, check the paint, and wonder if this is a $500 trip to the body shop or something you can fix in the driveway. Most people guess wrong and waste money on the wrong tools or make the dent worse.
This guide takes a different approach. Instead of throwing five methods at you and hoping one sticks, we’ll start with a 60-second assessment that tells you exactly which method fits your dent. You’ll learn the material of your panel, the condition of your paint, and the severity of the crease. Then you’ll match that diagnosis to the right fix—whether it’s boiling water, a plunger, a glue pull, or a professional paintless dent repair (PDR) tech.
You’ll also get real cost numbers, not vague promises. DIY tools run $15 to $50. Professional PDR runs $75 to $150 per panel. Knowing the difference before you start saves you time and frustration.
If you want a solid middle-ground tool for broad, shallow dents, the Oxerlas dent puller kit includes one large and two small pullers with a natural rubber bottom and a metal core. It’s a good option for the suction method we cover below, and it doubles as a phone holder in a pinch. Just check the current price on Amazon before you commit.
Before You Start: The 60-Second Dent Assessment
Grab a magnifying glass and a flashlight. You need to look at three things: the paint, the crease, and the material. This takes less than a minute and tells you which methods are safe.
Check the Paint for Cracks
Run your fingernail across the dent. If it catches on a crack or chip, the clear coat and paint are already broken. Stop right there. Any pulling method—suction, glue, or plunger—will pull the cracked paint off in chunks. You’ll turn a $100 dent into a $400 repaint.
Use the tape test to confirm. Press a piece of clear tape over the dent and pull it off slowly. If you see paint flecks on the tape, the paint is compromised. Your only real options are body filler or a professional body shop. Don’t attempt DIY removal on cracked paint.
Identify the Crease Severity
Run your fingernail across the dent’s deepest point. If it catches, you have a sharp crease. Creased dents have metal that’s stretched and folded. No suction cup or glue pull can fix that—the metal has to be reshaped from behind, which requires a PDR tech’s specialized tools or body filler. If your fingernail glides smoothly, the dent is a shallow depression, and DIY methods have a real chance.
Know Your Panel Material
Most car doors, fenders, and hoods are steel. But many newer trucks and luxury cars use aluminum for hoods and tailgates. Here’s the catch: aluminum doesn’t respond to thermal shock the way steel does. It dissipates heat too quickly, so the boiling water and compressed air trick won’t work. It also doesn’t hold a glue pull as well because the metal flexes differently. If you have a magnet handy, stick it to the panel. If it doesn’t stick, you have aluminum, and your DIY options shrink to the plunger or suction methods on very shallow dents.
Plastic bumpers are a different story. Most modern bumpers are thermoplastic polyurethane, which softens with heat and pops back into shape. That’s why the boiling water method works so well on them—but only if you check for parking sensors first.
The Cost Reality Check: DIY vs. Professional Dent Removal
Let’s talk money, because that’s usually the deciding factor. Here’s what you’re actually looking at:
| Method | Tool Cost | Time Required | Skill Level | Success Rate on Shallow Dents |
|---|---|---|---|---|
| Boiling water (plastic bumpers) | $0 (kitchen items) | 15–30 minutes | Beginner | 80% if done early |
| Hair dryer + compressed air | $10–$20 (air can) | 20–40 minutes | Beginner | 50–60% on steel |
| Plunger pull | $5–$10 | 10–20 minutes | Beginner | 40% (needs perfect seal) |
| Glue pull kit | $20–$40 | 30–60 minutes | Intermediate | 60–70% on steel |
| Suction cup dent puller kit | $15–$50 | 15–30 minutes | Beginner | 70% on broad dents |
| Professional PDR | $75–$150 per panel | 1–3 hours (shop time) | Expert | 95%+ on most dents |
That professional price tag stings, but it’s worth it when you factor in the risk of DIY. A failed glue pull that damages paint costs you $400 to repaint. A successful DIY fix costs you $20 and an afternoon. The smart play is to diagnose honestly, try the cheapest safe method first, and know when to stop.
Method 1: The Boiling Water Trick (For Plastic Bumpers Only)
This is the cheapest fix on the list, and it works surprisingly well on plastic bumpers. The heat softens the plastic, and the dent pops back out as the material relaxes to its original shape.
Start by boiling a full kettle of water. Pour it directly over the dent—slowly, so the heat soaks in. Don’t worry about the paint; the water is only 212°F, which won’t damage automotive clear coat. Wait 30 seconds, then reach behind the bumper and push the dent out from the inside. If you can’t reach the back, use a plunger or suction cup on the outside while the plastic is hot.
Here’s the safety warning most guides skip: check for parking sensors first. Modern bumpers have ultrasonic sensors embedded in the plastic, and pouring boiling water directly on them can damage the electronics. If your bumper has sensor circles, cover them with a wet cloth or skip this method entirely. Also, don’t use boiling water on metal panels—it doesn’t get hot enough to affect steel, and you’ll just make a mess.
One more tip: work fast. The plastic cools in 60–90 seconds. If the dent doesn’t pop on the first try, reheat and repeat. Most shallow bumper dents come out in two or three cycles.
Method 2: The Hair Dryer and Compressed Air Thermal Shock (For Metal Panels)
This method uses rapid temperature change to make the metal contract and pop the dent out. It works on steel, not aluminum. The science is simple: heat expands the metal, then sudden cold makes it shrink and pull the dent outward.
Set your hair dryer to the highest heat setting and hold it 2–3 inches from the dent. Move it in a circular motion for 2–3 minutes until the panel is hot to the touch. Then flip the can of compressed air upside down and spray the dent directly. The liquid propellant hits the hot metal and drops the temperature fast—we’re talking a 100°F change in seconds.
You’ll hear a popping sound sometimes. That’s the dent releasing. If nothing happens, repeat the cycle two or three times. This works best on shallow, round dents. On a sharp crease, it does nothing.
Two warnings. First, don’t use this on aluminum—it doesn’t hold heat, so the thermal shock never happens. Second, keep the hair dryer away from any water. You’re working outside, maybe near a hose or puddle. Electrical shock is a real risk. Dry the panel completely before you start, and don’t stand in a puddle while the dryer is running.
This method has a moderate success rate, which is why it’s best for small dents where you have nothing to lose. If it fails, you haven’t damaged anything, so you can move on to a stronger method.
Method 3: The Plunger Pull (For Broad, Shallow Dents)
You probably have a plunger in your bathroom, and that’s the tool for this job. But not just any plunger—you need a flat-bottomed one, not the flanged toilet style. A sink plunger with a flat rim creates the best seal.
Wash the dent area with soap and water, then dry it completely. Wet the plunger cup and press it firmly over the dent, making sure no air escapes. Pull straight out with a quick, sharp motion. Don’t yank slowly—you want a sudden pop, not a sustained pull.
The plunger works on broad dents with a large surface area, like a door ding or a fender crease that’s actually a shallow depression. It fails on small, sharp dents because the plunger can’t get a seal around the edges. It also fails if the dent has a crease, because the plunger pulls on the whole panel, not the specific spot.
This method is free and takes five minutes. Try it before spending money on anything else. If the dent doesn’t pop after three or four attempts, it’s not the right tool for the job.
Method 4: The Glue Pull and Slide Hammer (For Tight Spots)
When a dent is too small for a plunger and too sharp for a suction cup, glue pulling is the answer. This is the technique professional PDR techs use, but you can do a simplified version at home.
You’ll need a glue pull kit—hot glue sticks, a pulling tool, and a slide hammer. Clean the dent with rubbing alcohol to remove any wax or grease. Heat the glue gun and apply a quarter-sized dollop of hot glue to the center of the dent. Press the pulling tab into the glue and wait 60 seconds for it to set. Then attach the slide hammer and give it a firm, quick pull.
The glue adheres to the paint, and the pull transfers force to the dent. This works on steel panels and tight spots where a suction cup can’t fit—like near door edges, mirror bases, or body lines. It’s the best DIY method for creased dents, though it won’t fix a sharp crease completely. It’ll make it less noticeable, but the metal is stretched, and only a professional can reshape it fully.
Use caution with the glue. It’s hot enough to burn skin, and if it’s not fully set, it’ll pull off the paint when you yank. Wait the full 60 seconds. Also, don’t use this on aluminum—the glue bond is strong, but the aluminum panel flexes too much and the glue pops off without moving the dent.
Method 5: The Suction Cup Dent Puller Kit (The Middle Ground)
Suction cup pullers are the most popular DIY tool because they’re forgiving. You place the cup over the dent, lock the handle, and pull. No heat, no glue, no risk of paint damage—as long as the paint is intact.
The Oxelar dent remover kit fits this category well. It includes one large and two small pullers, so you can match the cup size to the dent. The large one has 110 lbs of horizontal suction and 77 lbs vertical, which is strong enough for most shallow dents. The rubber bottom is seamless, so it won’t scratch your clear coat.
Here’s the technique that actually works. Clean the surface thoroughly—any dirt or grease kills the seal. Heat the dent with hot water or a hair dryer for 30 seconds; warm paint is more pliable. Press the puller down vertically, then pull the double handles upward quickly and firmly. Don’t twist or wiggle. Repeat until the dent pops out.
The pro tip on the package is accurate: the dent must be larger than the suction cup. If the cup is bigger than the dent, you’re pulling on the surrounding panel, not the dent itself. For small dents, use the small puller. For a door ding that’s about the size of a quarter, the small one works.
This method has the best success-to-effort ratio for beginners. It won’t fix creases, and it won’t work on aluminum as well as steel, but for the common parking-lot door ding, it’s the tool I reach for first.
When DIY Fails: The 90/10 Rule and How to Find a Good PDR Tech
Here’s a rule of thumb I’ve learned from years of messing with car bodies: DIY methods fix about 90% of shallow dents, but the last 10%—the sharp creases, the stretched aluminum, the dents right on a body line—will never look right without professional help. Knowing when to stop saves you money.
If you’ve tried two methods and the dent hasn’t improved, stop. Continuing risks paint damage and makes the dent harder for a pro to fix. A professional PDR tech can often fix a dent that’s been partially pulled, but not if you’ve cracked the paint.
Finding a good PDR tech isn’t hard. Look for one who works on high-end cars—they’re used to delicate paint and tight tolerances. Ask to see before-and-after photos of similar dents. A good tech will show you their work without hesitation. The cost runs $75 to $150 per panel, which is a fraction of a body shop’s $400 to $600 estimate for the same repair.
For hail damage, the math changes. If you have 20 dents across the roof and hood, a PDR tech charges per dent or per panel, and the total can hit $1,000. That’s when you go through insurance. For a single door ding, pay the $100 and be done with it.
Quick Reference Chart: Match Your Dent Type to the Right Method
Use this as your cheat sheet before you start any repair.
| Dent Type | Material | Paint Condition | Best Method | Expected Result |
|---|---|---|---|---|
| Shallow, broad (door ding) | Steel | Intact | Suction cup puller | 90% gone |
| Shallow, broad | Aluminum | Intact | Suction cup puller (gentle) | 70% gone |
| Shallow, broad | Plastic bumper | Intact | Boiling water | 90% gone |
| Small, tight spot | Steel | Intact | Glue pull | 80% gone |
| Small, tight spot | Aluminum | Intact | Professional PDR | 95% gone |
| Sharp crease (fingernail catches) | Any metal | Intact | Professional PDR | 95% gone |
| Any dent | Any | Cracked or chipped | Body shop only | Requires repaint |
If you’re dealing with a specific panel, like a door or hood, the approach stays the same, but the material matters more. Hoods are often aluminum on newer trucks, and doors are almost always steel. Check with a magnet before you pick a method.
For more detail on specific panels, check out our guide on door dent removal or the one on hood dent repair.
Frequently Asked Questions
Can I use dry ice instead of compressed air for the thermal shock method?
Dry ice works, but it’s riskier. The temperature drop is more extreme, which can crack the paint on older vehicles with brittle clear coat. Compressed air gets cold enough (around -60°F) without the same risk. Stick with compressed air unless you’re experienced.
Will the boiling water method damage my bumper’s paint?
No. Boiling water at 212°F is well below the temperature that damages automotive paint (which starts failing around 250°F). The plastic bumper itself is rated for much higher heat. Just don’t use boiling water on a bumper that’s been repainted after an accident—the aftermarket paint may not be cured properly.
How do I know if my car’s panel is aluminum or steel?
Use a magnet. A rare earth magnet (like a neodymium one) will stick firmly to steel and barely hold to aluminum. If you don’t have a magnet, check the vehicle’s VIN and look up the body panel material online. On newer trucks like the Ford F-150, the hood and tailgate are aluminum while the doors are steel.
Can a dent puller kit fix a crease?
No. A crease means the metal is stretched and folded. Suction cups and glue pulls apply outward force, but they can’t reshape the metal back to its original form. A crease needs a PDR tech who can work the metal from behind with specialized rods, or body filler if the crease is deep.
Is it worth trying DIY before going to a professional?
For a shallow dent with intact paint, yes. The tools cost $15 to $50, and the success rate is high enough to justify the attempt. For a creased dent or cracked paint, no—you’ll likely make it worse and increase the professional repair cost. Do the 60-second assessment first and be honest with yourself.
What to Do Next: Your Action Plan
- Assess the dent in 60 seconds: check paint cracks with a fingernail, test the crease, and confirm the material with a magnet.
- If the paint is cracked or chipped, stop and call a body shop. DIY will make it worse.
- For plastic bumpers, try the boiling water trick first. It’s free and works on most shallow dents.
- For steel panels, start with a suction cup puller like the Oxerlas dent puller kit—it’s the most forgiving method for beginners.
- For sharp creases or aluminum panels, skip DIY and book a PDR tech. The $100 you spend beats the $400 you’ll pay for a repaint.
- Never use boiling water on bumpers with parking sensors, and keep hair dryers far away from water.
- If two methods fail, stop. A professional can fix a partially pulled dent, but not one with cracked paint.
Removing a dent from your car isn’t rocket science, but it does require an honest look at what you’re dealing with. Match the method to the dent, respect the limits of each technique, and you’ll save yourself a pile of money. When in doubt, the professionals are worth the cost—especially for that last stubborn 10%.
Products related to this article
Sponsored / affiliate links. As an Amazon Associate I earn from qualifying purchases. I may earn additional commission from eligible campaigns.
 Super PDR Dent Puller Kit Paintless Dent Repair Kit for Car – Slide Hammer Suction Cup and PDR Light for 98% Auto Body Dent Removal, Hail Damage & Appliance Dents or Vehicle Dent Removal
 ZukZythepsor Car Dent Puller, Suction Cup Dent Remover Kit, Professional Car Dent Repair Tool Set with Large and Small Dent Pullers for Auto Body, Glass, Screen, Tiles Lifting and Moving