Can You Wash a Freshly Painted Truck? Best Care Guide
Many truck owners wonder, Can You Wash a Freshly Painted Truck? Best Local Care Guide, after their vehicle gets a new coat of paint. It’s a common question because you want to keep that fresh look, but you also don’t want to damage the new paint.
Beginners often feel unsure about the right timing and the best way to clean. This guide will make it simple for you. We’ll walk through exactly what to do, step by step, so your truck looks amazing for a long time.
Let’s get your truck sparkling clean safely.
When Can You Wash a Freshly Painted Truck
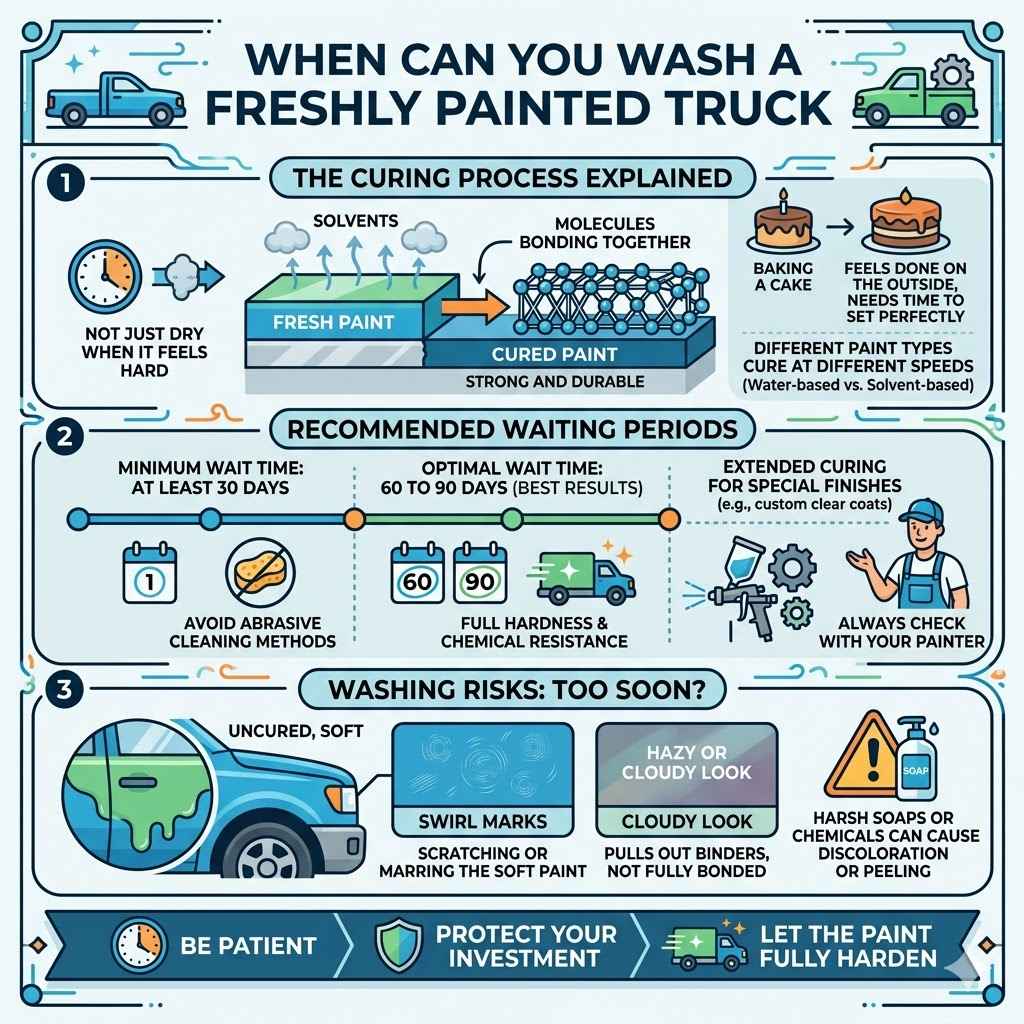
Knowing the right time to wash a freshly painted truck is very important for the paint’s longevity and appearance. When paint is new, it needs time to fully harden and cure. This process can take longer than people think, and rushing it can lead to problems.
If you wash it too soon, you might damage the soft paint, causing swirls or dullness. This section explains the timeline and why waiting is a smart move. We will cover the different stages of paint curing and what they mean for your washing routine.
The Curing Process Explained
Car paint isn’t just dry when it feels hard. It goes through a process called curing. This is when the solvents in the paint evaporate, and the paint molecules bond together tightly.
It makes the paint strong and durable.
Different types of paint cure at different speeds. For example, some modern water-based paints might be dry to the touch quickly, but they still need weeks to fully cure. Traditional solvent-based paints can take even longer.
Think of it like baking a cake. It feels done on the outside when it comes out of the oven, but it needs to cool and set to be perfect. Paint is similar; it needs time to reach its strongest state.
Understanding these stages helps you know exactly when it’s safe to wash your truck without risking damage to that beautiful new finish. This waiting period is critical.
Recommended Waiting Periods
Most auto body shops and paint manufacturers suggest a waiting period before the first wash. This is a crucial step to ensure the paint job lasts. It protects your investment and keeps your truck looking new.
Generally, you should wait at least 30 to 90 days before giving your freshly painted truck a full wash. Some experts even recommend up to six months for certain types of paint or finishes, especially for enthusiast-grade paint jobs.
This waiting time allows the paint to fully harden and cure. During this period, the paint is still somewhat soft and vulnerable. Washing it too early can cause issues.
Minimum Wait Time: For most standard automotive paints, a minimum of 30 days is advised. This is the absolute earliest you should consider washing.
This 30-day window allows the initial drying and hardening to occur. The paint will feel hard to the touch much sooner, but this initial hardness is not the same as full curing. During this period, avoid abrasive cleaning methods or harsh chemicals.
Optimal Wait Time: Waiting 60 to 90 days is often recommended for the best results. This longer period ensures the paint has reached a more robust state.
A longer wait gives the paint more time to develop its full hardness and chemical resistance. This makes it much less susceptible to damage from washing, waxing, or environmental contaminants. Most professional detailers and painters agree this is the safest bet for a lasting finish.
Extended Curing for Special Finishes: Some specialty paints, like high-gloss clear coats or custom finishes, may require even longer. Always check with your painter for specific advice.
Certain advanced paint technologies or custom paint jobs might have unique curing requirements. These can be more sensitive in their early stages. Following the painter’s specific instructions is paramount to avoid voiding warranties or damaging unique finishes.
What Happens If You Wash Too Soon
Washing a freshly painted truck before the paint is fully cured can lead to several problems. These issues can affect the look and durability of the paint job. It’s like trying to use a new piece of furniture before the glue dries.
The most common problem is scratching or marring the paint. The paint is still soft, so even light pressure from a sponge or cloth can create swirl marks. These are tiny, circular scratches that make the paint look dull.
You might also notice the paint looking hazy or cloudy. This can happen if the washing process pulls out some of the binders that hold the paint together. It’s a sign that the paint hasn’t fully bonded.
Additionally, harsh soaps or chemicals used too early can react with the uncured paint. This can cause discoloration or even peeling. It’s best to be patient and let the paint do its thing.
Best Practices for Washing a Freshly Painted Truck
Once the recommended waiting period has passed, you can begin washing your truck. However, it’s important to use the right methods and products. This section focuses on how to wash safely and effectively to protect your new paint.
We will cover gentle washing techniques, recommended supplies, and what to avoid. Following these steps will help maintain that showroom shine.
Gathering Your Supplies
Having the right supplies is key to a safe wash. You need products that are gentle on new paint. Using the wrong tools can undo all the waiting and careful application.
Think about using two buckets. One for soapy water and one for rinsing your wash mitt. This prevents dirt from going back onto the paint.
Always choose a car wash soap specifically designed for automotive use. Avoid household detergents or dish soaps. These are too harsh and can strip protective waxes or sealants.
Two Buckets with Grit Guards: This method is often called the “two-bucket wash.” One bucket holds your car wash soap and water, and the other holds clean rinse water. Grit guards at the bottom of each bucket catch dirt particles, preventing them from being transferred back to your wash mitt and then onto the paint.
The two-bucket technique is a fundamental practice in safe car washing. It significantly reduces the risk of creating swirl marks and scratches. The clean rinse water bucket is used to rinse the wash mitt after washing a small section of the vehicle.
This ensures that only clean water and soap touch your paintwork going forward.
pH-Neutral Car Wash Soap: Use a soap that is specifically formulated for car paint and has a neutral pH level. This means it won’t be too acidic or too alkaline.
pH-neutral soaps are essential for new paint because they clean effectively without stripping away any protective layers that may have been applied. They are gentle enough not to damage the delicate bonds forming within the curing paint. Always check the product label to confirm it’s pH-neutral.
Soft Wash Mitts and Microfiber Towels: Opt for plush microfiber wash mitts and drying towels. Avoid sponges or old rags that can be abrasive.
Microfiber is designed to trap dirt and grit particles away from the paint surface, minimizing the chance of scratches. A soft, deep-pile microfiber wash mitt allows for a smooth gliding action across the paint, carrying away dirt effectively. Similarly, high-quality microfiber drying towels are highly absorbent and soft, preventing any marring during the drying process.
Hose with a Gentle Spray Nozzle: A nozzle that provides a gentle spray or rinse is ideal. Avoid high-pressure washers directly on new paint.
A gentle stream of water helps to rinse away soap and dirt without forcing contaminants into the paint. While pressure washers can be useful, their high intensity can sometimes damage delicate paint or sealants if not used with extreme caution and at a safe distance. For new paint, a standard garden hose is often sufficient.
The Gentle Washing Technique
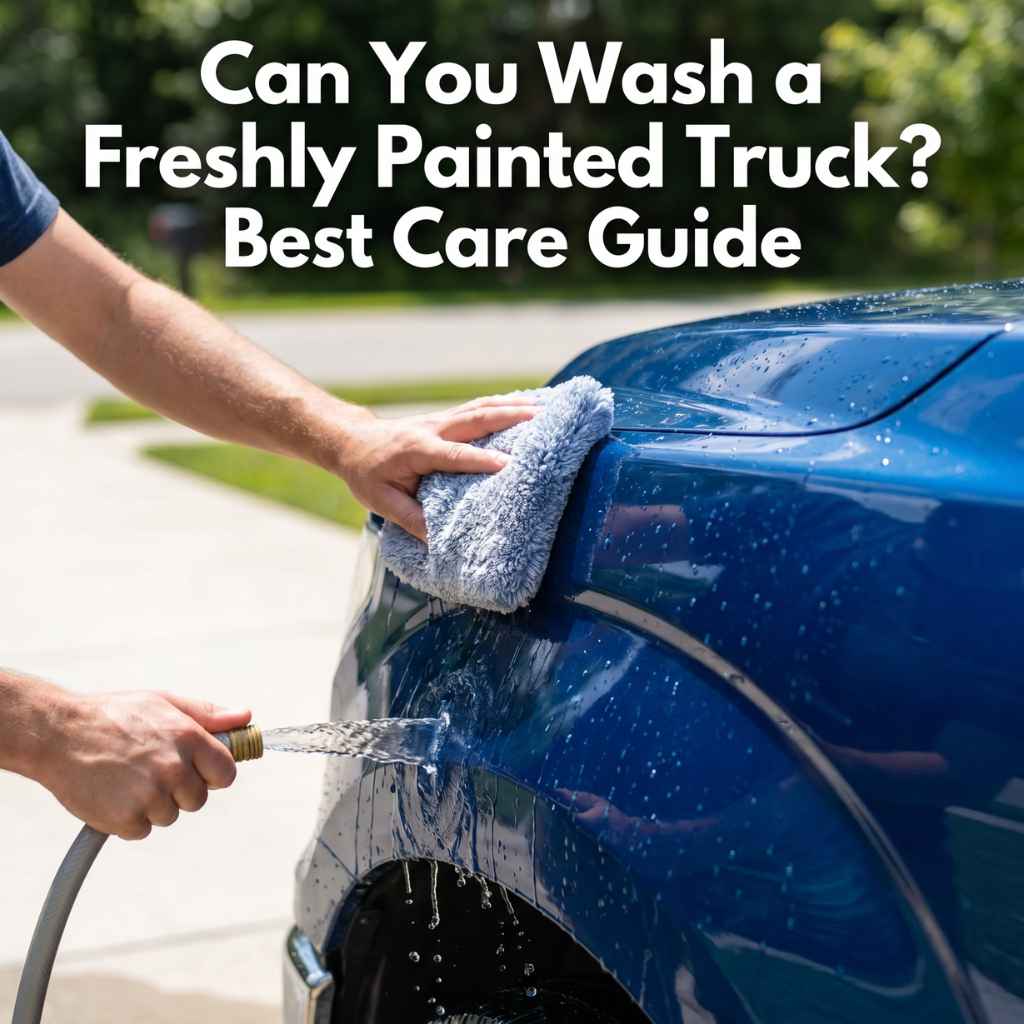
Washing should be done from top to bottom. This way, dirt and soap rinse down from areas you haven’t cleaned yet. It stops you from dragging dirt onto clean paint.
Work in small sections. Wash a panel, then rinse your mitt thoroughly in the rinse bucket before getting more soap. This is the core of the two-bucket method.
Never let soap dry on the surface. Always rinse thoroughly as you go. Dried soap can leave spots and streaks on your new paint.
Start by rinsing the entire truck with water. This removes loose dirt and debris.
A good pre-rinse is the first line of defense against scratches. It washes away loose particles like dust, mud, and pollen. This step is vital because these loose particles are the primary culprits that cause scratches when you begin to wash with a mitt.
A thorough rinse ensures that your wash mitt only has to deal with more stubborn grime, not large abrasive particles.
Dip your wash mitt into the bucket of soapy water. Wash one section of the truck at a time, starting from the roof and working your way down. Use gentle, straight-line motions.
When washing a section, focus on applying light pressure. Avoid aggressive scrubbing or circular motions, which can create swirl marks. Imagine you are gently gliding the mitt over the surface to lift dirt, rather than rubbing it off.
This approach is critical for preserving the integrity of the fresh paint.
After washing a section, rinse your wash mitt thoroughly in the clean water bucket. Make sure to rub it against the grit guard to release all trapped dirt.
This rinsing step is what makes the two-bucket method so effective. By cleaning your mitt in the separate rinse bucket, you remove all the dirt that the mitt picked up from the previous section. This prevents you from transferring that dirt back onto the next section of your truck, drastically reducing the risk of scratching the paint.
Rinse the washed section of the truck with water immediately. Ensure all soap residue is removed.
Prompt rinsing is important because car soap can dry quickly, especially in warm weather. Dried soap leaves behind unsightly spots and can even etch into the paint if left too long. Rinsing thoroughly guarantees a clean, spot-free surface after each section is washed, preparing it for the next step.
Repeat the process for each section of the truck until it is completely washed.
Consistency in applying the gentle washing technique across the entire vehicle is key. By systematically working through each panel, you ensure that no part of the new paint job is neglected or subjected to improper cleaning methods. This systematic approach also helps in maintaining a consistent finish across the whole truck.
Drying the Truck Properly
Drying is just as important as washing. Water spots can form if the water is left to air dry. These spots can be hard to remove from new paint.
Use clean, high-quality microfiber drying towels. Pat the surface dry instead of rubbing. This reduces friction and the chance of scratches.
Work from top to bottom, just like washing. Make sure to dry all the nooks and crannies, like around door handles and mirrors.
Use Multiple Drying Towels: Have several clean, plush microfiber drying towels ready.
Using multiple towels prevents you from saturating one towel too quickly. A damp towel is less effective at absorbing water and can also increase the risk of scratching if it starts to drag across the surface. Having plenty of dry towels on hand ensures efficient and safe drying.
Blot, Don’t Rub: Gently blot water off the surface with the towel.
Blotting is a much gentler method than rubbing or wringing the towel. It allows the microfiber to absorb the water without creating friction. This is especially important for new paint, which is still more sensitive to abrasion.
Think of it as soaking up water rather than wiping it away.
Dry in Shade: If possible, dry the truck in a shaded area.
Drying in direct sunlight can cause water to evaporate too quickly, leading to water spots. Drying in the shade allows you to control the drying process better and ensures a streak-free finish. It also keeps the paint surface cooler, making the process more comfortable.
What to Avoid When Washing a Freshly Painted Truck
Certain cleaning methods and products should be strictly avoided when your truck’s paint is still new. These can cause irreversible damage. This section highlights common mistakes to steer clear of, ensuring your paint job stays pristine.
We will discuss abrasive materials, harsh chemicals, and improper techniques.
Abrasive Materials and Chemicals
Things like rough sponges, old rags, or stiff brushes can easily scratch new paint. They are too abrasive. Always use soft microfiber materials.
Harsh chemicals are also a big no-no. This includes things like degreasers not meant for car paint, strong household cleaners, or even some all-purpose cleaners.
Even automatic car washes with their brushes can be too rough for freshly painted surfaces. It’s best to avoid them entirely for a while.
Harsh Soaps and Detergents: Avoid dish soap, laundry detergent, or any cleaning product not specifically labeled as pH-neutral car wash soap.
These products can strip away protective clear coats and waxes. They can also leave the paint vulnerable to environmental damage. For new paint, maintaining its integrity is the top priority, and harsh chemicals compromise this significantly.
Abrasive Cleaning Tools: Do not use scouring pads, stiff brushes, or rough sponges.
These tools have sharp edges or abrasive particles that will scratch the paint. Microfiber is the gold standard because it is soft and designed to trap dirt safely. Using the wrong tool is a quick way to ruin a beautiful new paint job.
Pressure Washers at Close Range: While a gentle rinse is okay, high-pressure jets can damage new paint.
High pressure can force water into tiny cracks or imperfections in the paint, causing delamination or damage over time. It can also strip away clear coat if used too intensely. Always maintain a safe distance and use a wide spray pattern if a pressure washer is used at all.
Improper Washing Techniques
Washing in direct sunlight is problematic. The heat causes soap and water to dry too quickly, leaving water spots and streaks that are hard to remove.
Circular washing motions are another common mistake. These motions create swirl marks. Always wash in straight lines.
Letting the wash mitt become dirty and then continuing to wash without rinsing it properly is a sure way to scratch. This is why the two-bucket method is so important.
Washing in direct sunlight.
The sun’s heat causes water and soap to evaporate rapidly. This leads to water spots, which are mineral deposits left behind. These spots can be difficult to remove and may even etch into the new paint if left untreated.
It is always better to wash your vehicle in the shade or on a cloudy day.
Scrubbing aggressively or using circular motions.
This is a major cause of swirl marks, which are tiny scratches that create a hazy appearance. Gentle, straight-line motions are recommended to minimize friction and prevent damage. Imagine you are guiding the wash mitt, not scrubbing the paint.
Using a dirty wash mitt or sponge.
A dirty mitt carries abrasive particles that will scratch the paint. The two-bucket wash method with grit guards is designed to keep your mitt clean. Always rinse your mitt thoroughly in the clean water bucket after washing each section.
Allowing soap or water to dry on the surface.
Dried soap and water can leave spots and streaks. Always rinse each section immediately after washing it. This ensures a clean, clear finish without residue.
Protecting Your Fresh Paint After Washing
Once your truck is clean and dry, you’ll want to protect that beautiful new paint. This section covers the best ways to add a layer of protection. We will discuss waxing, sealing, and ceramic coatings.
These steps help maintain the shine and defend against environmental damage.
Applying Wax or Sealant
After the initial curing period, you can start applying protective products. Wax provides a warm shine and protection. Sealants offer longer-lasting protection and can be easier to apply.
Always choose a product designed for automotive paint. Read the instructions carefully. Some products can be applied in thin layers.
Work in a shaded area. Apply the product to an applicator pad and then spread it thinly and evenly over the paint. Buff off the residue with a clean microfiber towel.
Carnauba Wax: Offers a deep, warm glow and good protection for about one to two months.
Carnauba wax is a natural product derived from the leaves of the Brazilian carnauba palm. It’s highly regarded for its ability to create a rich, deep shine that many car enthusiasts love. While it offers excellent aesthetics, its protective lifespan is relatively short, requiring frequent reapplication.
Synthetic Sealants: Provide longer-lasting protection, often six months or more, and are generally easier to apply than waxes.
Synthetic sealants are man-made polymer-based products. They bond to the paint surface at a molecular level, creating a durable barrier. Their longevity and ease of application make them a popular choice for those seeking extended protection without constant reapplication.
They also tend to offer a brighter, more reflective shine.
Hybrid Ceramic Waxes/Sealants: Combine the ease of application of waxes with the durability of ceramic coatings.
These newer products aim to bridge the gap between traditional waxes and advanced ceramic coatings. They often offer impressive water beading, slickness, and durability that can last for several months, all while being as simple to apply as a spray wax. They provide a good balance for those wanting enhanced protection and shine.
Ceramic Coatings Explained
Ceramic coatings are a more advanced form of paint protection. They form a hard, glass-like layer on top of your paint. This layer is very durable and can last for years.
These coatings offer superior protection against UV rays, chemical stains, and light scratches. They also create an incredibly slick surface that makes washing easier.
Applying a ceramic coating is a more involved process. It often requires paint correction beforehand. For best results, professional application is recommended.
Can You Use a Car Cover After Painting?
Yes, you can use a car cover, but with some caution, especially in the initial weeks. Make sure the cover is clean and made of a breathable material. A dirty cover can scratch new paint.
For the first few weeks, it’s best to use a soft, indoor car cover if you need protection. This is because the paint is still off-gassing and can potentially bond to certain types of cover materials if they trap moisture.
Outdoor covers are designed to protect against elements, but ensure it’s a high-quality, soft-lined cover. Avoid covers that are stiff or have rough inner surfaces. Always ensure the car is completely dry before putting on any cover.

Frequently Asked Questions
Question: How long should I wait before waxing a freshly painted truck?
Answer: It is generally recommended to wait at least 60 to 90 days before applying wax or sealant to a freshly painted truck. Some paint manufacturers may suggest longer, so always consult your painter or the paint product’s guidelines for the most accurate recommendation.
Question: Can I use a bug and tar remover on new paint?
Answer: It’s best to avoid bug and tar removers on freshly painted trucks for at least 90 days, and ideally longer. These removers can be harsh and may damage or strip the uncured paint. If you must remove bugs or tar, try a very gentle method like soaking with water or using a specialized, mild product only after consulting with your painter.
Question: What is the best way to dry my truck without scratching?
Answer: The best way to dry your truck without scratching is to use multiple high-quality microfiber drying towels. Gently blot the water off the surface, working from top to bottom. Avoid rubbing or wringing out the towels.
Ensure your towels are clean and free of debris.
Question: Can I park my freshly painted truck under a tree?
Answer: While possible, parking under a tree is not ideal for a freshly painted truck. Tree sap can be very difficult to remove and can etch into the paint. Bird droppings are also acidic and can damage the paint if left on too long.
It’s better to park in a garage or a sheltered area if possible.
Question: Should I use a clay bar on my new paint job?
Answer: Generally, you should wait at least 90 days, and often longer, before using a clay bar on a freshly painted vehicle. Clay bars are designed to remove embedded contaminants, but they can be abrasive. It’s essential for the paint to be fully cured before any aggressive detailing processes like clay barring are performed.
Wrap Up
You now know Can You Wash a Freshly Painted Truck? Best Local Care Guide. The key is patience, waiting the recommended time for the paint to cure fully.
Use gentle washing methods and high-quality microfiber tools. Always protect your new paint with wax, sealant, or a ceramic coating. Following these simple steps keeps your truck looking its best for years to come.
Enjoy your freshly painted ride.