How to Charge Car Battery in Home: Easy Guide
Yes, you can charge your car battery at home using a battery charger and a few simple steps. This guide will walk you through the process safely and effectively, saving you time and money.
Is your car refusing to start, leaving you stranded and frustrated? A dead car battery is a common problem that many drivers face. It can feel like a big, complicated issue, but often, it’s something you can fix yourself right in your own driveway. Don’t worry if you’re new to car maintenance; this guide is designed with you in mind. We’ll break down exactly how to charge your car battery at home, making it simple, safe, and stress-free. Get ready to get your car back on the road!
Why You Might Need to Charge Your Car Battery
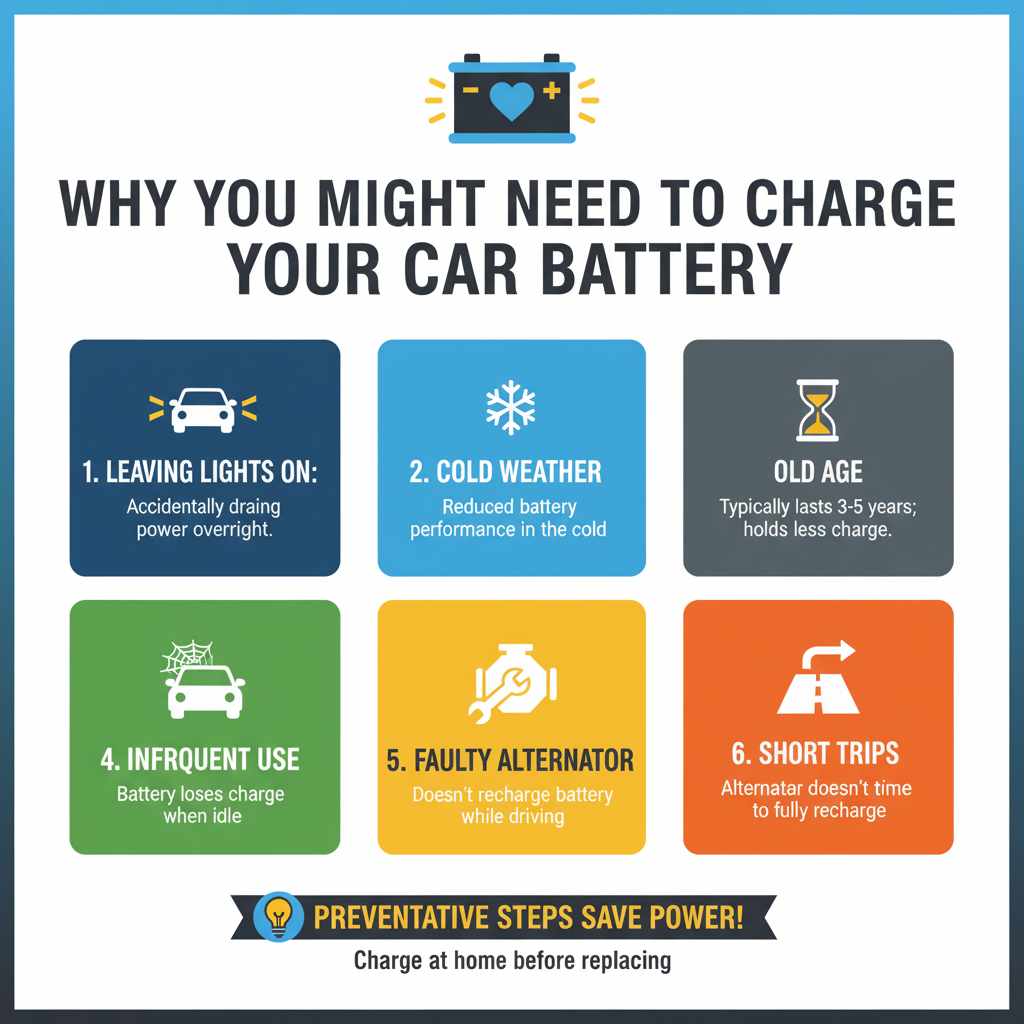
A car battery is like the heart of your vehicle’s electrical system. It stores the power needed to start the engine and runs all the electronics when the engine isn’t on, like your headlights, radio, and interior lights. Over time, or due to certain circumstances, this battery can lose its charge. Factors that can lead to a dead battery include:
- Leaving Lights or Accessories On: Accidentally leaving headlights, interior lights, or the radio on after turning off the engine is a very common cause.
- Cold Weather: Batteries perform less effectively in cold temperatures. Starting the engine requires more power, and the battery’s ability to supply that power is reduced.
- Old Age: Car batteries typically last between 3 to 5 years. As they age, they can no longer hold a charge as well.
- Infrequent Use: If your car sits unused for long periods, the battery can naturally lose its charge.
- Faulty Alternator: The alternator recharges the battery while the engine is running. If it’s not working correctly, the battery won’t get recharged.
- Short Trips: Making lots of very short trips means the alternator doesn’t have enough time to fully recharge the battery.
Recognizing these situations can help you prevent a dead battery in the first place. But if it happens, charging it at home is a great first step before considering a replacement.
What You’ll Need to Charge Your Car Battery
Before you start, gathering the right tools and materials will make the process smooth and safe. You don’t need to be a mechanic to do this; these are standard items many car owners might already have or can easily purchase.
Essential Tools and Supplies:
- A Car Battery Charger: This is the most important item. There are different types, but an automatic or smart charger is highly recommended for beginners. They monitor the battery’s charge level and stop charging when it’s full, preventing overcharging. You can find these at auto parts stores or online. Look for chargers designed for 12-volt car batteries.
- Safety Gloves: Battery acid is corrosive, so protecting your hands is crucial.
- Safety Glasses: To protect your eyes from any potential sparks or battery acid.
- Wire Brush or Battery Terminal Cleaner: To clean off any corrosion from the battery terminals.
- A Wrench or Socket Set: Usually a 10mm or 13mm wrench is needed to disconnect the battery cables.
- A Static Discharge Source (Optional but Recommended): A piece of metal like a screwdriver. You’ll use this to ground yourself before touching the battery.
- Owner’s Manual: Your car’s owner’s manual might have specific recommendations or warnings about your battery.
Having these items ready will ensure you can perform the charging process efficiently and safely. The battery charger is the key piece of equipment here; investing in a good automatic charger is a wise choice for any car owner.
Step-by-Step Guide: How to Charge Your Car Battery at Home
Charging a car battery at home is straightforward if you follow these steps carefully. Safety is our top priority, so pay close attention to each instruction.
Step 1: Prepare Your Vehicle and Work Area
First, park your car in your garage or driveway, ensuring it’s on a level surface. Turn off the engine, and make sure all accessories like headlights, radio, and interior lights are off. Open the hood and locate your car battery. It’s usually a rectangular box with two metal terminals on top, often with red and black plastic covers.
Ensure the area around the battery is well-ventilated. Car batteries can release explosive hydrogen gas during charging, so avoid charging in enclosed, unventilated spaces. Also, keep any open flames or sparks away from the battery area.
Step 2: Safety First – Protective Gear and Grounding
Put on your safety gloves and safety glasses. It’s also a good idea to disconnect anything that’s plugged into your car’s power outlets (like a phone charger or dashcam) as a precaution. Before touching the battery terminals, it’s recommended to ground yourself to prevent static electricity discharge, which could ignite hydrogen gas. You can do this by touching a metal part of your car’s body with a metal object (like a wrench) that you will later use on the battery terminals.
Step 3: Disconnect the Battery Cables
Locate the negative (-) and positive (+) terminals on your battery. The negative terminal is usually marked with a minus sign (-) and often has a black cable. The positive terminal is marked with a plus sign (+) and usually has a red cable.
Using your wrench, loosen the nut on the clamp holding the negative (black) cable. Gently twist and pull the cable off the terminal. It’s important to always disconnect the negative cable first. This is a safety measure to avoid electrical shorts.
Next, loosen the nut on the clamp holding the positive (red) cable. Remove this cable from the terminal. Once both cables are disconnected, you can set them aside. Make sure they don’t accidentally touch the battery terminals or each other.
Step 4: Inspect and Clean the Battery Terminals and Cables
Look at the battery terminals and the inside of the cable clamps. You might see a gritty, powdery substance, which is corrosion. This corrosion can prevent a good connection and hinder charging. Use your wire brush or battery terminal cleaner to scrub away any corrosion on both the battery posts and the inside of the cable clamps until they are clean and shiny.
A clean connection is crucial for efficient charging and for current to flow properly when you start your car. Refer to resources like the National Highway Traffic Safety Administration (NHTSA) for general vehicle safety tips, including battery care.
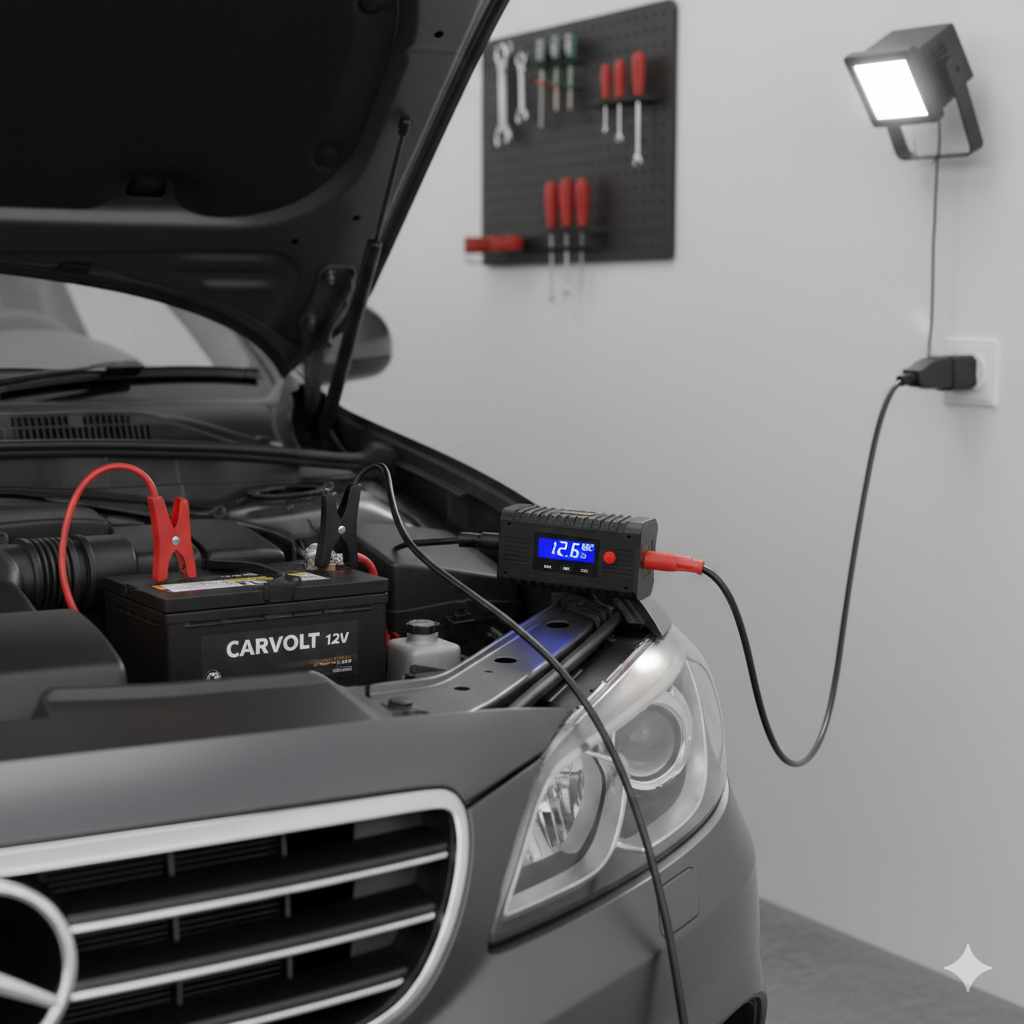
Step 5: Connect the Battery Charger
Read your battery charger’s manual carefully, as instructions can vary slightly. However, most automatic chargers follow a similar connection order:
First, connect the positive (red) clamp of the charger to the positive (+) terminal of the battery. Ensure it’s a secure connection.
Next, connect the negative (black) clamp of the charger to a ground point on your car’s engine block or chassis. Do NOT connect it directly to the negative (-) battery terminal. This is another important safety step to minimize the risk of sparks near the battery. Look for a clean, unpainted metal surface away from moving parts.
Make sure the charger is turned OFF or set to its charging mode before plugging it into a power outlet.
Step 6: Plug In and Select Charging Mode
Plug the battery charger into a standard household electrical outlet (usually 120V in North America). Set your charger to the appropriate mode. Most automatic chargers will have modes like “12V Battery,” “Normal Charge,” or “Winter” mode. If your charger has options for charging speed (e.g., slow, fast, or a maintenance charge), a slower charge is generally better for the battery’s long-term health. Consult your charger’s manual for specific settings.
Many modern chargers are “smart” or “automatic” and will determine the best charging rate based on the battery’s condition. They often have indicator lights that show the charging status.
Step 7: Monitor the Charging Process
Let the charger do its work. The time it takes to charge can vary widely, from a few hours to overnight, depending on how discharged the battery is and the charger’s amperage. Most automatic chargers will indicate when the battery is fully charged. Some may even switch to a maintenance mode, providing a trickle charge to keep the battery topped up.
Don’t rush the process. Allow the charger to complete its cycle. It’s a good idea to check the charger’s indicator lights periodically to see the progress. If you notice any unusual smells, excessive heat from the charger or battery, or strange noises, unplug the charger immediately and consult your charger’s manual or a professional.
Step 8: Disconnect the Charger and Battery Cables
Once the charger indicates the battery is fully charged, unplug the charger from the electrical outlet FIRST. Then, disconnect the charger clamps from the battery and ground point.
Disconnect the negative (black) clamp from the ground point first.
Then, disconnect the positive (red) clamp from the positive battery terminal.
The order of disconnection is the reverse of the connection order for safety.
Step 9: Reconnect the Battery Cables
Now, reattach the battery cables to the correct terminals:
Place the positive (red) cable onto the positive (+) battery terminal. Tighten the clamp securely with your wrench.
Place the negative (black) cable onto the negative (-) battery terminal. Tighten the clamp securely with your wrench.
Ensure both cables are firmly attached and won’t wiggle. A solid connection is essential for your car to start and run correctly.
Step 10: Final Checks and Starting Your Car
Close the hood of your car. Double-check that all tools are put away and that there are no loose items near the battery. Wipe down any surfaces you touched. Now, try starting your car. It should start up smoothly if the battery was successfully charged.
If the car still doesn’t start or starts weakly, the battery might be too old and unable to hold a charge, or there could be another issue with your vehicle. In this case, it’s best to seek professional help.
Types of Car Battery Chargers
Choosing the right battery charger can make a big difference in how easy and effective the charging process is. Here’s a look at the common types:
| Charger Type | Description | Pros | Cons | Best For |
|---|---|---|---|---|
| Manual Charger | Requires constant monitoring. You set a specific amperage and must unplug it manually when the battery is charged. | Inexpensive, simple design. | Risk of overcharging if not monitored carefully. Requires user attention. | Experienced users who can monitor closely or for occasional top-ups. |
| Automatic/Smart Charger | Uses microprocessors to monitor the battery’s voltage and current. It adjusts the charging rate and stops automatically when fully charged. Many can also enter a maintenance mode. | Safe and prevents overcharging. User-friendly, requires minimal supervision. Often have diagnostic features. | More expensive than manual chargers. | Beginners and most car owners looking for a safe and convenient solution. |
| Trickle Charger | Supplies a very low amount of current over a long period. Ideal for maintaining a battery’s charge. | Extremely safe for battery health, prevents overcharging, and is good for long-term storage. | Very slow charging. Not suitable for reviving a deeply discharged battery quickly. | Maintaining batteries in vehicles that are rarely used or stored for extended periods. |
| Jump Starter/Charger Combo | A portable device that can both jump-start a dead battery and also charge it. Some have built-in chargers. | Versatile, provides immediate starting power in emergencies, and can also charge. Compact and portable. | Can be pricier. Charging capacity might be limited compared to dedicated chargers. | Anyone who wants the convenience of jump-starting and charging capabilities in one unit. |
For most home users, particularly beginners, an automatic or smart charger is the recommended choice. They offer the best balance of safety, convenience, and effectiveness. These chargers are intelligent enough to do most of the work for you, ensuring your battery is charged without damaging it.
Tips for Battery Maintenance and Longevity
Keeping your car battery healthy involves more than just charging it when it dies. Regular maintenance can significantly extend its lifespan and prevent future dead battery incidents.
Preventative Maintenance Tips:
- Keep Terminals Clean: Regularly inspect your battery terminals for corrosion. Brush them clean at least once or twice a year, or whenever you notice buildup.
- Check Battery Mount: Ensure the battery is securely fastened in its tray. A loose battery can vibrate, which can damage it.
- Avoid Deep Discharges: Try not to let your battery get completely drained. If you know you’ll be using a lot of power with the engine off (like listening to the radio for a long time), consider running the engine for a bit afterward to let the alternator recharge it.
- Drive Regularly: If you don’t use your car often, try to take it for a decent drive (at least 20-30 minutes) once a week. This allows the alternator to recharge the battery. For long-term storage (over a month), consider using a trickle charger.
- Protect from Extreme Temperatures: While you can’t always control the weather, be aware that extreme heat and cold can affect battery performance. In very hot climates, ensure your battery is well-ventilated. In very cold climates, a fully charged battery performs better.
- Test Your Battery Annually: Have your battery tested by a mechanic or at an auto parts store once a year, especially after the battery is 2-3 years old. This can reveal if it’s starting to weaken before it fails completely.
Following these simple tips can help you get the most out of your car battery and avoid the inconvenience of a dead battery. Understanding battery health is part of smart car ownership.
When to Call a Professional
While charging your car battery at home is often a successful DIY task, there are times when it’s best to let a professional handle it. Don’t hesitate to seek expert help if:
- The Battery is Damaged: If the battery case is cracked, leaking, or swollen, do not attempt to charge it. These are signs of a severely damaged battery that could be dangerous.
- The Battery is Very Old: If your battery is more than 3-5 years old and doesn’t hold a charge, it’s likely nearing the end of its life. Even if you can charge it, it might fail again soon. It may be time for a replacement.
- The Car Still Won’t Start: If you charge the battery and the car still won’t start or cranks very slowly, the problem might not be the battery itself. It could be an issue with the starter, alternator, or other electrical components. A mechanic can diagnose these complex issues.
- You’re Unsure or Uncomfortable: If at any point you feel unsure about the process, unsafe, or uncomfortable, it’s always better to err on the side of caution and call a professional mechanic or a roadside assistance service.
Your safety and the health of your vehicle are paramount. Knowing when to tackle a DIY job and when to get expert help is part of being a confident car owner.

Frequently Asked Questions (FAQ)
What if my car battery is completely dead? Can I still charge it?
Yes, you can usually still charge a completely dead battery. However, a deeply discharged battery takes longer to charge and puts more stress on the battery. If a battery has been deeply discharged multiple times, it might have lost some capacity and won’t hold as much of a charge as it used to. A smart charger is best for these situations as it can often revive a deeply discharged battery safely. If it still doesn’t take a charge or fails to start the car afterward, the battery might be beyond recovery.
How long does it typically take to charge a car battery?
The charging time varies greatly depending on the battery’s discharge level, the charger’s amperage output, and the battery’s capacity. A common automatic charger might take anywhere from 4 to 12 hours to fully charge a moderately discharged battery. A deeply discharged battery could take 24 hours or more. Trickle chargers can take days. Always refer to your charger’s manual for estimated charging times and rely on its indicator lights.