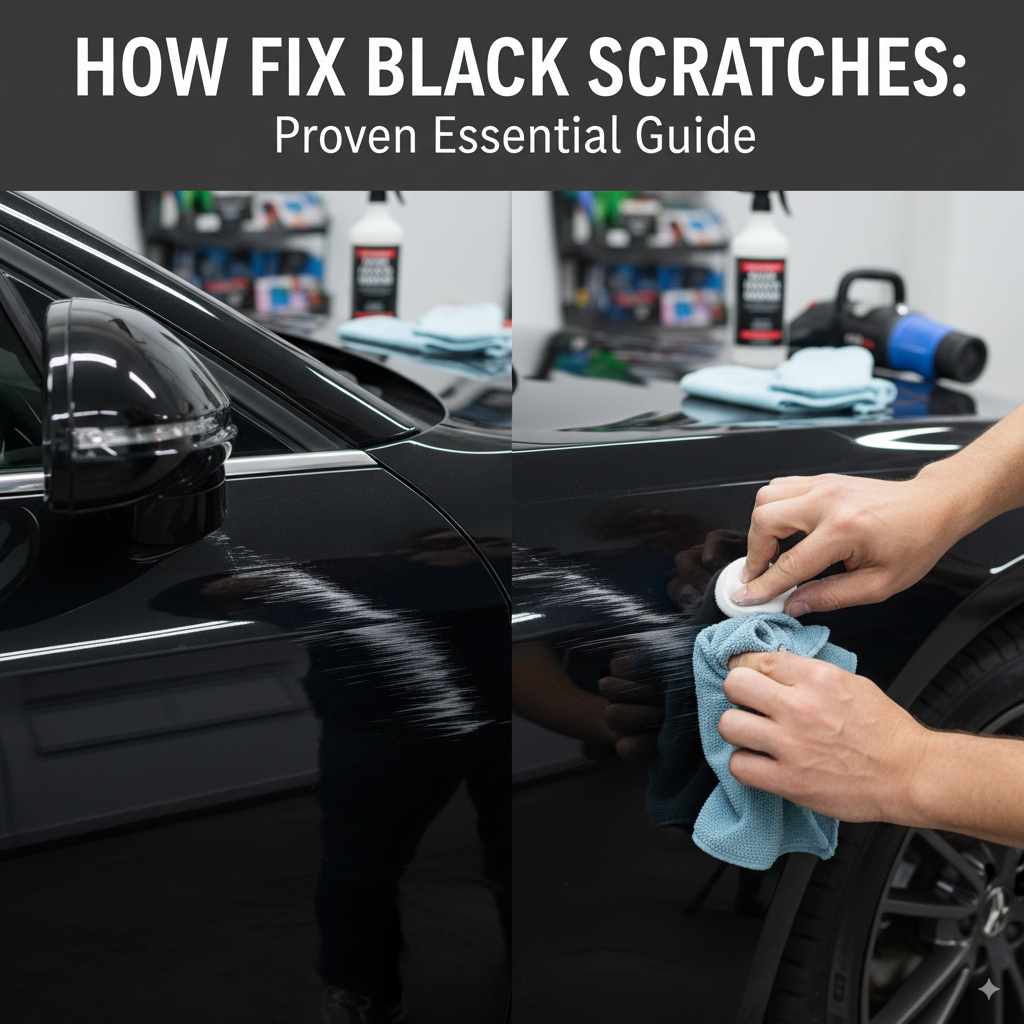
How to Fix Black Scratches: Proven Essential Guide
Don’t let those annoying black scratches on your car get you down! This guide offers simple, step-by-step solutions using everyday items or affordable products. You’ll learn how to identify scratch depth and choose the right fix to restore your car’s finish, making it look like new again with confidence.
Seeing a black scratch mar your car’s pristine paint can be disheartening. Whether it’s from a rogue shopping cart, a stray branch, or just everyday bumps, these marks seem to appear out of nowhere. They detract from your car’s shine and can make you feel like you need an expensive trip to the body shop. But don’t worry! Most black scratches are actually superficial and can be fixed right at home with a little know-how and the right approach. This guide will walk you through exactly how to identify and fix these common blemishes, saving you time and money.
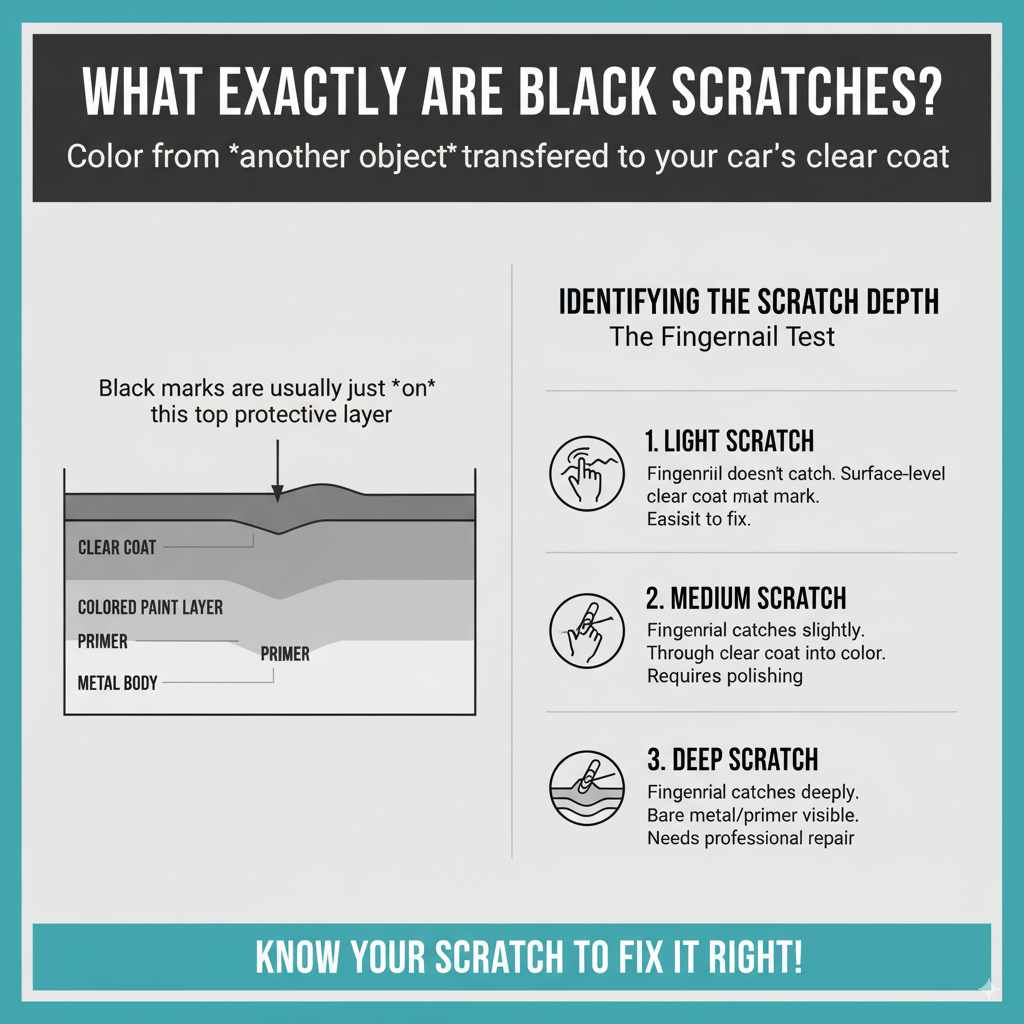
What Exactly Are Black Scratches?
First things first, let’s understand what we’re dealing with. “Black scratches” on a car aren’t typically deep gouges into the metal. Usually, they are colored marks left behind from another object – like black paint from a bumper, a tire, or rubber – that has rubbed against your car’s clear coat. Think of it like a scuff mark. The scratch itself might be very shallow, or it might be the clear coat that’s been disturbed. The ‘black’ is from the transferred material, not necessarily the car itself being scratched down to the metal.
Identifying the Scratch Depth
This is the most crucial step before you grab any cleaning supplies. The depth of the scratch will determine the best way to fix it. Here’s a simple way to check:
-
The Fingernail Test: Gently run your fingernail across the scratch.
- If your fingernail doesn’t catch on the scratch, it’s likely a very light scratch or transfer mark, sitting on the clear coat. These are the easiest to fix.
- If your fingernail catches slightly, the scratch might have gone through the clear coat and into the colored paint layer. These require a bit more effort, often involving polishing compounds.
- If your fingernail catches deeply and you can see bare metal or primer, it’s a deep scratch. This guide will focus on lighter-to-medium scratches, as deep ones often require professional repair.
Simple Solutions for Light Black Scratches
For those surface-level scuffs and marks where your fingernail glides smoothly, you’ve got a great chance of fixing them with minimal fuss. These are fantastic candidates for DIY fixes.
Method 1: The Magic of Soap and Water
Sometimes, the simplest approach is the most effective. If the “black scratch” is just debris or paint transfer on the surface, a good wash might do the trick.
-
Gather Your Supplies:
- Two buckets
- Car wash soap
- Wash mitt (microfiber is great)
- Clean microfiber drying towels
- Prepare Your Buckets: Fill one bucket with soapy water and the other with clean rinse water. Dunking your wash mitt in the rinse bucket after washing a section helps prevent grit from scratching your paint further.
- Wash the Area: Gently wash the scratched area using your wash mitt and soapy water. Work in straight lines, not circles, to minimize the chance of creating new swirl marks.
- Rinse and Inspect: Rinse the area thoroughly with clean water. Dry the area with a clean microfiber towel and inspect the scratch. If it’s gone, you’re done! If not, move on to the next step.
Method 2: The Power of Cleaning Clay (Clay Bar)
A clay bar is a detailing product designed to lift contaminants from your car’s paint surface that washing alone can’t remove. It’s excellent for stubborn paint transfer.
-
What You’ll Need:
- Detailing clay bar (available at auto parts stores)
- Clay lubricant spray (often comes with the clay bar)
- Several clean microfiber towels
- Prepare the Surface: Ensure the car is clean and dry. Spray a generous amount of clay lubricant onto the scratched area. This is crucial as it allows the clay to glide smoothly without causing damage.
- Work the Clay: Take a small piece of the clay bar and gently rub it back and forth over the lubricated scratch area. You’ll feel the clay grabbing initially and then smoothing out as it lifts the contaminant.
- Fold and Repeat: As the clay picks up debris, fold it over on itself to expose a clean surface. Continue this process until the scratch is no longer visible.
- Wipe and Inspect: Wipe away the lubricant with a clean microfiber towel. Inspect the paint. The black mark should be gone.
Method 3: Using a Bug and Tar Remover or Rubbing Alcohol
For very persistent paint transfer or tar spots, a specialized remover can work wonders. Rubbing alcohol is a readily available alternative for lighter marks.
-
Supplies:
- Bug and Tar Remover (specifically designed for automotive paint) OR Isopropyl Rubbing Alcohol (70% or higher)
- Several clean microfiber towels
- Detailing spray or car wax (for post-treatment)
-
Apply the Cleaner:
- Bug and Tar Remover: Spray a small amount directly onto a microfiber towel, not directly onto the car.
- Rubbing Alcohol: Dampen a microfiber towel with rubbing alcohol. Caution: Rubbing alcohol can dry out paint if left on for too long or used excessively. Always test in an inconspicuous area first.
- Gently Rub: Dab and gently rub the scratched area with the dampened towel. You should see the black transfer begin to lift. Avoid harsh scrubbing.
- Clean and Protect: Once the scratch is gone, wipe the area clean with a separate, dry microfiber towel. Follow up with a spray of detailing wax or a light coat of carnauba wax to protect the paint.
Fixing Medium-Depth Scratches: Polishing to the Rescue
If the fingernail test indicated a slight catch, the scratch might have compromised the clear coat. Here, we’ll use abrasive compounds to carefully level the clear coat and blend the scratch away.
Method 4: Using a Scratch Remover Product
Many automotive brands offer specific scratch remover products. These contain mild abrasives that are designed to gently polish away minor imperfections.
-
Gather Your Gear:
- Automotive scratch remover product (follow product instructions)
- Applicator pad (usually comes with the product or a foam applicator)
- Clean, soft microfiber cloths (at least two)
- Clean the Area: Make sure the car surface around the scratch is clean and dry.
- Apply the Product: Apply a small amount of the scratch remover to the applicator pad.
- Work the Scratch: Gently rub the product over the scratch using the applicator pad. Follow the product’s instructions for the amount of pressure and motion (usually light to moderate pressure in a back-and-forth or circular motion). Work slightly beyond the actual scratch area to help blend it in.
- Wipe Away Residue: Use a clean microfiber cloth to wipe away any product residue.
- Inspect and Repeat (If Necessary): Check the scratch. If it’s still visible but less so, you can apply another small amount of product and repeat the process. Don’t overdo it, as you don’t want to wear through the clear coat.
- Protect the Finish: Once satisfied, apply a coat of car wax or sealant to the treated area to protect the freshly polished paint.
Method 5: The Two-Bucket Wash and Polish Technique
This method elevates the basic wash by incorporating a compound or polish for a deeper clean and minor correction.
-
You Will Need:
- Two buckets with grit guards (optional but recommended)
- High-quality car wash soap
- Soft wash mitt
- Mild abrasive polish or rubbing compound (look for “swirl remover” or “fine polish”)
- Foam applicator pad or microfiber applicator pad
- Several clean microfiber drying towels
- Car wax or sealant
- Pre-Rinse and Wash: Thoroughly rinse the entire car to remove loose dirt. Then, use the two-bucket method to wash the car from top to bottom, focusing on the scratched area.
- Apply Polish/Compound: After rinsing and drying the car, apply a small amount of polish or compound to an applicator pad.
- Work the Scratch: Gently apply the polish/compound to the scratch and the surrounding area. Use light to moderate pressure and work in small sections. For a rubbing compound, short, controlled strokes are best. For a polish, you can use more of a buffing motion. The goal is to lightly abrade the clear coat around the scratch to level it. For more information on polishing, resources like The Society of Protective Coatings (SSPC) Paint Finishing Handbook offer detailed insights into surface preparation and finishing techniques.
- Wipe Clean: Use a clean microfiber towel to wipe away all residue and buff the area gently.
- Assess Results: Look at the scratch. If it’s significantly diminished or gone, great! If it’s still there, you can try another light application, but be cautious not to over-polish and thin the clear coat too much.
- Protect with Wax: Apply a good quality car wax or sealant to the polished area to restore shine and protect the paint.
Essential Tools and Products
Having the right gear makes all the difference. Here’s a breakdown of what you might need:
| Product/Tool | Purpose | When to Use | Beginner Tip |
|---|---|---|---|
| Two Buckets & Grit Guards | Safe car washing to prevent introducing new scratches. | All washing steps. | Keeps dirt at the bottom, away from your wash mitt! |
| Microfiber Wash Mitt | Gentle application of soap to paint. | All washing steps. | Softer and safer than sponges. |
| Microfiber Towels | Drying, wiping residue, applying products. | Drying, cleaning, buffing after treatment. | Have plenty! They’re lint-free and non-abrasive. |
| Detailing Clay Bar & Lubricant | Removes embedded contaminants and stubborn transfer. | When washing alone doesn’t remove the mark. | Always use lubricant – never dry clay! |
| Bug & Tar Remover / Rubbing Alcohol | Dissolves stubborn paint transfer. | For very tenacious black marks. | Use sparingly; test alcohol first. |
| Scratch Remover Product or Polish | Mildly abrasive to level clear coat. | Scratches that catch fingernail slightly. | Start with the least abrasive option. |
| Foam or Microfiber Applicator Pad | Applies polish or compound evenly. | When using scratch removers or polishes. | Distributes product without absorbing too much. |
| Car Wax or Sealant | Protects and enhances shine after treatment. | After any scratch correction steps. | Adds a protective layer, like sunscreen for your car! |
Pro Tips for Scratch-Free Success
Here are a few extra pointers to help you achieve the best results:
- Work in the Shade: Always clean and polish your car in the shade or on a cool, overcast day. Direct sunlight can cause cleaning products to dry too quickly, leaving streaks or dullness.
- One Direction is Best: When washing or polishing, work in straight lines (front to back) rather than in circles. This helps minimize the appearance of swirl marks, especially on darker paint colors.
- Test in an Inconspicuous Area: Before applying any new product to a visible scratch, test it on a hidden part of your car (like a lower door panel or inside the door jamb) to ensure it doesn’t cause damage or discoloration.
- Gentle Pressure is Key: For most treatments, especially polishing, less is more. Start with minimal pressure and gradually increase if needed. Over-polishing can wear down the clear coat.
- Cleanliness is Crucial: Ensure all your tools (towels, pads) are clean before you start. Even a tiny grain of dirt can cause new scratches.
- Patience Pays Off: Don’t rush the process. Take your time, follow the steps, and you’ll get a much better result.
When to Call a Professional
While this guide covers many common black scratches, there are times when professional help is necessary. If you’ve performed the fingernail test and your nail catches deeply, or if you can see the color coat peeling or the metal underneath, it’s time to consult a professional detailer or body shop. Deep scratches, stone chips, and corrosion require specialized tools and techniques that are beyond typical DIY capabilities. It’s better to get a professional quote than to try a DIY fix that could potentially worsen the damage.
For valuable insights into various automotive paint repair techniques, including those that may require professional intervention, resources like those provided by the SEM Products Technical Updates can offer detailed information on paint systems and repair processes.
Frequently Asked Questions (FAQ)
Q1: How do I know if a black scratch can be fixed at home?
A1: Use the fingernail test. If your fingernail glides over the scratch without catching, it’s likely a surface-level scuff or paint transfer that you can fix at home with washing, claying, or mild polishes. If your nail catches deeply, it might be too deep for DIY.
Q2: Can I use toothpaste to remove car scratches?
A2: While toothpaste has mild abrasives and might work on very, very light surface imperfections on some paints, it’s not recommended. Automotive polishes are specifically designed for car paint, contain the right abrasives, and have conditioning agents that help protect the finish. Toothpaste can be too harsh or not effective enough.
Q3: How often should I wax my car after fixing scratches?
A3: After using scratch removers or polishes, it’s highly recommended to wax or seal the area immediately to protect the newly exposed clear coat. You should then aim to wax your entire car every 2-4 months, depending on the type of wax used and environmental exposure, to maintain its shine and protection.
Q4: Will a black scratch eventually damage my car’s paint?
A4: If the scratch is only on the clear coat, it’s unlikely to cause long-term damage beyond its unsightly appearance. However, if it goes through the clear coat and into the base color or primer, it can expose the metal to moisture, leading to rust. Promptly addressing even minor scratches is always a good idea.
Q5: What’s the difference between a scratch remover and a rubbing compound?
A5: A scratch remover is typically a milder polish designed for very light scratches and swirl marks. A rubbing compound is more aggressive and contains coarser abrasives; it’s for more noticeable scratches but requires more care to avoid creating new damage or removing too much clear coat. Always start with the least abrasive product first.
Q6: Can I use a power polisher for scratch removal?
A6: Power polishers (like orbital or rotary polishers) can be very effective, but they are generally not recommended for absolute beginners. They have a steep learning curve, and improper use can easily damage your car’s paint. For most light black scratches, hand application with appropriate products is safer and very effective.
Conclusion
You’ve learned that those frustrating black marks on your car are often more of a surface issue than a deep problem. By understanding the fingernail test to gauge scratch depth and selecting the right method – from a simple wash and wax to using a clay bar or a gentle polishing compound – you can effectively remove most of these blemishes yourself. Remember to always work in the shade, use clean microfiber towels, and be patient.