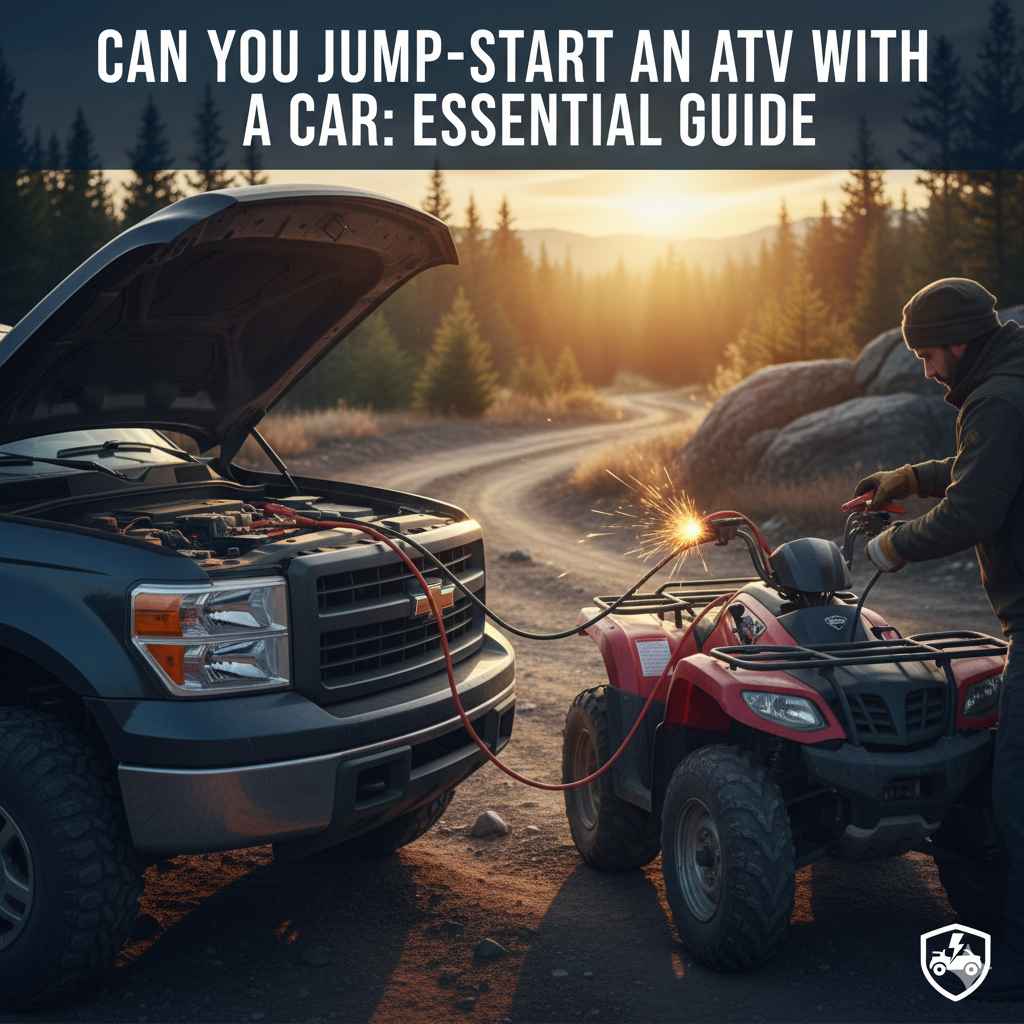
Can You Jump-Start An ATV With A Car: Essential Guide
Yes, you can jump-start an ATV with a car, but it requires careful connection of jumper cables and attention to safety. Using the correct procedure ensures you won’t damage either vehicle’s electrical system.
It’s a common scenario: you’re all set for an exciting ride on your ATV, but the battery is dead. You’ve tried the pull-start, but it’s not cooperating. Then, you spot your car – a potential savior! Many folks wonder if they can use their car’s battery to revive their ATV. The good news is, you absolutely can, and it’s a straightforward process if you know the right steps. This guide will walk you through it safely and effectively, so you can get back to your adventure without a hitch.
Can You Jump-Start An ATV With A Car? Understanding the Basics
The simple answer is a resounding yes. Your car’s battery typically has a higher amperage (a measure of electrical current) than your ATV’s battery. This extra power is usually more than enough to get a depleted ATV battery back to life. However, it’s not as simple as just connecting any wires. The key is to do it correctly to prevent sparks, damage to your ATV’s sensitive electronics, or even harm to yourself.
The primary concern when jump-starting any vehicle with another is the risk of electrical surges. Modern ATVs, like cars, are equipped with sophisticated electronic components. A faulty connection or a sudden surge of power can easily fry these expensive parts. This is why understanding the proper procedure and taking necessary precautions is not just recommended, but essential.
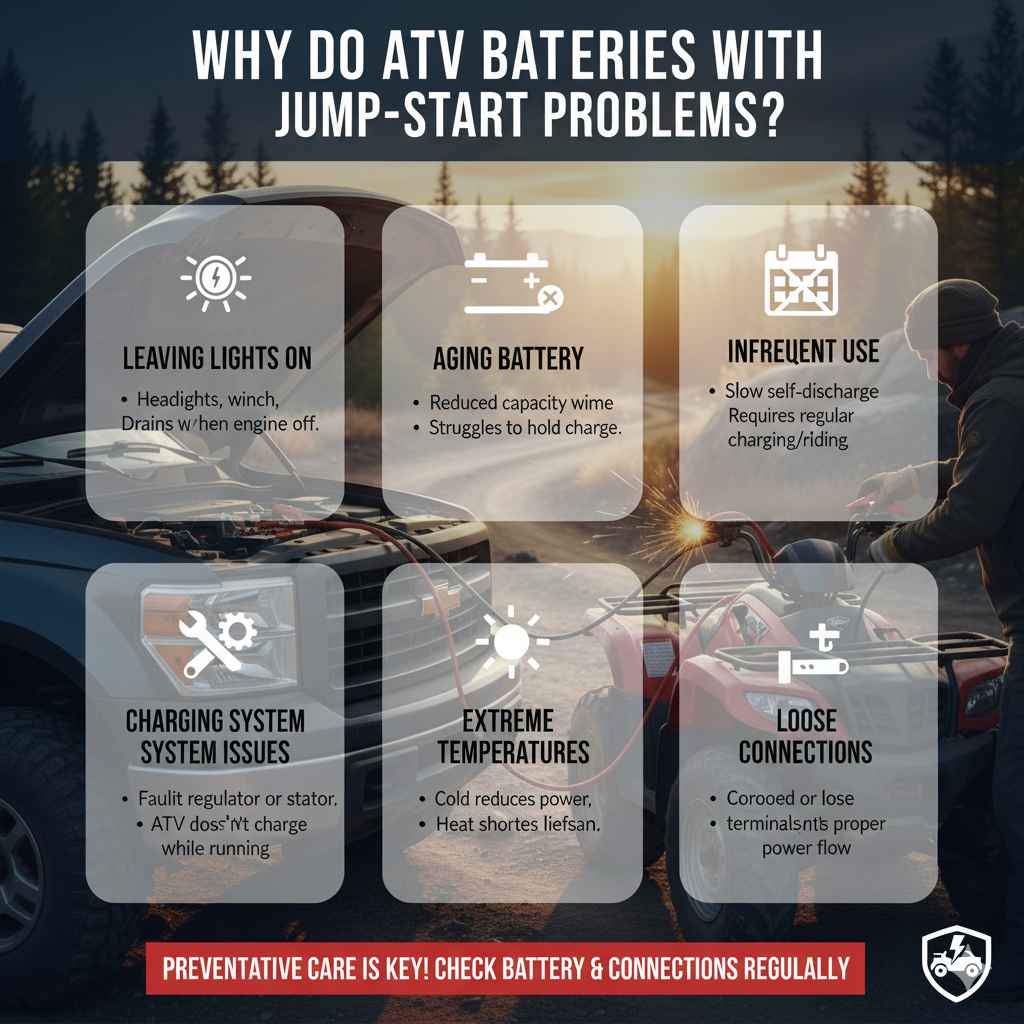
Why Do ATV Batteries Die?
Before we dive into the jump-starting process, it’s helpful to understand why your ATV battery might be dead in the first place. This can help you prevent future issues:
- Leaving Lights or Accessories On: Just like in a car, forgetting to turn off headlights, a winch, or other accessories can drain the battery significantly, especially if the engine wasn’t running.
- Aging Battery: Batteries have a lifespan. As they age, they lose their ability to hold a charge effectively, making them more prone to dying.
- Infrequent Use: If your ATV sits for long periods without being ridden or charged, its battery can slowly discharge.
- Charging System Issues: A faulty voltage regulator or stator can prevent the ATV from charging its battery properly while you ride.
- Extreme Temperatures: Very cold or very hot weather can impact battery performance and longevity.
- Loose Connections: Corroded or loose battery terminals can impede the flow of electricity, leading to starting problems.
Essential Tools and Supplies You’ll Need
Gathering the right tools before you start is crucial. This makes the process smoother and safer. Here’s what you’ll need:
- Jumper Cables: Ensure you have a good set of jumper cables. Look for cables with heavy-duty clamps and a decent length (at least 6 feet) so you can position the vehicles adequately. The gauge (thickness) of the cable matters – thicker cables are better for ATV batteries. For a helpful comparison of cable gauges and their applications, consider resources like those from Batteries Plus, which explain how cable thickness affects power transfer.
- Safety Glasses: Always wear eye protection to shield your eyes from any potential sparks or battery acid.
- Gloves: Rubber or latex gloves protect your hands from dirt and potential battery acid.
- A Reliable Car: Your car will be the power source. Make sure it’s in good working condition.
- An ATV with a Dead Battery: Obviously!
- Owner’s Manuals: Keeping the owner’s manuals for both your ATV and car handy is always a good idea. They may contain specific instructions or warnings related to jump-starting.
Step-by-Step Guide: How to Jump-Start Your ATV With a Car
Follow these steps carefully to ensure a safe and successful jump-start:
Step 1: Position the Vehicles
Park your car close enough to the ATV so that the jumper cables can reach both batteries comfortably, but do not let the vehicles touch each other. You want enough space to work safely between them. Ensure both vehicles are in park (or neutral for manual transmissions) with the emergency brake fully engaged. Turn off both the engine and all accessories (lights, radio, etc.) on both the car and the ATV. For added safety, remove the keys from the ignition of the ATV. This prevents accidental starting while you’re connecting cables.
Step 2: Locate the Batteries
Open the hoods or access panels to locate the batteries on both your car and your ATV. Once found, remove any plastic covers from the battery terminals if they are present. This will give you clear access to the positive (+) and negative (-) terminals.
Step 3: Connect the Jumper Cables (The Crucial Part!)
This is where most people get confused. The order of connection is critical for safety. You are trying to avoid creating a power loop that could cause sparks around the battery, which can ignite hydrogen gas emitted by batteries.
Connect the red (positive) cable first:
- Attach one red clamp to the positive (+) terminal of the dead ATV battery.
- Attach the other red clamp to the positive (+) terminal of the good car battery.
Connect the black (negative) cable second:
- Attach one black clamp to the negative (-) terminal of the good car battery.
- Attach the other black clamp to an unpainted, non-moving metal surface on the ATV’s engine block or chassis, away from the battery. This is called a grounding point. Do NOT connect it to the negative terminal of the dead ATV battery. This helps to safely dissipate any sparks away from the battery.
Double-check all connections. Ensure the clamps have a firm grip on the terminals or metal surface.
Step 4: Start the Car
With all cables connected correctly, start the engine of your car. Let it run for at least 5-10 minutes at idle speed. This allows the car’s alternator to charge the ATV’s battery slightly, making it easier for the ATV to start. You can also briefly rev the car’s engine to around 1500-2000 RPM to provide a bit more charging power.
Step 5: Start the ATV
Now, try to start your ATV. If it starts, great! Let it run for a few minutes while still connected to the car. If it doesn’t start, wait another couple of minutes with the car running, then try again. If the ATV still won’t start after a few attempts, there might be a more serious issue with the ATV’s battery, starting system, or ignition.
Step 6: Disconnect the Jumper Cables
Once the ATV is running, you need to disconnect the cables. It’s vital to disconnect them in the REVERSE order of how you connected them.
- First, remove the black clamp from the grounding point on the ATV.
- Next, remove the black clamp from the negative (-) terminal of the car battery.
- Then, remove the red clamp from the positive (+) terminal of the car battery.
- Finally, remove the red clamp from the positive (+) terminal of the ATV battery.
Be careful not to let the clamps touch each other or any metal parts of the vehicles as you remove them.
Important Note on ATV Electronics: Many modern ATVs have sensitive electronic components. While this method is generally safe, some manufacturers advise against jump-starting ATVs altogether due to the higher voltage of car systems. Always consult your ATV’s owner’s manual for specific recommendations. If in doubt, consider using a dedicated ATV jump-starter or battery charger.
Important Safety Precautions You Can’t Ignore
Safety isn’t just a suggestion; it’s a non-negotiable rule when dealing with car batteries and electrical systems. Here are crucial precautions:
- Always Wear Safety Gear: Safety glasses and gloves are a must. Batteries contain sulfuric acid, which is corrosive, and can also release explosive hydrogen gas.
- No Smoking or Open Flames: Never smoke or have any open flames near a battery. The gas emitted by a battery during charging or discharging is highly flammable.
- Avoid Sparks: Ensure you connect the cables in the correct order to minimize the risk of sparks. Never let the positive and negative clamps touch each other or any metal parts of the vehicle.
- Check Battery Condition: Do not attempt to jump-start a battery that is frozen, leaking, cracked, or looks damaged. This could lead to an explosion.
- Voltage Match: Most cars and ATVs operate on 12-volt systems, making jump-starting feasible. However, if you have an older vehicle or a specialized piece of equipment with a different voltage system (e.g., 6-volt or 24-volt), do not attempt to jump-start it with a standard car. A quick way to check your ATV’s battery voltage is often printed directly on the battery label.
- Disconnect Cables Properly: Reversing the disconnection order can cause sparks, just as connecting them incorrectly can.
- Let the Car Run: Give the car’s alternator time to properly charge the ATV’s battery before trying to start the ATV.
- Don’t Overcrank: Avoid cranking the ATV’s engine for too long, as this can overheat the starter motor. Try for 5-10 seconds at a time, with breaks in between.
Alternative Methods for a Dead ATV Battery
While jump-starting with a car is a common solution, it’s not the only one. Here are other options many DIYers consider:
1. Battery Charger
This is the safest and often most recommended method for reviving a dead ATV battery. A dedicated battery charger (trickle charger or smart charger) will slowly and safely replenish the battery’s charge without the risk of surges. This method is ideal for batteries that are only mildly discharged or for regular maintenance.
Pros:
- Safest method, minimizes risk to electronics.
- Helps extend battery life when used regularly.
- Can often revive batteries that are significantly drained.
Cons:
- Requires the charger and a power outlet.
- Takes time (hours) to fully charge.
For essential information on battery types and charging, resources like those from the U.S. Department of Energy offer insights into the science behind them.
2. Portable Jump Starter/Power Pack
These compact, battery-powered devices are specifically designed to jump-start vehicles. They contain their own battery and often come with built-in safety features like surge protection and reverse polarity protection, making them a safer alternative to using a car.
Pros:
- Portable and convenient for on-the-go use.
- Generally safer than using a car, with built-in protections.
- No need for another vehicle.
Cons:
- Requires pre-charging the jump starter itself.
- Can be an upfront cost.
- May have less power than a car battery for very dead batteries.
3. Push-Starting (for Manual Transmission ATVs)
Some ATVs, particularly older or manual transmission models, can be push-started if they have a way to engage the transmission without the battery. This involves getting the ATV rolling with some momentum (by pushing it downhill or having a friend help push) and then engaging a gear. The momentum of the wheels turns the engine, potentially starting it.
Pros:
- Requires no external power source or cables.
- Completely bypasses the electrical system for starting.
Cons:
- Difficult to do alone and requires physical effort.
- Only works for specific ATV models (primarily manual transmission, although some automatics might have emergency starting features or ways to manually turn the engine).
- Can be dangerous if not done on a flat or downhill surface.
- Not all ATVs are designed for this.
When to Seek Professional Help
While jump-starting is a useful skill, there are times when it’s best to call in an expert. If your ATV:
- Still won’t start after multiple jump-start attempts.
- Sounds like it’s trying to start but just can’t quite catch.
- Has a visibly damaged or leaking battery.
- Has experienced electrical issues even before the battery died (e.g., flickering lights, strange noises).
- The jump-start process causes unusual smells or smoke.
In these situations, it’s wise to contact a qualified ATV mechanic or service center. They have the specialized tools and knowledge to diagnose and repair more complex electrical problems, such as a faulty starter, alternator, or wiring issues.
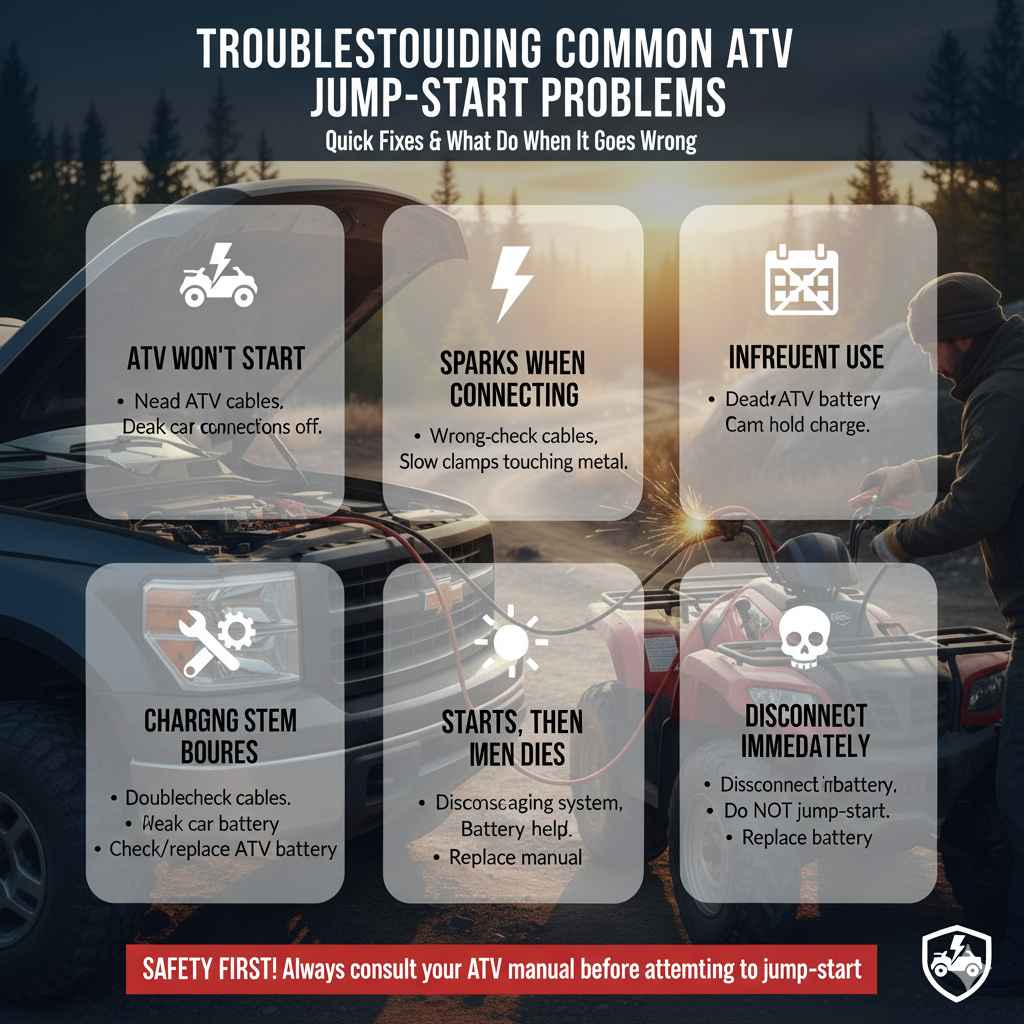
Troubleshooting Common Jump-Start Problems
Even with the best intentions, sometimes things don’t go as planned. Here are common issues and how to tackle them:
ATV won’t start after connecting cables and running carIncorrect cable connections. Dead ATV battery is completely shot and won’t accept a charge. Car battery is also weak. Loose connections.Double-check all cable connections (order and grip). Let the car run longer (15-20 minutes). Try swapping the negative cable clamp to a different unpainted metal point on the ATV. If the ATV battery is old or damaged, it may need replacement. If the car battery is weak, try revving the car engine more or using a different, stronger car.Sparks when connecting cablesConnecting in the wrong order. Clamps touching incorrectly grounded metal.
Immediately disconnect all cables. Re-read the connection steps and follow them precisely. Ensure the final black clamp connection is on bare metal, away from the battery.ATV starts but dies immediately after disconnecting cablesThe ATV’s charging system (stator/regulator) is not working, so the battery isn’t being recharged. The battery itself is failing and cannot hold a charge.Have the charging system checked by a professional. You may need to replace the battery if it’s old or unable to hold a charge.Smell of rotten eggs from the batteryBattery is overheating or has an internal short.Disconnect cables immediately. Do NOT attempt to jump-start again. The battery likely needs replacement. Ventilate the area.
Frequently Asked Questions (FAQ)
Q1: Can I use a motorcycle jumper cable to jump-start my ATV?
A1: Generally, yes, if the motorcycle jumper cables are of sufficient gauge (thickness) and length for your ATV’s battery. However, if they are very thin, they might not deliver enough current. Always use the thickest jumper cables you have available, and ensure they are long enough. See our “Essential Tools” section for more on cable gauge.
Q2: What if my ATV has its battery located under the seat or in a difficult spot?
A2: This can make jump-starting trickier. Ensure you have enough slack in your jumper cables and that you can safely reach both the car battery and the ATV battery terminals or a suitable grounding point. Sometimes, using jumper cables with magnetic or specialized clamps can help in tight spaces. Always prioritize safety and avoid straining the cables.
Q3: How long should I let the car run to charge the ATV battery?
A3: Letting the car run for at least 5-10 minutes at idle is usually sufficient to give the ATV battery enough of a boost to start. If the ATV battery is severely depleted or old, you might need to let the car run for 15-20 minutes, or even rev the car’s engine slightly (to around 1500-2000 RPM) while connected.
Q4: Can jump-starting damage my ATV’s electronics?
A4: It can, if not done correctly due to potential voltage spikes or reverse connections. This is why following the connection and disconnection order precisely, and using a good grounding point for the final connection, is so important. If your ATV is very new or has a complex electronic system, consult its manual; some manufacturers advise against jump-starting.