Best Ways to Remove Tree Sap from Car Paint
Getting tree sap on your car can be a real bother, and figuring out the Best Ways to Remove Tree Sap from Car Paint can seem tricky at first, especially if you’re new to car care. It might feel like a sticky mess that’s impossible to clean. But don’t worry, it’s not as hard as it looks!
We’ll walk you through simple steps to get your car looking great again.
Safely Removing Tree Sap from Your Car
This section will cover the most effective and safe methods for taking tree sap off your car’s paint. We’ll discuss different approaches and why they work. Our goal is to help you get rid of that sticky residue without causing any harm to your car’s finish.
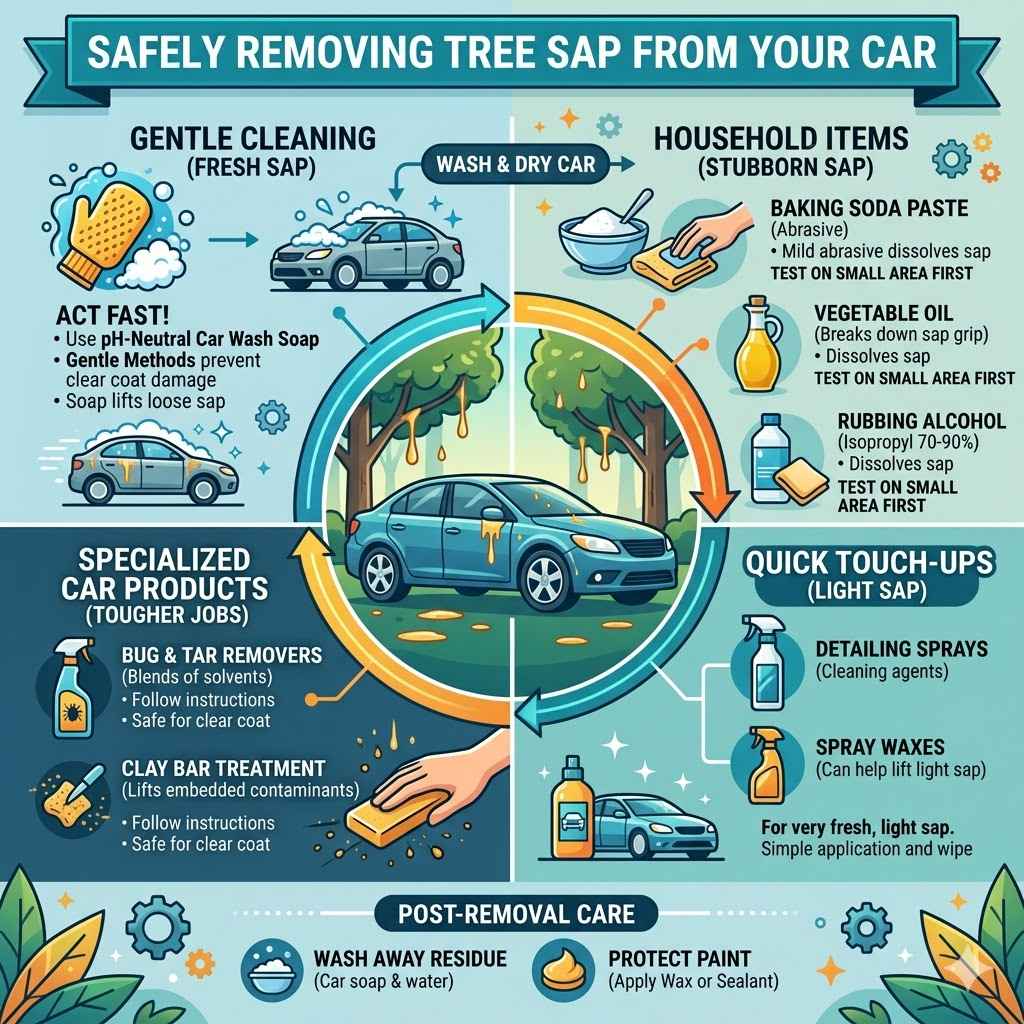
Gentle Cleaning Methods for Fresh Sap
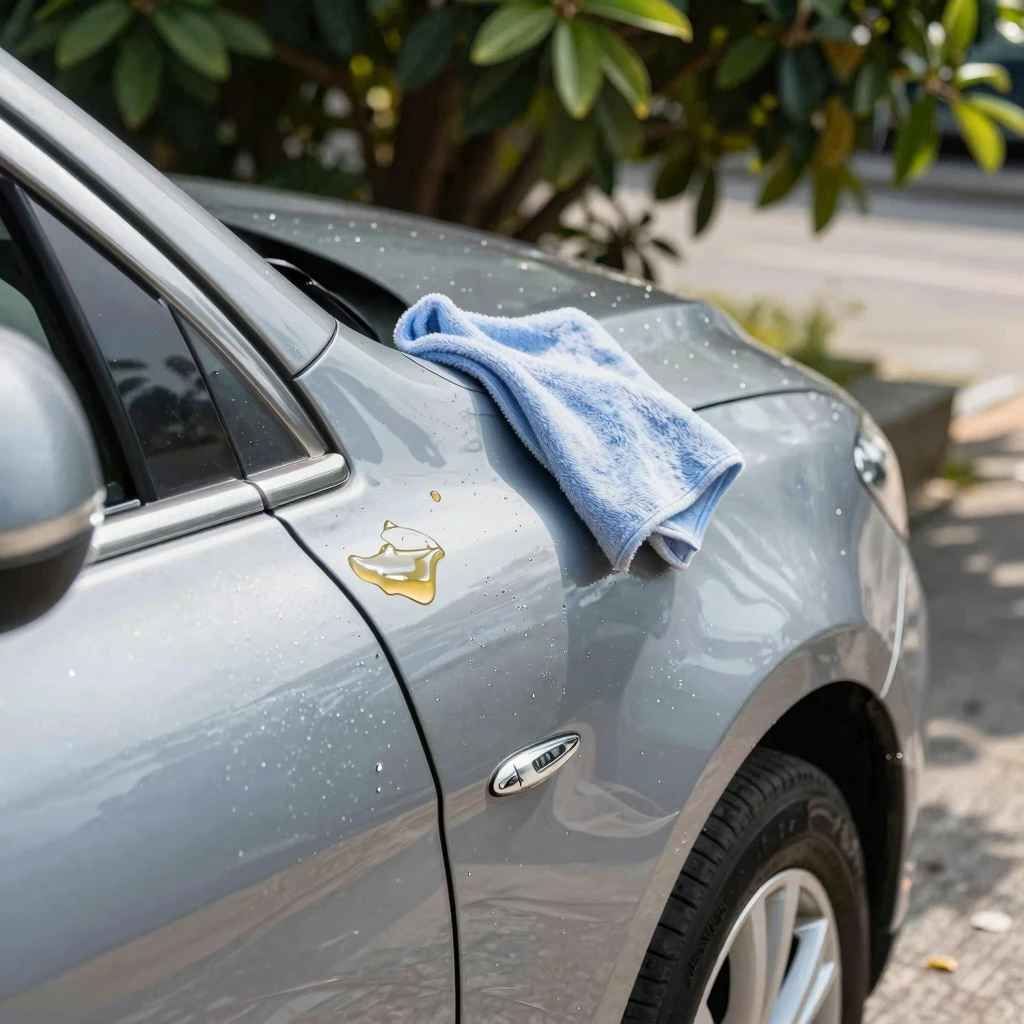
When tree sap is still fresh, it’s much easier to remove. The sooner you act, the better. Gentle methods are key to preventing scratches or damage to your car’s clear coat.
Washing your car with soap and water is the first step. This can remove some of the sap if it hasn’t bonded too strongly to the paint. Use a pH-neutral car wash soap.
This type of soap is formulated to clean effectively without stripping away protective wax or sealant layers on your car.
After washing, rinse thoroughly. Sometimes, a simple wash is enough, especially if the sap is very fresh and hasn’t hardened.
Using Household Items for Stubborn Sap
If soap and water don’t do the trick, there are common household items that can help. These are often overlooked but can be very effective.
Baking Soda Paste
A paste made from baking soda and water can act as a mild abrasive. Mix about three parts baking soda with one part water until you have a thick paste. Gently apply it to the sap spot with a soft cloth.
Rub in a circular motion, but be very light. The mild abrasive quality of baking soda can help lift the sap without scratching.
After applying, rinse the area well with water. Ensure all baking soda residue is removed. You can then wash the spot again with car soap to be sure.
Vegetable Oil or Cooking Spray
Surprisingly, oils can break down sticky sap. Apply a small amount of vegetable oil or cooking spray directly to the sap. Let it sit for a few minutes.
The oil helps to loosen the sap’s grip on the paint. Gently wipe the sap away with a soft microfiber cloth. Rinse the area thoroughly with car soap and water to remove any oily residue.
This method is great because oils are non-corrosive and won’t damage your car’s paint or clear coat. It’s a safe option for those hesitant to use stronger chemicals.
Rubbing Alcohol (Isopropyl Alcohol)
Rubbing alcohol can be very effective for dried sap. Use a concentration of 70% or 90% isopropyl alcohol. Dampen a soft microfiber cloth with the alcohol.
Do not pour alcohol directly onto the car. Gently rub the sap spot. The alcohol helps to dissolve the sticky sap.
Work in small sections, and avoid letting the alcohol dry on the paint.
After the sap is gone, wash the area with car soap and water immediately. This removes any alcohol residue. It’s important to test rubbing alcohol on an inconspicuous area first, as it can potentially dull some types of paint finishes if left too long.
Specialized Car Cleaning Products for Sap Removal
For tougher jobs, dedicated car cleaning products are often the best choice. These are made specifically for car surfaces and are formulated to be effective yet safe.
These products are designed to break down stubborn, sticky contaminants like bug splatter and tree sap. Follow the product instructions carefully. Typically, you spray the product onto the sap, let it dwell for a short period, and then wipe it away with a microfiber cloth.
These removers are often a blend of solvents that safely lift contaminants without harming the clear coat.
After using a bug and tar remover, always wash the area with car soap and water. This ensures all chemical residue is removed, protecting your paint’s finish.
Clay Bar Treatment
A clay bar is a synthetic putty that lifts contaminants embedded in your car’s paint. It’s used with a lubricant. First, wash and dry the car.
Then, spray a clay lubricant generously over the sap spot. Gently glide the clay bar over the lubricated area in a back-and-forth motion. The clay bar will pick up the sap and any other debris.
Keep folding the clay bar to expose a clean surface. This is a more advanced technique but yields excellent results for deeply bonded sap.
Once done, rinse the area and follow up with a wash and wax. Clay barring is very effective for restoring a smooth paint surface.
Detailing Sprays and Waxes with Sap Removal Properties
Some quick detailer sprays or spray waxes are formulated with cleaning agents that can help lift light sap. These are great for quick touch-ups. Simply spray the product onto the sap, and gently wipe it off with a clean microfiber towel.
While not as powerful as dedicated removers, they can work for very light, fresh sap.
Understanding Why Tree Sap Sticks and How to Prevent It
Tree sap is a sticky substance that trees produce. It protects them from insects and helps them heal wounds. For car owners, this natural protection becomes a nuisance.
Understanding why it sticks helps in removing it and preventing future occurrences.
The Nature of Tree Sap
Tree sap is a viscous liquid, often sugary and resinous. Its stickiness comes from the natural resins and sugars it contains. When sap lands on your car’s paint, it’s exposed to sunlight and heat, which can cause it to harden and bond with the paint surface.
This bonding process makes it difficult to remove with just a simple wash.
The type of tree also matters. Pine trees, for example, are known for producing very sticky sap. Different trees have different sap compositions, making some harder to remove than others.
The longer the sap sits on your car, the stronger its bond becomes, and the more challenging it will be to remove.
Factors Contributing to Sap Adhesion
Several factors contribute to how well tree sap sticks to your car’s paint.
- Paint Condition: A well-maintained paint surface with a good coat of wax or sealant offers a smoother surface. This makes it harder for sap to stick and easier to wipe off. Older or neglected paint, or areas with clear coat damage, can provide more grip for the sap.
- Temperature: Warm or hot weather can make the sap softer and more pliable, allowing it to spread and bond more effectively. Conversely, very cold temperatures might make sap brittle but still strongly adhered.
- Time: As mentioned, the longer sap remains on your car, the more it cures and hardens. This is similar to how glue dries; time allows the bonding agents to set.
Preventative Measures to Avoid Sap Deposits
The best approach to dealing with tree sap is to avoid it altogether if possible. Parking smart can save you a lot of cleaning time.
- Strategic Parking: Try to park your car in a garage or under a carport whenever possible. If you must park outside, avoid parking directly under trees known for dripping sap. Look for open spaces away from tree canopies.
- Consider Car Covers: A good quality car cover can provide a physical barrier between your car’s paint and falling tree sap. Make sure the cover is clean before putting it on, as dirt can scratch the paint.
- Regular Washing and Waxing: Keeping your car clean and well-waxed is a strong defense. A layer of wax or sealant creates a slick surface that sap has a harder time adhering to. It also makes any sap that does land easier to remove during your regular washes.
Step-by-Step Guide to Removing Tree Sap
This guide breaks down the process of removing tree sap into simple, actionable steps. Following these instructions will help you achieve the best results safely and effectively.
Step 1 Preparation and Initial Wash
Before you start tackling the sap, it’s important to prepare the area and give your car a basic wash. This removes loose dirt and debris that could scratch your paint during the sap removal process.
- Gather Your Supplies: Collect everything you’ll need: soft microfiber cloths, car wash soap, a bucket of water, your chosen sap remover (household item or commercial product), and a clean water source.
- Pre-Wash the Vehicle: Rinse your car thoroughly with water to remove any loose dirt or grit. Then, wash the entire car with a pH-neutral car wash soap and a clean wash mitt. Rinse again and dry the car with a clean microfiber towel. This ensures you’re working on a clean surface.
- Identify Sap Spots: Locate all the areas on your car where tree sap has landed. Sometimes sap can be hard to see, especially on lighter colored cars or in direct sunlight.
Step 2 Applying the Sap Remover
This is where you’ll actively work to dissolve or lift the sap from your car’s paint.
- Choose Your Remover: Select the appropriate remover based on the severity of the sap. For fresh sap, a good wash might be enough. For older, hardened sap, you might need a bug and tar remover or a rubbing alcohol solution.
- Test in an Inconspicuous Area: If using a commercial product or rubbing alcohol, it’s wise to test it on a small, hidden part of your car’s paint first. This ensures it doesn’t damage or discolor the finish.
- Apply Generously but Locally: Apply your chosen remover directly to the sap spot. Do not spray it all over the car. Work on one spot at a time. For household items like oil or baking soda paste, apply with a cloth. For commercial removers, follow the product’s instructions for application.
- Allow Dwell Time: Let the remover sit on the sap for the recommended time. This is usually a few minutes. This dwell time allows the product to break down the sticky bonds of the sap.
Step 3 Gentle Removal and Wiping
Now it’s time to gently lift the sap away from the paint. Patience and a light touch are key here.
- Use a Soft Microfiber Cloth: Use a clean, soft microfiber cloth to gently wipe away the loosened sap. Avoid scrubbing hard.
- Work in One Direction: Wipe in a straight line or a gentle circular motion. If the sap is stubborn, apply a little more remover and wait again.
- Fold Your Cloth Often: As you wipe, the sap will transfer to your cloth. Fold the cloth to expose a clean section frequently. This prevents you from spreading the sap around.
- Rinse the Cloth Frequently: If you’re using a household method, rinse your cloth with water to remove sap before continuing.
Step 4 Final Wash and Protection
Once the sap is completely gone, you need to clean the area and protect your car’s paint.
- Wash the Treated Area Again: After all the sap is removed, wash the area thoroughly with car wash soap and water. This removes any residue from the sap remover.
- Rinse and Dry Thoroughly: Rinse the car again to ensure all soap is gone. Dry the area completely with a clean, dry microfiber towel.
- Apply Wax or Sealant: To protect your car’s paint and make future sap removal easier, apply a coat of wax or a paint sealant. This restores the protective layer on your car and gives it a nice shine.
Comparing Different Sap Removal Techniques
When faced with tree sap, you have several options. Some are quick fixes, while others are more thorough. Understanding the pros and cons helps you choose the right method for your situation.
Effectiveness and Safety of Methods
The effectiveness and safety of a sap removal method depend on the type of sap, how long it’s been on the car, and your car’s paint condition.
Mild Methods (Soap, Water, Oil)
- Pros: Very safe for all paint types. Easy to access materials. Good for fresh, light sap.
- Cons: May not be strong enough for old, hardened sap. Requires more elbow grease.
Moderate Methods (Baking Soda, Rubbing Alcohol)
- Pros: Generally effective for moderately stubborn sap. Baking soda is mildly abrasive. Alcohol dissolves sap.
- Cons: Baking soda can scratch if rubbed too hard. Alcohol can potentially dull paint if used improperly or left on too long. Always test first.
Specialized Products (Bug & Tar Removers, Clay Bars)
- Pros: Highly effective for tough, dried sap. Formulated to be safe for automotive paint when used correctly. Clay bars leave paint feeling extremely smooth.
- Cons: Require purchasing specific products. Need to follow instructions carefully. Clay barring can be time-consuming.
Situational Recommendations
The best method often depends on the specific problem you’re facing.
Scenario 1: Fresh Sap Drips on a Sunny Day
The sap is still wet and hasn’t bonded yet. A quick wash with car soap and water might be enough. If not, a gentle wipe with a microfiber cloth dampened with a little vegetable oil should lift it.
Follow with a wash and dry.
Scenario 2: Small, Hardened Sap Spots After a Week
The sap has dried and is sticking firmly. Try a dedicated bug and tar remover. Apply it to the spot, let it sit for a few minutes, and then gently wipe it away with a microfiber cloth.
Follow up with a wash and wax.
Scenario 3: Extensive Sap Contamination Over Several Weeks
If your car has been covered in sap for a while, it’s time for a more thorough approach. After washing the car, use a bug and tar remover on all affected areas. For very stubborn spots, a clay bar treatment after the remover will ensure all residue is gone and the paint is perfectly smooth.
This usually requires a full detail.
Tools and Materials Comparison
Here’s a quick look at common tools and their roles:
| Tool/Material | Purpose | Best For |
|---|---|---|
| Microfiber Cloths | Wiping and drying | All stages of sap removal; gentle on paint |
| Car Wash Soap | General cleaning | Initial wash, final rinse |
| Vegetable Oil/Cooking Spray | Loosens sap | Fresh or light sap |
| Baking Soda | Mild abrasive | Moderately stubborn sap; use gently |
| Rubbing Alcohol (Isopropyl) | Dissolves sap | Dried sap; test first |
| Bug & Tar Remover | Breaks down tough contaminants | Dried, hardened sap |
| Clay Bar & Lubricant | Removes embedded contaminants | Deeply bonded sap, restoring smoothness |
| Car Wax/Sealant | Protection | After sap removal; prevents future issues |
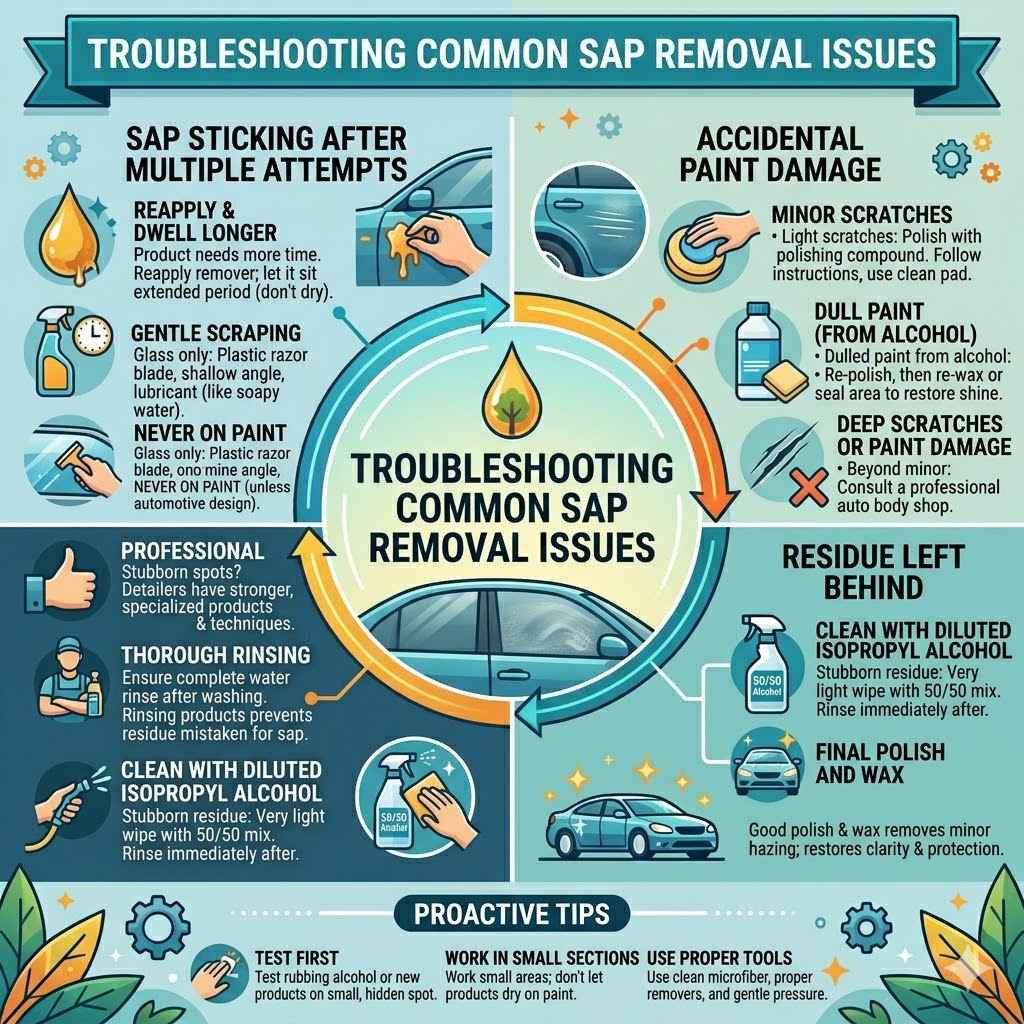
Troubleshooting Common Sap Removal Issues
Sometimes, even with the best methods, you might run into problems. Here are some common issues and how to solve them.
Sap Sticking After Multiple Attempts
If sap is still stubbornly attached after trying a few methods, it might be deeply bonded or in a hard-to-reach spot.
- Reapply and Dwell Longer: Sometimes, the product needs more time. Reapply your chosen remover and let it sit for an extended period (but not so long that it dries out).
- Gentle Scraping (with caution): As a last resort for very tough spots on hard surfaces like glass, a plastic razor blade can be used very carefully. Hold it at a shallow angle and spray lubricant (like soapy water) as you scrape. Never use this on painted surfaces unless specifically designed for automotive paint.
- Consider Professional Help: If you’ve tried everything and the sap won’t budge, a professional detailer has access to stronger, specialized products and techniques.
Accidental Paint Damage
Mistakes can happen, and sometimes the paint might get scratched or dulled.
- Minor Scratches: Light scratches can often be buffed out with a polishing compound. Always follow the product instructions and use a clean applicator pad.
- Dull Paint (from alcohol): If rubbing alcohol has dulled your paint, you’ll need to re-polish and then re-wax or seal the area. This process restores the shine.
- Deep Scratches or Paint Damage: For anything beyond minor surface damage, it’s best to consult a professional auto body shop.
Residue Left Behind
Occasionally, you might notice a hazy film or sticky residue after the main sap is gone.
- Thorough Rinsing: Ensure you’ve rinsed the area completely with water after washing. Sometimes, product residue can be mistaken for remaining sap.
- Clean with Isopropyl Alcohol (Diluted): A very light wipe with a 50/50 mix of isopropyl alcohol and water can sometimes remove stubborn residue without harming the paint. Rinse immediately after.
- Final Polish and Wax: A good polish and wax can help remove any minor hazing and restore the paint’s clarity and protection.
Frequently Asked Questions
Question: How long does tree sap typically stay on a car if left untreated?
Answer: If left untreated, tree sap can remain on your car indefinitely. Over time, it hardens and bonds strongly with the paint, becoming increasingly difficult to remove and potentially causing permanent damage to the clear coat if left for extended periods, especially under sunlight and varying weather conditions.
Question: Can I use nail polish remover to get rid of tree sap?
Answer: It is strongly advised against using nail polish remover. Nail polish remover contains harsh acetone which can severely damage and dissolve your car’s paint and clear coat. Stick to products specifically designed for automotive use or safe household alternatives.
Question: Is it safe to use a pressure washer on tree sap?
Answer: While a pressure washer can rinse off loose debris, it’s generally not the primary tool for removing tree sap. High pressure can force sap deeper into microscopic paint imperfections or even damage the paint itself if too close or too strong. It’s better for rinsing away cleaning solutions after sap removal.
Question: How often should I wash my car to prevent sap buildup?
Answer: Washing your car regularly, ideally every one to two weeks, helps prevent sap from bonding strongly. If you know you park under sap-producing trees, consider washing more frequently, especially after noticeable sap deposits. Applying wax or sealant during these washes adds protection.
Question: Will washing my car in the sun damage the paint when removing sap?
Answer: Washing your car in direct sunlight can cause soap and water to dry too quickly, leaving water spots and streaks. It can also cause cleaning products to evaporate before they have time to work effectively on the sap, making removal harder and potentially increasing the risk of residue or faint marks.
Conclusion
Removing tree sap from your car’s paint is achievable with the right methods and patience. Gentle washing, household items like oil, or specialized products like bug and tar removers offer effective solutions. Regular washing and waxing are key to prevention and easier cleanup.
Protect your car’s finish by acting promptly and using safe, proven techniques.