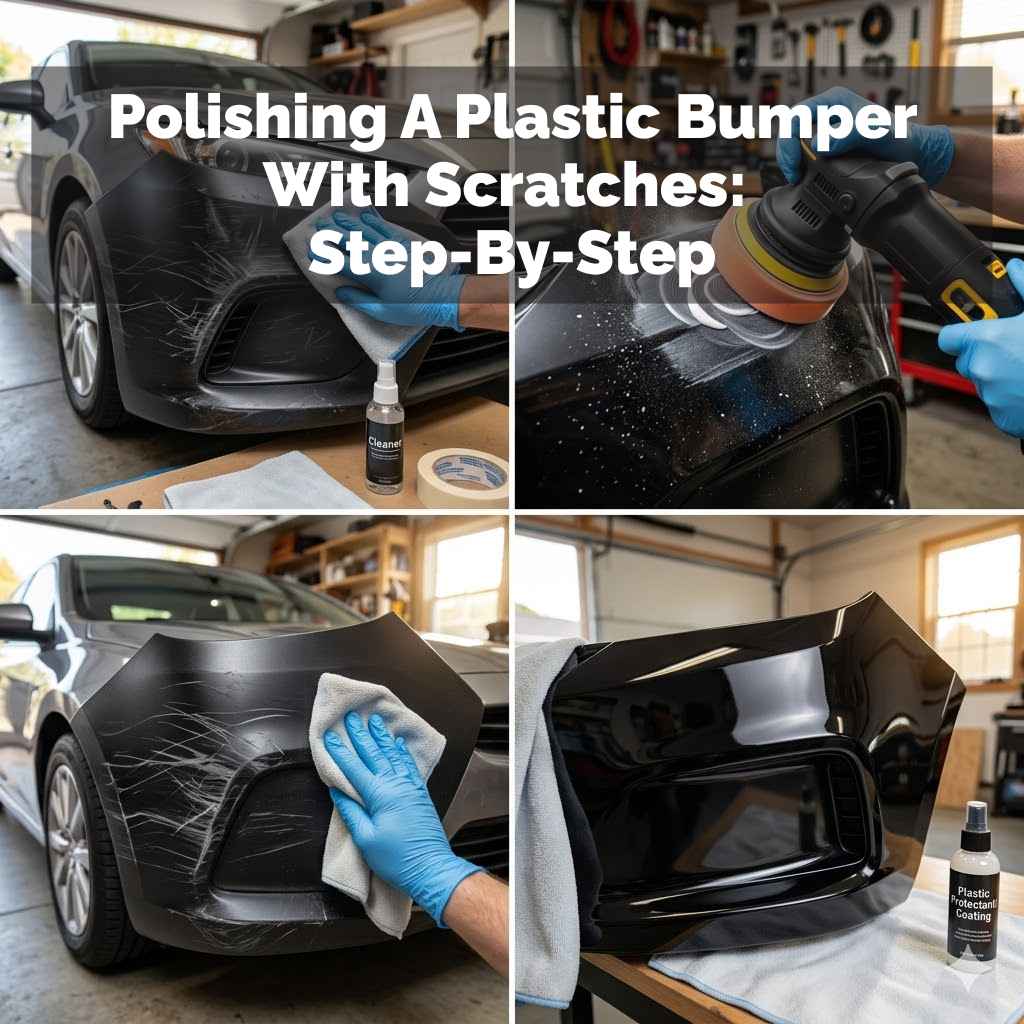
Polishing A Plastic Bumper With Scratches: Step-By-Step
It’s a common sight. You’re out and about, maybe at the grocery store or just navigating a tight parking spot. Then you hear it – that sickening little scrape.
You look back, and there it is: a scratch on your car’s plastic bumper. It’s frustrating, right? You want your car to look its best, and those marks just… well, they stick out.
But what if I told you that fixing those scratches, even making your plastic bumper look polished and new again, is totally within your reach? It might seem tough, but with the right steps and a little patience, you can bring back that smooth finish. Let’s get into how you can do just that.
Getting rid of scratches on a plastic bumper often involves cleaning, assessing the scratch depth, and then using a polishing compound or repair kit. Light scratches can be buffed out, while deeper ones may need filler and paint. Patience is key.
Understanding Plastic Bumper Scratches
Plastic bumpers are a big part of modern cars. They help protect you in small bumps. But they also show scratches easily.
These scratches can be just on the surface. Sometimes they go deeper. Knowing the difference helps you fix it right.
Surface scratches are light. They don’t go through the paint or plastic. You can often feel them with your fingernail.
Deeper scratches go into the plastic. They might even go down to the color layer below the clear coat. Or they might show the bare plastic.
These need more work.
Why do these scratches happen? Lots of things. Parking lots are a big one.
Low walls or curbs can catch the bumper. Other cars can also cause them. Even things like dirt and sand rubbing on the surface can cause fine scratches over time.
It’s just part of owning and using a car.
So, what makes plastic bumpers different from metal ones? Plastic is more flexible. It can bend and absorb some impact.
This is good for safety. But it also means the surface can be scratched more easily. The material itself is often a textured plastic or a painted finish over plastic.
The repair methods depend on this.
Most modern bumpers are painted to match the car’s body. This means you have a clear coat, a color coat, and then the plastic itself. A scratch might only hit the clear coat.
That’s the easiest to fix. If it goes into the color coat, it’s harder. If it hits the plastic, it’s even tougher.
It’s important to look closely. Grab a flashlight. You can also run your fingernail gently over the scratch.
Does your nail catch? If it doesn’t catch, it’s likely a surface scratch. If your nail catches a bit, it’s going deeper.
This test is super helpful. It guides your next steps.
How to Polish a Plastic Bumper with Scratches: A Deep Dive
When you notice scratches on your car’s plastic bumper, it’s natural to feel a pang of annoyance. These marks can really take away from the overall look of your vehicle, making it seem older or less cared for than it is. But don’t worry, because with the right approach, you can often bring back that smooth, unblemished finish.
We’re going to break down the process, step by step, so you can tackle this task with confidence.
The first step is always about preparation. You wouldn’t try to paint over a dirty canvas, and the same goes for fixing your car’s bumper. Cleaning it thoroughly is essential.
You need to remove all dirt, dust, grime, and any wax or sealants that might be on the surface. This ensures that your cleaning and polishing products can work directly on the scratch, not on top of debris.
For cleaning, start with a good car wash soap and water. Use a soft microfiber wash mitt. Gently wash the entire bumper.
Rinse it well. After washing, it’s a good idea to use a clay bar. A clay bar removes bonded contaminants.
These are things like tree sap, bug residue, or industrial fallout. These can be tiny and hard to see but can interfere with the polishing. Use a spray lubricant with the clay bar.
Glide the clay bar over the surface. You’ll feel it grab. When it glides smoothly, the surface is clean.
Rinse again and dry the bumper completely with a clean microfiber towel.
Now that the bumper is clean, it’s time to look at those scratches more closely. As we talked about, you need to know how deep they are. Use your fingernail test.
If your fingernail catches, it’s more than a surface scratch. If it glides over, it’s likely in the clear coat.
For light clear coat scratches, you’ll want a good quality rubbing compound or a fine-cut polishing compound. These compounds have mild abrasives. They work by gently removing a thin layer of the clear coat.
This smooths out the surface. It takes the scratch with it. Always start with the least aggressive product you think will work.
You can always move to something stronger if needed. But you can’t put clear coat back easily.
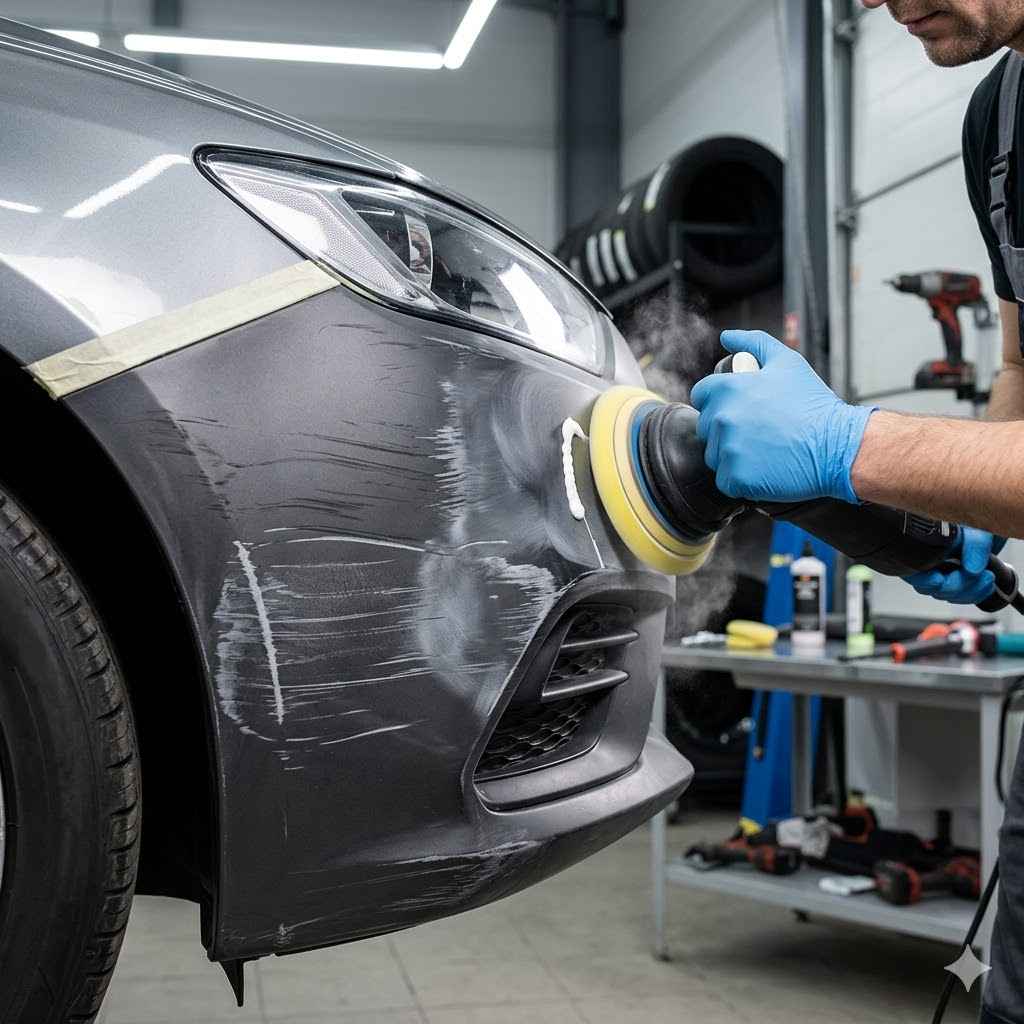
When applying the compound, use a foam applicator pad or a clean microfiber towel. Work in a small section at a time. Use back-and-forth motions.
Apply moderate pressure. You don’t need to press super hard. Let the compound do the work.
After working the compound for a minute or two, wipe away the residue with a separate clean microfiber towel. Inspect the area. If the scratch is gone or significantly reduced, move on.
If not, you can apply the compound again. Or, if it’s a stubborn scratch, you might need a slightly more aggressive compound.
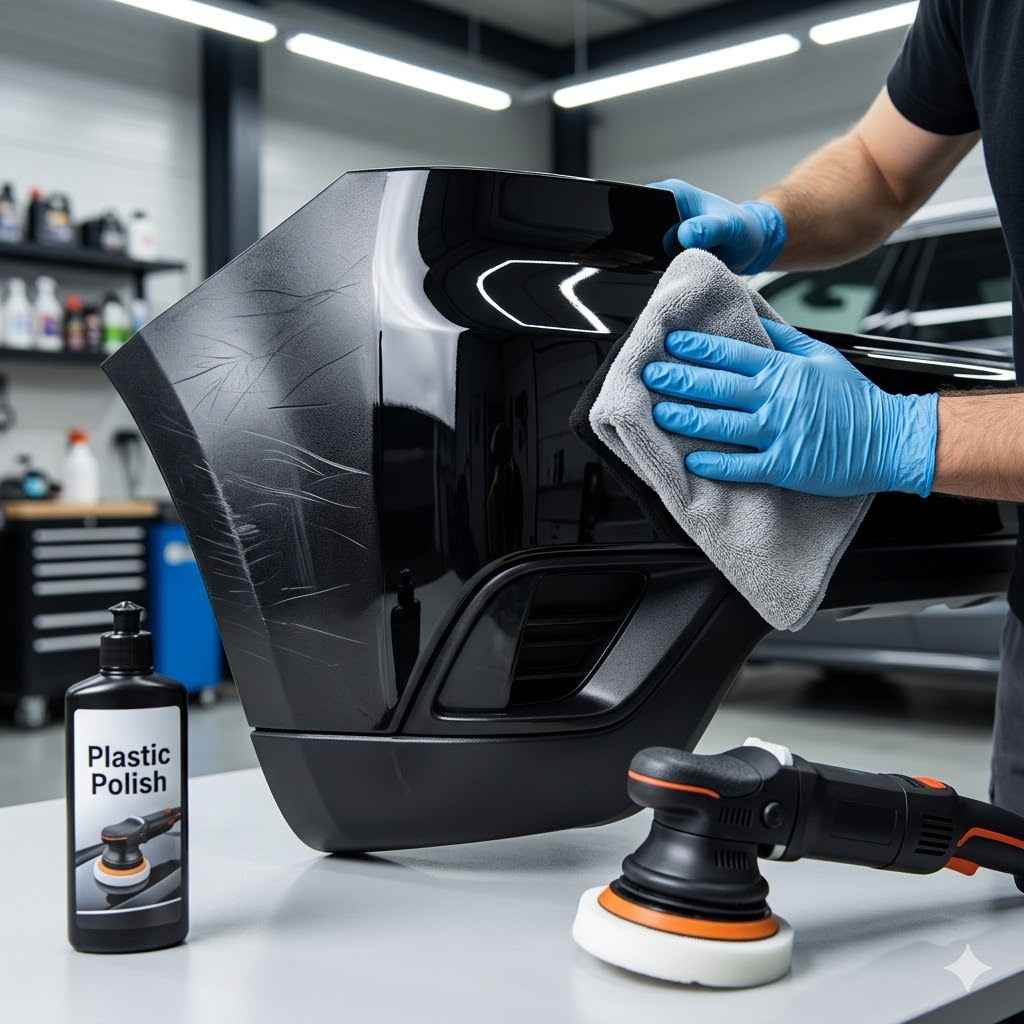
After you’ve worked out the scratches with the compound, the area might look a bit hazy. This is normal. Now you need to use a polish.
A polish is less abrasive than a compound. It refines the surface. It brings back the shine.
Apply the polish using a clean applicator pad or microfiber towel. Again, work in small sections. Use gentle, circular motions.
Wipe off the residue with a clean towel. You should start to see a much clearer, glossier finish.
If the scratches are deeper and your fingernail catches significantly, you might need more than just polishing. This is where things get a bit more involved. You might be looking at a plastic repair kit.
These kits often come with fillers or epoxies. They are used to fill in the gouge left by the scratch. You’ll need to follow the kit’s instructions very carefully.
Usually, this involves cleaning the scratch, mixing the filler, applying it, letting it cure, and then sanding it smooth.
Sanding is a critical step here. You want to sand it perfectly flush with the surrounding surface. Start with a high grit sandpaper, like 1000 or 1500 grit.
Use it with water. This helps prevent clogging. Sand gently.
Keep the sandpaper flat. You don’t want to create new low spots or high spots. After sanding, the area will be very dull.
You’ll then move back to the compounds and polishes we discussed earlier. You’ll need to gradually work your way through finer grits of sandpaper, perhaps up to 3000 grit, before hitting it with compounds and polishes to restore the shine.
This process for deeper scratches requires a lot of patience. You’re essentially rebuilding the surface. If the bumper has a textured finish, matching that texture after filling can be very tricky.
For painted bumpers with deep scratches, after filling and sanding, you might even need to touch up the paint. This involves color-matching. You might need to spray a little bit of color coat.
Then you’ll need to clear coat it. This is getting into more advanced car detailing and bodywork. For most people, light to moderate scratches are the main concern, and those are definitely manageable with polishing compounds.
Once you’ve finished polishing and the shine is back, it’s important to protect that work. Apply a good quality car wax or sealant. This adds a layer of protection.
It also enhances the gloss. It will help prevent future light scratches from etching too deeply. It makes cleaning easier too.
Remember, practice makes perfect. If this is your first time, take your time. Watch some videos.
Look at the products you’re using. Always test a small, inconspicuous area first if you’re unsure. The goal is to make the scratches disappear or become unnoticeable.
And for most light scratches, that is absolutely achievable.
Step-by-Step Bumper Polishing Guide
1. Clean Thoroughly: Wash, rinse, and dry. Use a clay bar to remove all bonded grime.
2. Assess Scratches: Use your fingernail. Does it catch?
This tells you how deep the scratch is.
3. Light Scratches (Clear Coat Only):
- Use a rubbing compound.
- Apply with a foam pad or microfiber.
- Work in small sections with back-and-forth motions.
- Wipe clean and inspect. Repeat if needed.
- Follow with a polish for extra shine.
4. Deeper Scratches (Into Plastic/Paint):
- Consider a plastic repair kit.
- Clean the scratch area.
- Apply filler as directed.
- Let it cure completely.
- Sand smooth, starting with high grit sandpaper (e.g., 1000) and moving to finer grits (up to 3000).
- After sanding, use compounds and polishes to restore shine.
- May require touch-up paint and clear coat for painted bumpers.
5. Protect Your Work: Apply car wax or sealant for lasting shine and protection.
My Own Bumper Blunder and How I Learned to Polish
I remember this one time, it was a bright Saturday morning. I was pulling out of a parking spot at a local park. I wasn’t paying quite enough attention, honestly.
I heard that familiar, awful scraping sound. My heart sank. I knew it wasn’t good.
I hopped out, dreading what I’d see. There it was, a long, ugly scratch right across the driver’s side rear plastic bumper. It wasn’t just a surface mark; I could feel my fingernail catch in it.
It looked bad. I felt this wave of frustration wash over me. How could I be so careless?
I loved my car, and this scratch just screamed “neglected.”
At first, I thought about just living with it. But every time I looked at it, it bothered me. So, I decided to try and fix it myself.
I did a lot of reading online. I watched countless videos. I learned about compounds, polishes, and even the dreaded sanding.
My initial thought was that it would be a quick fix, maybe just a little buffing.
I bought a basic polishing kit from the auto parts store. I washed the bumper, dried it, and then nervously applied the rubbing compound. I worked it in.
I buffed it off. The scratch was still there, maybe a little less noticeable, but still very much present. I felt a bit defeated.
This was harder than it looked.
That’s when I realized I needed to be more systematic. I went back to the drawing board. I learned about assessing scratch depth more carefully.
I understood that for scratches that catch your nail, you often need to fill them or carefully level the surrounding area. I ended up buying a more advanced kit that included a plastic filler and finer grit sandpaper.
The process of filling and sanding was nerve-wracking. I was so afraid of making it worse. I took my time, working in small areas.
I sanded gently. I kept checking. Slowly, painstakingly, the scratch started to blend in.
The filler was flush with the bumper’s surface. The area was dull, but the gouge was gone.
Then came the polishing. This time, I used finer grits of sandpaper to smooth the sanded area even further. Then I applied the rubbing compound.
Then a finer polish. It took several passes, but gradually, the shine returned. It wasn’t perfect, but the scratch was almost invisible.
Seeing that transformation felt amazing. It taught me that with the right tools and a good dose of patience, you can indeed make those frustrating scratches disappear. That experience gave me the confidence to tackle other small imperfections on my car.
Real-World Bumper Scratches: What to Expect
When we talk about plastic bumper scratches, it’s good to know what you’re likely to encounter in everyday life. Most cars on the road today have plastic bumpers. They’re designed to absorb low-speed impacts.
This is great for protecting the car’s structure and, more importantly, its occupants. But this flexibility also makes them prone to certain types of damage.
Think about common scenarios. You’re parking in a tight city spot. The car next to you is a bit too close.
You misjudge the distance. That cringe-worthy scrape happens. Or maybe you’re on a gravel road.
A stray rock kicks up and hits your bumper. Even brushing against a shopping cart in a parking lot can leave a mark.
The environment plays a big role. In sunny climates, UV rays can make the plastic more brittle over time. This can make it more susceptible to cracking or deeper scratches.
In colder climates, impacts can cause the plastic to become more rigid, and then it might chip or scratch more easily.
User behavior is also key. Some people are very careful. They park far away from others.
They take their time. Others might be less aware. They’ll nudge into parking spots or drive over rough terrain without a second thought.
These habits directly affect the likelihood of getting bumper scratches.
The design of the bumper itself matters too. Some bumpers have a very smooth, glossy finish that shows every little scratch. Others have a more textured, matte finish.
Textured bumpers can hide minor imperfections better. But they can also be harder to repair if the damage is significant. Repairs on textured plastic often involve special techniques to mimic the original look.
When a scratch occurs, the way the plastic is made is important. Is it a single piece of molded plastic? Is it painted?
If it’s painted, the quality of the paint job matters. A cheap paint job might chip or peel easily around a scratch. A high-quality factory paint job will have multiple layers: primer, color coat, and clear coat.
Each layer can be scratched, and each requires a different approach to fix.
Most people will encounter light scuff marks. These are often caused by other car bumpers or even garage walls. These typically don’t go deep.
They might just be on the very top layer of paint or clear coat. Deeper scratches might occur from scraping against curbs or rough surfaces. These can gouge the plastic itself.
It’s also worth noting that plastic bumpers can get faded or chalky looking over time, especially if they’re unpainted black plastic. This isn’t a scratch, but it can make the bumper look old and worn. Special plastic restorers can help bring back the color and finish in those cases.
Understanding these common issues helps you identify what you’re dealing with and choose the right solution.
Understanding Your Bumper’s Material
Painted Plastic Bumpers:
- Appearance: Smooth, glossy finish matching car color.
- Layers: Primer, Color Coat, Clear Coat, Plastic Base.
- Scratch Type: Can affect clear coat (light), color coat (medium), or go through all layers (deep).
- Repair Focus: Polishing for clear coat scratches. Filling and painting for deeper damage.
Textured Plastic Bumpers:
- Appearance: Matte, often black or dark grey, with a slight grain.
- Scratch Type: Can be superficial scuffs or deeper gouges.
- Repair Focus: Difficult to perfectly match texture after filling. Often requires specialized kits or professional help. May hide minor damage better.
Unpainted Plastic Trim:
- Appearance: Often black, grey, or grey-ish plastic. Can be smooth or textured.
- Issue: Fading and chalkiness from UV exposure.
- Repair Focus: Plastic restorers and conditioners to bring back color and shine.
What This Means For Your Bumper’s Appearance
So, what does all this mean for your car’s bumper and its look? It really boils down to whether the scratch is a minor annoyance or something more significant. Knowing the difference helps you decide what to do.
When it’s normal to see minor scuffs and very light scratches on a plastic bumper. Especially if your car is used regularly. Think about all the times you’ve pulled into a garage or a tight parking spot.
A few light marks are almost inevitable. These kinds of scratches usually don’t go deeper than the clear coat. They don’t affect the structural integrity of the bumper.
These minor marks are often what you can fix with a good polishing compound. They’re usually not worth a major repair. They just happen with everyday use.
Most car owners just accept them as part of having a car that’s actually driven. You might only notice them when the sun hits the bumper just right.
When should you start to worry, or at least consider a more serious fix? If the scratch is deep. If you can easily feel a significant edge with your fingernail.
If you can see different layers of paint (like a lighter color showing through dark paint). Or if the plastic itself looks gouged or torn. These are signs that it’s more than just a surface blemish.
Deeper scratches can sometimes allow water and dirt to get underneath the paint. Over time, this could lead to rust or paint peeling, though rust is less common on plastic. More importantly, deep damage can compromise the bumper’s ability to do its job if you were to have another impact.
It can also be a breeding ground for dirt and grime, making your car look less clean.
What simple checks can you do? After cleaning the bumper, run your finger over the scratch. Does it feel smooth or rough?
Does your fingernail catch on it? Shine a flashlight on it. Can you see the white or grey plastic underneath the paint?
If the scratch is white or grey, it has gone through the paint layers.
Another check is to look for any flaking or peeling paint around the scratch. If the paint is lifting, that’s a sign of deeper damage and potential future problems. For textured bumpers, check if the texture is disrupted or if the plastic looks melted or deformed.
If you have a painted bumper and the scratch is deep, it’s important to consider if you want to fill and repaint it. For a truly seamless look, especially on show cars, this might require professional body shop work. However, for many people, a good DIY repair kit can significantly improve the appearance and be good enough for their needs.
For textured or unpainted bumpers, deep scratches are also an issue. These can be harder to fix invisibly. Sometimes, the best option is to use a good plastic restorer to make the surrounding area look its best, and the scratch becomes less obvious.
If the damage is severe, replacement might be the only way to get that perfect look back.
The key takeaway is that minor scratches are normal. They’re part of life with a car. You can often handle them yourself with polishing.
Deeper damage requires more attention and possibly more advanced techniques or professional help. Understanding the depth and impact of the scratch is your first step to deciding the best course of action.
Quick Tips for Bumper Scratch Care
When it comes to keeping your plastic bumper looking its best, a few simple habits can make a big difference. Think of these as preventative measures and quick solutions.
1. Gentle Washing: Always use a soft wash mitt and car-specific soap. Avoid abrasive sponges or harsh household cleaners.
Rinse the bumper thoroughly before and after washing. This removes grit that can cause new scratches.
2. Be Mindful in Parking Lots: Park further away from other cars if possible. Take your time when maneuvering into tight spots.
Look for those annoying low concrete parking blocks before you get too close.
3. Quick Wipe-Downs: If you notice a fresh scuff mark, try to clean it off as soon as you can. Sometimes, simple grime can look like a scratch.
A quick wipe with a damp microfiber cloth can solve many minor marks.
4. Use a Protectant: For unpainted plastic bumpers, applying a plastic restorer or trim protectant regularly can keep them looking darker and newer. This also adds a slight protective layer against UV damage.
5. Address Minor Scratches Early: If you see a light scratch, don’t wait too long. Using a plastic polish or a fine rubbing compound while the scratch is still shallow is much easier than dealing with it later when it might have collected dirt.
6. Consider a Bumper Guard: For a more preventative approach, especially on heavily used vehicles, you can buy clear or black bumper protectors. These are often strips of plastic or rubber that adhere to the most vulnerable parts of the bumper.
7. Know When to Stop: If you’re trying to polish and the scratch isn’t improving, or you feel like you’re removing too much material, it’s okay to stop. Sometimes, it’s better to live with a minor imperfection than to risk making it worse.
Quick Fix vs. Deeper Repair
Quick Fix (Light Scratches):
- Goal: Remove light scuffs and clear coat scratches.
- Tools: Microfiber towels, car wash soap, polishing compound, car polish.
- Method: Clean, apply compound, buff, then polish for shine.
- Result: Greatly improved appearance, often making scratches invisible.
Deeper Repair (Gouges, Paint Damage):
- Goal: Fill in damage and restore surface.
- Tools: Plastic filler/epoxy, sandpaper (various grits), primer, touch-up paint, clear coat, compounds, polishes.
- Method: Clean, fill, sand smooth, prime, paint, clear coat, then compound and polish.
- Result: Can be near-perfect with practice, but requires more skill and time.
Frequently Asked Questions About Polishing Plastic Bumpers
Can I use toothpaste to polish a plastic bumper scratch?
Toothpaste is sometimes suggested for very light scuffs because it contains mild abrasives. However, it’s not specifically designed for automotive clear coats. It can sometimes work, but you risk creating more fine scratches or dulling the finish.
It’s better to use products made for car care, like a dedicated plastic polish or rubbing compound, which offer more control and predictable results.
How long does it take to polish out a bumper scratch?
The time it takes depends heavily on the scratch’s depth and your experience. For a very light scratch that only needs a quick polish, it might take 15-30 minutes. If you’re dealing with deeper scratches that require filling and sanding, it could take several hours, spread over multiple sessions to allow for curing times.
Will polishing damage my bumper if I do it wrong?
Yes, it’s possible. If you use too aggressive a compound, apply too much pressure, or rub too long, you could remove too much clear coat or even wear through the paint. For textured bumpers, improper sanding or filling can permanently alter the surface.
Always start with the least abrasive method and product, and test in an inconspicuous area first.
Can I fix deep scratches on a plastic bumper without repainting?
For some deep scratches, especially on unpainted plastic or textured bumpers, you might be able to fill them with a specialized plastic filler or epoxy. After filling and sanding smooth, you can sometimes restore the finish with compounds and polishes. However, for painted bumpers, a perfect match usually requires touching up the paint.
Professional results often involve repainting a section or the whole bumper.
What’s the difference between a rubbing compound and a polishing compound?
A rubbing compound is more abrasive. It’s designed to remove deeper scratches and imperfections. A polishing compound is less abrasive.
It’s used after a rubbing compound to refine the surface, remove haze, and bring back a high shine. Think of it like starting with sandpaper and then moving to very fine sandpaper to smooth it out.
How do I know if my bumper scratch needs professional attention?
If the scratch is very deep, exposing the bare plastic, or if there are cracks or tears in the plastic itself, it’s a good idea to consult a professional. Also, if the bumper has complex textures or sensors embedded in it, DIY repairs can be risky. If you’re not comfortable with the repair process, or if the cosmetic result is critical for you, a professional detailer or body shop is the best bet.
Bringing It All Together: Your Bumper’s New Shine
Dealing with scratches on your plastic bumper can feel like a nuisance, but it doesn’t have to be a permanent eyesore. We’ve walked through why these scratches happen, how to assess them, and the steps you can take to polish them away. From gentle cleaning to careful application of compounds and polishes, you have the power to restore your bumper’s smooth finish.
Remember, patience and the right approach are your best tools. Even deeper scratches can often be significantly improved with DIY repair kits and a steady hand. Take your time, follow the steps, and don’t be afraid to practice on a less visible area first.
Your car will thank you for it, and you’ll feel a real sense of accomplishment.