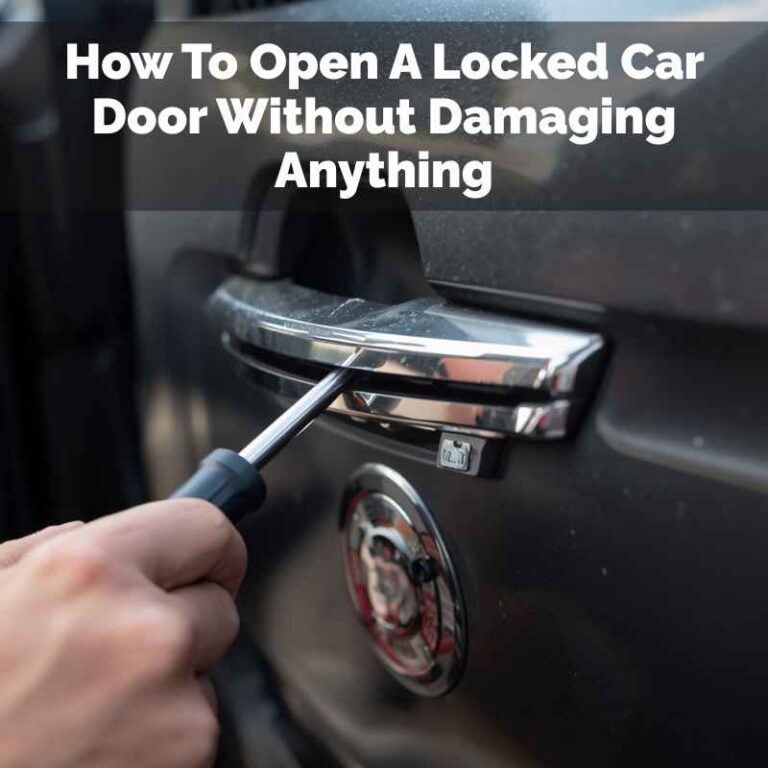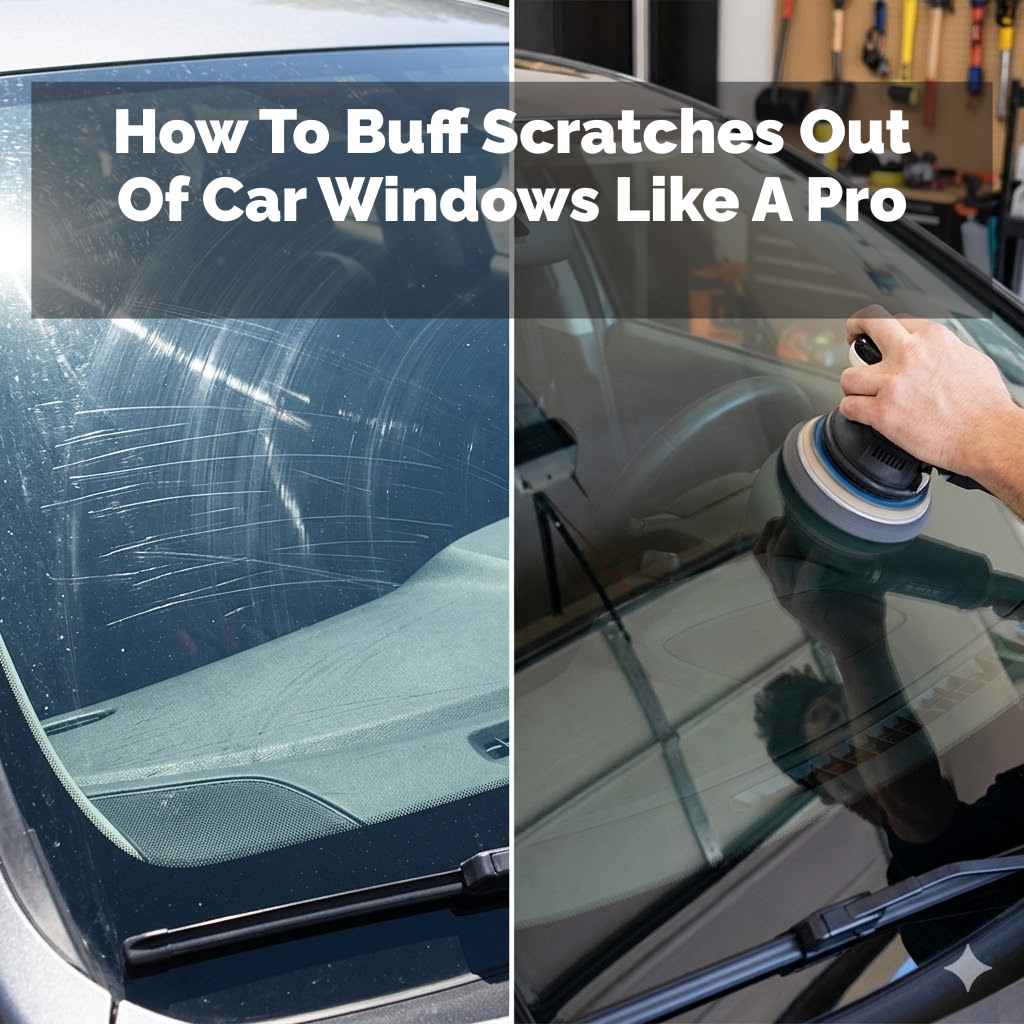
How To Buff Scratches Out Of Car Windows Like A Pro
Finding a scratch on your car’s window can feel like a punch to the gut. You might think it’s a permanent eyesore, ruining your view and your car’s look. But what if I told you there’s a way to fix many of these annoying marks yourself?
It’s true. With the right approach and a bit of patience, you can often buff out those pesky scratches. This guide will walk you through everything you need to know.
We’ll cover what causes them, how to assess them, and the best ways to tackle them. Let’s get your windows looking crystal clear again.
It is possible to buff out many common car window scratches. This involves carefully cleaning the glass, using appropriate polishing compounds, and applying them with the right tools and technique. Small to medium scratches are often fixable at home, while very deep ones might require professional help.
Understanding Car Window Scratches
Car windows get scratched for many reasons. Most often, it’s from daily use. Think about the tiny bits of grit and dust that travel with the wind.
When your wipers sweep across the glass, they can drag these particles. This creates fine lines, almost like sandpaper.
Another big culprit is improper cleaning. Using dirty cloths or harsh brushes can do damage. Even an automatic car wash can sometimes leave its mark.
Tiny grains of sand or dirt trapped in brushes can scratch the glass. Ice scrapers, if used roughly, are also known to cause deep gouges.
Sometimes, it’s the simple things. A stray twig brushing against the window as you drive down a wooded road can leave a mark. Even a badly placed fingernail while cleaning can cause a tiny scratch.
It’s often a combination of these small events that adds up over time.
Understanding how scratches happen helps us prevent them. But when they do appear, knowing the cause can hint at the severity. Fine, shallow scratches are usually easier to fix than deep, jagged ones.
The glass itself is tough, but it can still be marred.
The type of glass matters too. Most car side and rear windows are made of tempered glass. This type is strong but shatters into small pieces if broken.
The windshield is usually made of laminated glass. This is two layers of glass with a plastic film in between. It cracks rather than shatters.
The good news is that most minor scratches on both types can be addressed. The method might vary slightly. But the core idea of polishing the glass surface remains the same.
Assessing the Scratch
Before you grab any tools, take a good look at the scratch. This is a crucial first step. It helps you decide if it’s something you can fix yourself.
It also guides you on which method and materials to use. A quick assessment saves time and effort. It also prevents you from making the scratch worse.
Run your fingernail gently across the scratch. Does your nail catch on it? If your fingernail slides over it smoothly, it’s likely a shallow, superficial scratch.
These are often the easiest to buff out. They are usually caused by dust and fine debris.
If your fingernail catches on the scratch, it’s a deeper one. This means more glass has been removed. These are harder to fix completely.
You might be able to lessen their appearance significantly, but removing them entirely can be tricky. It might even be impossible without professional help or altering the glass surface too much.
Inspect the area around the scratch. Is the glass chipped or cracked? If so, buffing won’t help.
You’ll need to get the glass replaced. Scratches are different from chips or cracks. They are a surface-level imperfection.
Chips and cracks go deeper into the glass structure.
Consider the size and length of the scratch. A tiny, short line is easier to handle than a long, sprawling one. Multiple scratches close together can also be more challenging.
They might create a larger sanded-down area that looks duller.
Think about the location of the scratch. Is it in your direct line of sight when driving? If it is, you need to be extra careful.
Over-polishing an area in your line of sight can create distortion. This can be more dangerous than the original scratch. This is where professional help might be best.
Take a clear picture of the scratch. This can help you track your progress. It’s also useful if you need to show it to a professional later.
Good lighting is key here. You want to see the scratch clearly without glare.
Finally, consider your own comfort level. Are you comfortable trying a DIY fix? Or would you rather leave it to the pros?
There’s no shame in either choice. Knowing your limits is a sign of good judgment.
Quick Scratch Assessment Checklist
1. Fingernail Test: Does your nail catch?
2. Damage Type: Is it a scratch, chip, or crack?
3. Size & Length: How big and long is it?
4. Location: Is it in your direct line of sight?
5. Your Comfort: Are you ready for a DIY fix?
The DIY Scratch Buffing Process
If your assessment shows a fixable scratch, you’re ready to get to work. The process involves a few key steps. Each one is important for getting the best results.
Patience is your best friend here. Don’t rush through any part.
First, you need to gather your supplies. This includes a good quality glass cleaner. You’ll also need microfiber cloths.
These are soft and won’t scratch the glass. For polishing, you’ll need a glass polish or a cerium oxide compound. A small drill with a polishing pad attachment can help.
But you can also do it by hand.
Next, thoroughly clean the window. Use your glass cleaner and a microfiber cloth. Make sure the entire window is spotless.
You want to remove all dirt, dust, and grime. Any remaining debris can cause new scratches during the polishing process. Wash the area around the window too.
This prevents dirt from getting onto the wet glass.
Now, prepare your polishing compound. If you’re using cerium oxide, you’ll mix it with water. Follow the product’s instructions carefully.
It usually forms a slurry. If you’re using a glass polish, it will likely be a cream or paste. Apply a small amount to your polishing pad or cloth.
Begin polishing. If you’re using a drill, set it to a low speed. This prevents the glass from getting too hot.
Apply the polishing pad to the scratch. Use moderate pressure. Work in small, circular motions.
Keep the pad moving constantly. Don’t linger in one spot.
If you’re polishing by hand, use a clean microfiber cloth. Apply the polish to the cloth. Rub the scratch with firm, circular motions.
This will take more time and effort than using a drill. But it’s still effective for lighter scratches.
Periodically wipe away the polish residue with a clean, damp microfiber cloth. Then, dry the area with another clean, dry microfiber cloth. Inspect the scratch.
You should start to see it diminishing. You might need to repeat the polishing process several times.
Be patient. It can take many passes to fully remove a scratch. It’s better to do multiple light passes than one aggressive one.
This reduces the risk of damaging the glass. If the scratch seems to be disappearing, great! Keep going until you’re satisfied.
If the scratch is still there after several attempts, reassess. Is it a deeper scratch than you thought? At this point, you might need to consider professional help.
Pushing too hard can create a distorted patch of glass. This can be worse than the original scratch.
Once the scratch is gone or significantly reduced, clean the entire window again. Make sure all polish residue is removed. Then, buff the window dry to a streak-free shine.
Admire your work!
Essential Tools for Scratch Removal
- Microfiber cloths (lots of them!)
- Glass cleaner (ammonia-free is often best)
- Glass polish or Cerium Oxide compound
- Small electric drill with felt polishing pad (optional, but recommended)
- Water spray bottle (for cerium oxide mixing)
- Masking tape (to protect paint around the window)
- Gloves and safety glasses
Choosing the Right Polishing Compound
The polishing compound is key. It’s what actually does the work of smoothing out the glass. Using the wrong one can be ineffective or even damaging.
There are a few main options to consider.
Cerium Oxide: This is a fine powder that’s a standard in glass polishing. It’s very effective. You mix it with water to create a slurry.
This slurry acts as a fine abrasive. It gently grinds down the edges of the scratch. This makes the surface smooth again.
It’s widely used by professionals.
Cerium oxide can be purchased online or at auto parts stores. Make sure you get a good quality product. Follow the mixing instructions precisely.
The consistency of the slurry matters. Too thick and it’s hard to work with. Too thin and it’s not effective.
Specialized Glass Polishes: There are also many commercial glass polishes available. These often come in cream or paste form. They are designed for DIY use.
Some are very good for light scratches and swirls. They are usually gentler than cerium oxide.
Read the product labels carefully. Some are designed for minor haze or water spots. Others claim to remove light scratches.
Check reviews to see how effective they are. Many use aluminum oxide or similar fine abrasives.
Toothpaste (for very minor marks): For the absolute tiniest, superficial scuffs, some people have luck with plain white toothpaste. It’s a very mild abrasive. However, it’s generally not strong enough for actual scratches.
It’s more for buffing out light hazing or swirl marks left by cleaning.
Toothpaste is readily available but use it with caution. Make sure it’s the white paste kind, not gel. And don’t expect miracles.
It’s a last resort for the most minor issues.
DIY Abrasive Pastes: Some guides might suggest other DIY pastes. For instance, baking soda mixed with water. While baking soda is an abrasive, it can be too harsh for glass.
It might create more micro-scratches than it fixes. It’s best to stick to products specifically made for glass.
When in doubt, always start with the gentlest method. If that doesn’t work, you can step up. But avoid anything that feels too harsh.
Remember, glass is tough but not indestructible.
The method of application also matters. Whether you use a power tool or your hand, consistency is key. A consistent pressure and movement help the compound work evenly.
This leads to a smoother finish.
Always test your chosen compound on an inconspicuous area first. This might be a corner of the window. This helps you see how it reacts with the glass.
It also lets you practice your technique.
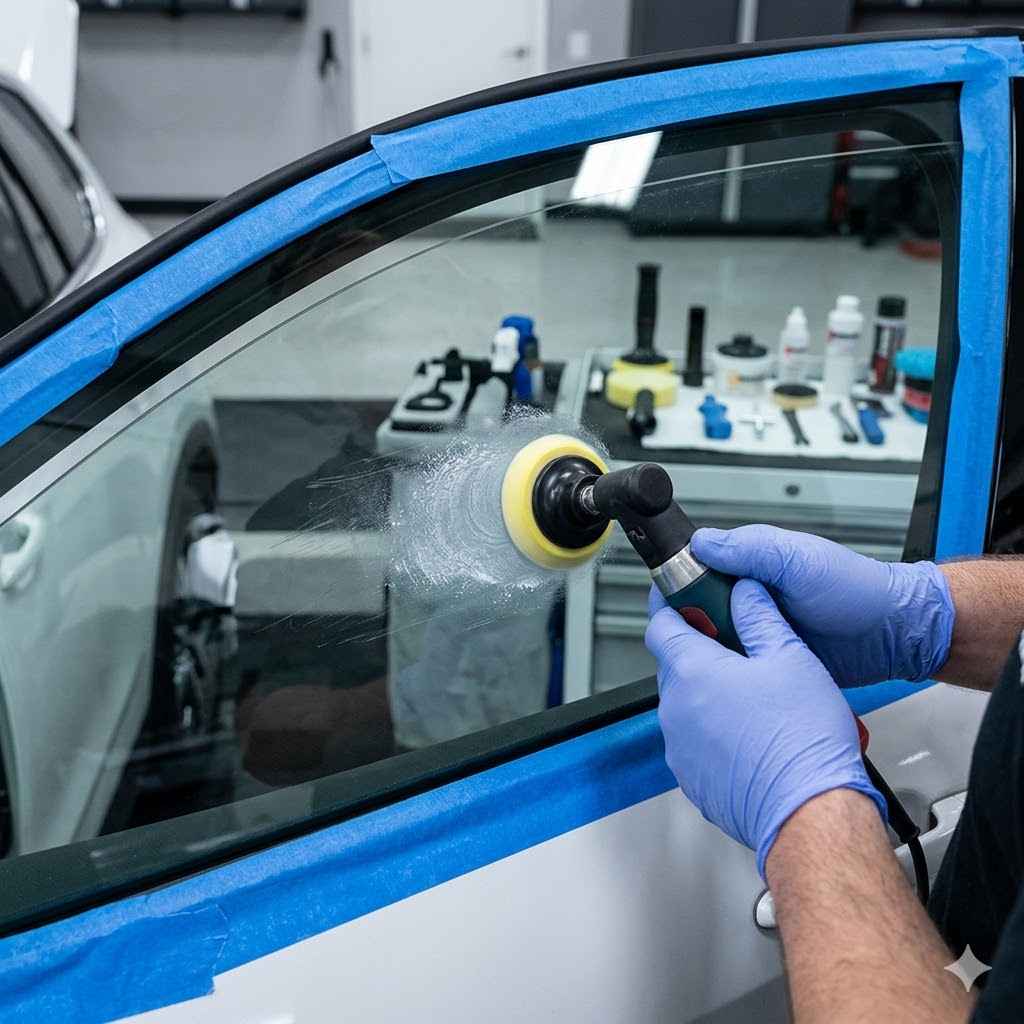
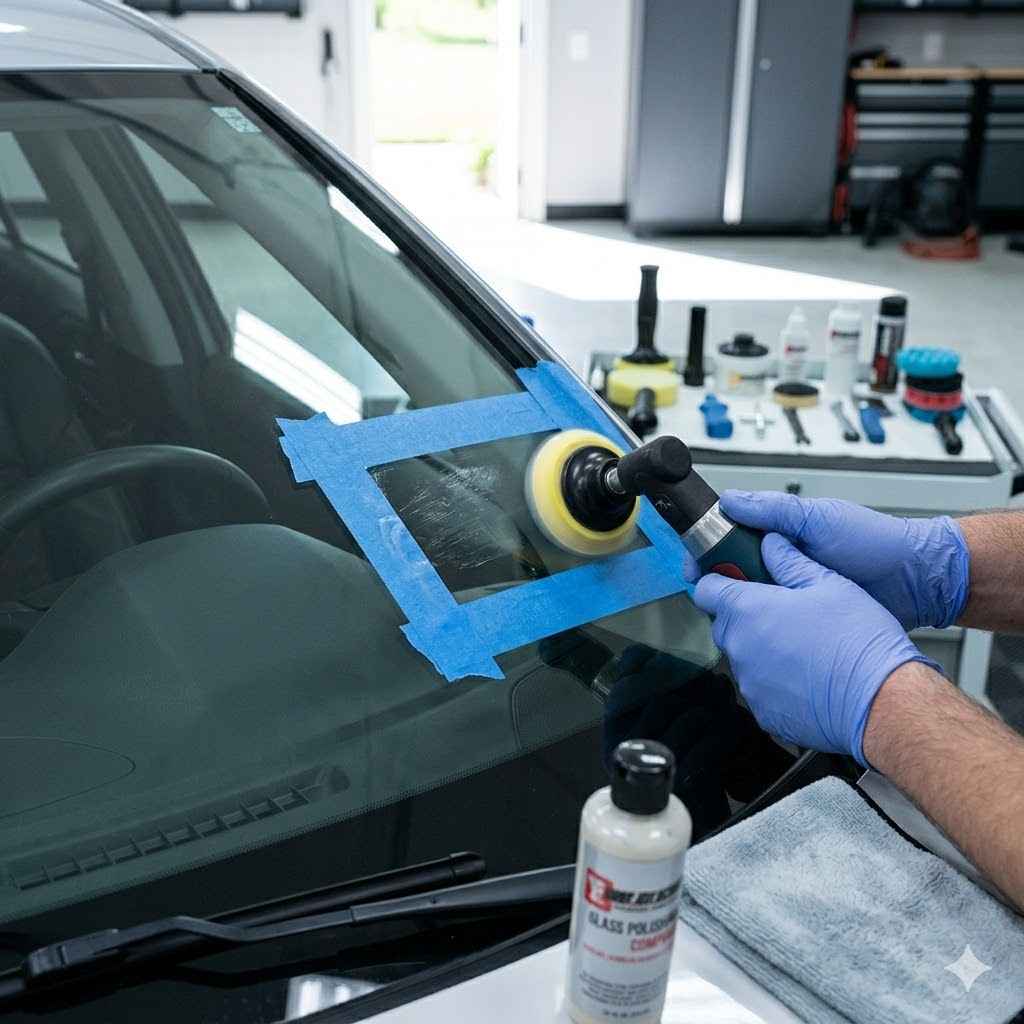
Using a Power Polisher (Drill Attachment)
Using a power tool like a drill can speed up the process. It also provides more consistent pressure. However, it requires more care.
The risk of overheating the glass or creating distortion is higher.
First, ensure your drill is set to its lowest speed setting. High speeds generate a lot of heat. Heat can stress the glass.
It can even cause it to crack. You need a polishing pad that attaches to your drill. Felt pads are common for glass polishing.
Make sure it’s clean and free of debris.
Apply your chosen compound to the pad. If using cerium oxide slurry, apply a small amount. Don’t overload the pad.
You want a thin, even layer. If using a cream polish, a dab is usually enough.
Start the drill slowly. Gently bring the spinning pad to the scratch. Keep the pad moving in a constant, overlapping circular motion.
Cover an area slightly larger than the scratch itself. This helps blend the polished area. It prevents creating a noticeable dip.
Apply light to moderate pressure. Let the compound and the pad do the work. Don’t press down hard.
If you feel the pad sticking or skipping, you might be applying too much pressure or the compound is drying out.
Keep the pad moving. Never let it stop on the glass. This can cause flat spots or localized heat.
If the area starts to feel warm, stop and let it cool down. You can mist it with a little water from your spray bottle.
Wipe away residue frequently. Use a clean, damp microfiber cloth. Then dry with another clean cloth.
This lets you see your progress. It also ensures the compound is working properly.
Repeat the polishing steps as needed. It might take several passes. The key is to be gradual.
Watch for the scratch to become less visible. If you start to see a dull patch forming, you might be over-polishing. Or you might be creating a concave area.
Masking tape is your friend here. Use it to protect the car’s paintwork around the window. Polishing compounds can be abrasive.
You don’t want to damage your paint finish. Apply tape along the edges of the glass where it meets the frame.
Safety first: wear gloves and eye protection. Glass dust can be irritating. And spinning tools always carry some risk.
After you’re done, remove the tape carefully.
The goal is to level the glass surface. You’re essentially smoothing down the high edges of the scratch. This makes the light pass over it without interruption.
A well-polished area should look clear and smooth, not foggy or distorted.
Power Polishing Tips
Speed: ALWAYS use the lowest speed setting.
Pad: Use a dedicated felt or foam polishing pad.
Pressure: Light to moderate, let the tool work.
Movement: Constant, overlapping circular strokes.
Cooling: Let the glass cool if it feels warm.
Protection: Mask off the paintwork.
Polishing by Hand
If you don’t have a power polisher, or if the scratch is very small, polishing by hand is perfectly effective. It just takes more time and elbow grease.
Start with a clean window. Use your microfiber cloths and glass cleaner. Ensure the glass is perfectly dry.
You want to work on a clean slate.
Apply your polishing compound to a clean microfiber cloth. A small amount is all you need. Don’t apply it directly to the glass.
You want good control.
For cerium oxide, you’ll have a slurry. Apply a small amount to the cloth. Then, rub the scratch using firm, circular motions.
Work the compound into the glass. Apply steady pressure.
Focus on the scratch itself, but also work a slightly larger area around it. This helps to blend the polished spot. You’re essentially trying to create a smooth patch.
This patch is indistinguishable from the rest of the glass.
Wipe away the residue with a damp cloth. Then dry the area with a clean, dry cloth. Inspect your progress.
You should see the scratch becoming less defined.
Repeat the process. This might involve re-applying compound and rubbing. Continue until the scratch is gone or much less visible.
Be persistent. It can take many minutes of rubbing for even small scratches.
If you’re using a cream polish, the process is similar. Apply the cream to the cloth and rub in circles. The key is to maintain consistent pressure.
And to keep the area moist with the polish.
It’s easier to manage heat when polishing by hand. You can feel the glass warming up. This is your cue to take a break.
Let it cool completely before continuing. Overheating by hand is less common, but still possible with very vigorous rubbing.
The advantage of hand polishing is the control. You can feel exactly how much pressure you’re applying. This makes it safer for very delicate areas or if you’re nervous about using power tools.
It also gives you a better feel for the glass itself.
When you’re finished, clean the entire window again. Make sure no polish residue is left behind. Then buff the window dry.
You should see a clear, smooth surface.
What to Do for Deeper Scratches
As we discussed, deep scratches are tougher. If your fingernail catches firmly, it’s deep. Polishing can help reduce their visibility.
But completely removing them might not be possible with DIY methods.
With deep scratches, you’re removing more glass. The goal is to level the glass surface. But you can only remove so much before you create a noticeable dip or distortion.
This is especially true for windshields.
If you try to polish a deep scratch, focus on softening its edges. You might not eliminate it entirely. But you can make it less distracting.
Continue with the cerium oxide method. It’s more aggressive than most commercial polishes.
Be prepared for a longer process. You might need to spend an hour or more polishing. And you may still not get a perfect result.
Always stop if you start to notice a distortion. This is your signal to quit before causing more damage.
For very deep scratches, especially on a windshield, professional help is often the best route. Auto glass repair shops have specialized tools and compounds. They can often fix deeper issues.
They also know how to do it without compromising safety.
Sometimes, professionals can even use filler compounds. These are designed to fill in the gouge. They then polish the filler to match the glass.
This is a specialized technique.
If the scratch is on a side window, and it’s very deep, you might have to consider replacement. It’s a costly option, but it guarantees a perfect result. For a windshield, replacement is often necessary for deep damage.
Remember the safety aspect. A damaged windshield can be less safe. If the scratch is large or deep, it could compromise the glass’s integrity.
Especially in an accident.
Don’t be discouraged if you can’t fix every scratch yourself. There are limits to DIY. Knowing when to call a pro is part of being a smart car owner.
It ensures your safety and maintains your car’s appearance.
Deep Scratch Reality Check
DIY Limits: Very deep scratches are hard to fully remove.
Focus: Aim to soften edges and reduce visibility.
Risk: Over-polishing can cause distortion.
Professional Help: Often the best option for deep damage.
Replacement: May be necessary for severe cases.
Real-World Contexts and Scenarios
Let’s think about where and why these scratches happen in our daily lives. Picture this: You’re driving down a dusty gravel road. The car behind you kicks up a cloud of fine particles.
These tiny rocks and sand hit your windshield. Your wipers might then drag them across the glass. That’s how fine scratches begin.
Or maybe you’re at the beach. The wind whips salt spray and sand. These abrasive elements can get on your windows.
Washing the car with a sandy sponge? Big mistake. The sand acts like sandpaper.
It grinds into the glass surface.
What about kids? They love to press their faces against the car window, leaving greasy smudges. Sometimes, if they’re playing with toys inside, a toy might scrape against the glass.
Even a pet’s paw can leave tiny marks. Children’s curiosity is wonderful, but it can sometimes lead to little nicks on the glass.
Consider winter. Ice scrapers are a common cause of scratches. If you use too much force, or if there’s grit trapped under the scraper blade, it can gouge the glass.
Frozen water droplets can also hold debris against the window.
Automatic car washes are convenient, but they can be harsh. The brushes and cloths used might have tiny abrasive particles embedded in them. Over time, these add up, creating a network of fine scratches, often called swirl marks.
These make the glass look dull.
Parking garages can also be an issue. Low-hanging signs or branches can brush against the side windows. If you’re not careful when maneuvering, you might drag something across the glass.
Even something as simple as carrying groceries. If a bag leans against the window, or a key falls out of a pocket, it can leave a mark. It’s the accumulation of these everyday events that we need to be mindful of.
These scenarios show that scratches aren’t usually from one big accident. They are often the result of many small, seemingly insignificant interactions with the environment. This is why regular, gentle cleaning is so important.
And why knowing how to fix minor damage can save you headaches.
What This Means for You
So, what’s the takeaway from all this? For most car owners, it means you have more power than you think. You can often handle minor window scratches yourself.
This saves money and time.
It’s normal for car windows to get small scratches over time. Don’t panic if you see a light scuff. Most of these are just surface-level.
They don’t affect the structural integrity of the glass.
When should you worry? If the scratch is deep enough to catch your fingernail. If the glass is chipped or cracked around the scratch.
Or if the scratch is in your direct line of sight and you’re unsure about DIY. These are signs to be cautious.
A simple check: when you wash your car, pay attention to the windows. Are they getting more hazy? Do you see new, fine lines appearing?
This might mean your cleaning methods are too harsh, or the environment is rough on your glass.
If you’re unsure about the depth of a scratch, err on the side of caution. Try the gentlest methods first. Use a good quality glass polish.
If that doesn’t seem to work after a few tries, consider stopping.
For windshields, safety is paramount. Deep scratches or chips can weaken the glass. This is especially important in case of an accident.
If you have any doubts about a windshield scratch, get it checked by a professional.
The good news is that many scratches are purely cosmetic. And with the right knowledge, you can often restore that crystal-clear look. It’s about being observant and knowing the right tools and techniques.
Quick Fixes and Tips
Here are some extra tips to help you get the best results when buffing scratches:
Cleanliness is Paramount: Always start with a spotless window. Any dirt left behind will only create more scratches. Use a separate clean microfiber cloth for cleaning and for drying.
Work in Sections: If you’re tackling a larger area or multiple scratches, work on one section at a time. This prevents the polish from drying out. It also helps you stay organized.
Use Gentle Pressure: This cannot be stressed enough. Too much force can damage the glass or create distortions. Let the compound do the work.
Circular Motions: Always work in small, overlapping circular motions. This ensures even polishing. It also helps to blend the polished area.
Keep it Cool: Avoid polishing in direct sunlight or when the glass is hot. Heat can cause the polish to dry too quickly. It can also stress the glass.
Protect Your Paint: Use painter’s tape to mask off the car’s paintwork around the window. This prevents accidental damage from the polishing compound.
Don’t Over-Polish: If the scratch is becoming less visible, don’t keep going indefinitely. Over-polishing can create a concave effect or distortion. Know when to stop.
Test First: If you are unsure about a product, test it on a small, inconspicuous area first. See how it works and what results you get.
Consider the Weather: Try to do this on a mild, overcast day. This helps maintain a consistent temperature. It also reduces glare.
Patience is Key: This is not a quick fix. Be prepared to spend time on it. Rushing will likely lead to poorer results.
Frequent Questions
Can I use household cleaners to remove scratches?
Most household cleaners are not abrasive enough to remove scratches. Some abrasive cleaners might even create more micro-scratches. It’s best to use products specifically designed for glass polishing, like cerium oxide or specialized glass polishes.
Will buffing scratches distort my view?
If done correctly, buffing should not distort your view. However, over-polishing an area too aggressively can create a dip or uneven surface. This distortion can be worse than the original scratch, especially on a windshield in your line of sight.
Always use gentle pressure and stop if you notice distortion.
How do I know if a scratch is too deep to fix?
The fingernail test is a good indicator. If your fingernail catches on the scratch, it’s likely too deep for simple DIY buffing. Also, if the glass is chipped or cracked around the scratch, it’s not a candidate for polishing and may need replacement.
How long does it take to buff out a scratch?
The time varies greatly depending on the scratch’s depth and size. Light scratches might take 15-30 minutes of polishing. Deeper scratches could take an hour or more, and may still not be fully removed.
Patience is essential.
Can I use toothpaste to remove car window scratches?
Plain white toothpaste can sometimes help with very minor scuffs or hazing. It is a very mild abrasive. However, it is usually not strong enough for actual scratches.
For more significant marks, you’ll need a stronger, dedicated glass polishing compound.
What is cerium oxide and why is it used?
Cerium oxide is a fine white powder used as a polishing agent for glass. It works by gently abrading the surface of the glass. This levels out the scratch by smoothing down the glass around it.
It’s very effective for both DIY and professional glass polishing.
Should I worry about scratches on my windshield more than side windows?
Yes, you should be more concerned about windshield scratches. A damaged windshield is a safety issue. Deep scratches can weaken the glass, making it more prone to cracking.
Also, any distortion in your direct line of sight can impair your vision. Professionals are highly recommended for windshield damage.
Conclusion
Seeing a scratch on your car window can be frustrating. But now you know that many can be fixed. With careful assessment and the right tools, you can often restore clarity.
Remember to clean thoroughly, use appropriate compounds, and work with patience. Don’t be afraid to try, but also know when to seek professional help. Clear windows mean safer driving and a better-looking car.