DIY Methods For Removing Car Scratches That Actually Work
This guide will walk you through DIY methods that really work. We’ll look at what kinds of scratches you can tackle. You’ll learn simple steps that can make those marks vanish. Get ready to bring back that showroom look to your car’s paint, without leaving your driveway.
Many common car scratches can be effectively removed or significantly reduced using accessible DIY methods and products. Understanding the scratch depth is key to choosing the right approach, from simple polishing to more involved touch-ups.
Quick Answer
Light clear-coat scratches (won’t catch a fingernail) can often be buffed out with rubbing compound and polish. Deeper color-coat scratches need touch-up paint plus clear coat, while scratches down to bare metal or primer are best left to a body shop to prevent rust.
Understanding Car Scratches
Not all scratches are created equal. To fix them right, you need to know what you’re dealing with. Think of your car’s paint like layers of an onion. The very top is clear coat. This is a protective layer. It’s what you see and touch every day.
Below that is the color coat. This layer gives your car its bright shade. The bottom layer is the primer. It helps the paint stick to the metal. Finally, there’s the metal of the car itself.
Why does this matter? Because the fix depends on which layer the scratch reached. A shallow scratch might only be in the clear coat. A deep one could go all the way to the primer or even the metal. Knowing the depth helps you pick the right tool and method. It also tells you if a DIY fix is even possible.
Clear Coat Scratches
These are the most common. You might get them from a car wash brush. Or maybe a shopping cart bumped your door. They look like light, thin lines. You can often feel them a little with your fingernail. But your nail doesn’t catch badly.
The good news is these are the easiest to fix. Since only the top clear coat is affected, you can often buff them out. Think of it like sanding down a tiny bump. You’re smoothing the surface. This makes the scratch disappear.
Products like rubbing compounds and polishes are your best friends here. They contain very fine abrasives. These gently remove a thin layer of clear coat. This smooths out the scratch. It blends the damaged area with the surrounding paint.
Color Coat Scratches
These scratches go deeper. They reach the colored layer of paint. You will see the color of your car is gone in the scratch line. Your fingernail will definitely catch in these. They are more visible than clear coat scratches.
Fixing these yourself is harder. Buffing alone might not be enough. You might need to add some color back. This usually involves touch-up paint. It’s like a tiny paint job for a small spot.
The goal is to fill the scratch with matching paint. This makes it level with the rest of the surface. It’s tricky to get perfect. But with patience, you can make it look much better. Sometimes, a scratch this deep still shows a faint line. But it’s much less noticeable.
Primer or Metal Scratches
These are the worst kinds of scratches. They go through the clear coat and color coat. You might see a white or gray layer (primer). Or you might see bare metal. These scratches can lead to rust if not fixed.
Honestly, these are usually beyond simple DIY fixes for a perfect finish. While you can stop rust with a touch-up, getting a smooth, seamless look takes skill. It often requires professional repair. This might involve sanding, priming, painting, and clear coating a larger area.
However, for a basic fix to prevent rust, you can use touch-up paint. You’ll need to clean the area well. Then apply primer if needed. Follow with color coat and clear coat. It won’t look factory fresh. But it will protect your car from more damage.
Tools and Supplies You’ll Need
Before you start, gather your supplies. Having everything ready makes the job smoother. You don’t want to stop halfway because you’re missing something. Think of it like preparing for a recipe.
The exact items depend on the scratch. But here’s a general list. Many are common car care items.
Essential Scratch Removal Supplies
- Car Wash Soap: To clean the area first.
- Microfiber Towels: Soft and non-abrasive. Get a few.
- Rubbing Compound: For light clear coat scratches.
- Polishing Compound: Finer than rubbing compound. Use after.
- Scratch Remover Products: Many brands offer kits.
- Touch-Up Paint: Matched to your car’s color code.
- Applicator Pads or Sponges: For applying compounds.
- Painter’s Tape: To mask off areas.
- Rubbing Alcohol or Panel Wipe: For final cleaning.
- Gloves: To keep your hands clean.
Finding your car’s paint color code is important for touch-up paint. It’s usually on a sticker in the driver’s side door jamb. Or check your car’s manual.
For deeper scratches, you might also need primer and clear coat pens. These come in handy kits. Always read the instructions on any product you buy. Different brands have slightly different steps.
DIY Method 1: The Toothpaste Trick (For Very Minor Scuffs)
Okay, let’s start with the simplest thing. This is for those tiny, barely-there scuffs. You know, the ones that look like haze or very light swirl marks. This method uses something most people already have at home: toothpaste.
Wait, toothpaste? Yes! White, non-gel toothpaste contains mild abrasives. These can buff out very shallow scratches. It’s like a super gentle polish. But be warned, this only works for the most superficial marks. If you can feel a groove with your nail, this won’t cut it.
First, wash the car area thoroughly. You don’t want to rub dirt into the paint. Dry it well with a soft microfiber towel. Then, put a small dab of white toothpaste on a clean, damp microfiber cloth or applicator pad.
Gently rub the toothpaste onto the scratch. Use small, circular motions. Don’t scrub hard. You’re just trying to polish the surface. Work for about 30 seconds to a minute. Then, wipe the area clean with a fresh, damp microfiber cloth.
Check the scratch. If it’s less visible, great! You can repeat the process a couple more times. If it’s still there, or if you see no change, this method isn’t strong enough for your scratch. Move on to something more potent.
Toothpaste Method Quick Guide
When to Use: Very light scuffs, surface haze.
What You Need: White non-gel toothpaste, microfiber cloths.
Steps:
- Clean and dry the paint.
- Apply toothpaste to a damp cloth.
- Rub gently in circles for 30-60 seconds.
- Wipe clean with a damp cloth.
- Inspect and repeat if needed.
Caution: Only use non-gel, white toothpaste. Avoid colored or gritty versions.
DIY Method 2: Rubbing Compound for Clear Coat Scratches
Now we’re stepping up. For actual clear coat scratches, rubbing compound is your best bet. This is a more aggressive abrasive than toothpaste. It’s designed specifically for automotive paint correction.
You can find rubbing compounds at auto parts stores. They come in various grits. Start with a less aggressive one if you’re unsure. Always test in an inconspicuous area first.
Wash and dry the car area thoroughly. Again, dirt is your enemy. If the scratch is long, you might want to mask off the surrounding paint. Use painter’s tape to protect undamaged areas. This prevents accidental buffing there.
Apply a small amount of rubbing compound to an applicator pad or a clean microfiber cloth. Don’t use too much. A little goes a long way. Start by gently working the compound over the scratch. Use back-and-forth or side-to-side motions. Some people prefer light circular motions, but straight lines are often recommended to avoid creating swirl marks.
Work the compound until it starts to “break down.” This means it becomes more transparent. You’ll feel less resistance. This process usually takes about 30 seconds to a minute per section. Wipe away the residue with a clean microfiber towel.
Inspect the scratch. If it’s gone, you’re done with this step. If it’s still visible, you can apply a bit more compound and repeat. Work in sections. Don’t try to fix a huge area all at once. You might notice the area looks a bit dull after using rubbing compound.
This is normal. Rubbing compound removes defects but also removes the shine. That’s why the next step is important.
DIY Method 3: Polishing for Shine Restoration
After using rubbing compound, the paint might look a little hazy. This is where polishing comes in. Polishing compounds are much finer than rubbing compounds. They are designed to restore gloss and remove any very fine hazing left behind.
You can use a separate polishing compound. Or some kits combine rubbing and polishing stages. If you’re using a separate polish, apply a small amount to a clean applicator pad or microfiber cloth.
Gently work the polishing compound over the same area you treated with rubbing compound. Use light pressure and overlap your strokes. Again, back-and-forth motions are good. Work until the polish begins to clear. Wipe away any residue with a clean microfiber towel.
The goal here is to bring back the shine. You want the corrected area to blend seamlessly with the rest of the paint. You should see a noticeable improvement. The scratch should be gone, and the paint should look glossy again.
Once you’re happy with the look, clean the area one last time. Use a panel wipe or rubbing alcohol. This removes any remaining polish oils. This ensures any wax or sealant you apply next will stick properly.
Rubbing & Polishing Steps
Best For: Clear coat scratches, swirl marks.
Key Products: Rubbing compound, polishing compound, microfiber towels, painter’s tape.
Process:
- Clean and dry the car surface.
- Tape off the surrounding paint if needed.
- Apply rubbing compound to an applicator.
- Work compound on scratch with gentle strokes.
- Wipe residue clean with a microfiber towel.
- Inspect and repeat if scratch remains.
- Apply polishing compound to restore shine.
- Work polish until clear, wipe clean.
- Final clean with panel wipe.
DIY Method 4: Touch-Up Paint for Deeper Scratches
When a scratch goes past the clear coat and into the color layer, it’s time for touch-up paint. This is where you physically fill the scratch with new paint. It’s more involved than just buffing.
The key is getting the exact color match. Use your car’s paint code. You can usually buy touch-up paint pens or small bottles online or at auto parts stores. Some come with tiny brushes. Others have needle-like applicators.
First, clean the scratch and surrounding area very well. Use rubbing alcohol or a panel wipe. You need a clean surface for the paint to stick. If there’s any rust, you’ll need to address that first. Sand it off and apply a rust inhibitor.
If the scratch is deep, you might need primer. Apply a thin layer of primer to the scratch base. Let it dry completely according to the product instructions. Then apply the color coat. Do this in very thin layers.
The goal is to build up the paint within the scratch. Don’t try to fill it all at once. This can lead to blobs. Apply one thin coat. Let it dry. Then apply another. You want the new paint to be slightly higher than the surrounding paint. This allows you to level it later.
After the color coat has dried for at least 24 hours, you can add a clear coat. This seals the color and adds protection. Apply it in thin layers, just like the color coat.
Once the clear coat is fully cured (this can take a few days), the painted area might still be a little high. You can carefully level it. Some people use very fine grit sandpaper (like 3000 grit) wet. Others use a polishing compound. Work very gently.
This step requires patience. You are essentially flattening the new paint to match the old. If you sand too deep, you’ll have to start over. It’s better to under-level and then polish it smooth.
Touch-Up Paint Process
Use For: Scratches into the color coat or primer.
What You Need: Exact color match touch-up paint, primer (if needed), clear coat (optional but recommended), fine sandpaper (3000+ grit), rubbing alcohol.
Steps:
- Clean the scratch thoroughly.
- Apply thin layer of primer if scratch is deep. Let dry.
- Apply thin, multiple layers of color coat. Let dry between layers.
- Apply thin layers of clear coat. Let cure for days.
- Carefully level the paint if it’s raised (wet sanding or polishing).
- Polish to blend the finish.
Tip: Practice on a piece of scrap metal first if you’re nervous.
DIY Method 5: Scratch Remover Kits
There are many products on the market sold as “scratch removers.” These often come in kits. They typically combine a mild abrasive compound with applicators and microfiber towels. Some may include a glaze or sealant.
These kits are often designed for ease of use. They can be a good starting point for beginners. They usually target clear coat scratches.
The process is generally similar to using rubbing and polishing compounds separately. You’ll clean the area, apply the compound from the kit, and buff it out. The kit’s instructions are your guide.
Read reviews before buying a kit. Some work better than others. Look for kits that clearly state what type of scratches they are for. Some might be too aggressive, others too mild.
I remember using one of these kits on my old sedan. It had a nasty scuff from hitting a shrub. The kit promised to make it disappear. I followed the steps exactly. It didn’t vanish completely, but it faded from a bright white line to a faint ghost. I was happy with that result for a quick DIY fix.
Scratch Remover Kit Insights
What They Are: Pre-packaged solutions for DIY scratch repair.
Common Contents: Mild abrasive compound, applicator pads, microfiber cloths, instructions.
Best For: Light to medium clear coat scratches.
Pros: Convenient, user-friendly, often affordable.
Cons: Effectiveness varies by brand; may not work on deep scratches.
My Personal Experience: The Shopping Cart Incident
It was a sunny Saturday. I was unloading groceries. My toddler, bless his energetic heart, decided to practice his running around the car. As I turned to grab another bag, I heard it. A horrible scraping sound. My stomach dropped. I looked, and there it was: a long, ugly scratch down the side of my new car’s door. It looked like a white stripe.
Panic set in. This was a deep scratch. I could feel my nail catch in it. My first thought was calling the dealership. Then I remembered all the articles I’d read about DIY car care. I decided to try a method myself before shelling out cash.
I went online and found my car’s paint code. I ordered a touch-up paint pen. It arrived a few days later. It felt like a little miracle. I spent an hour cleaning the car. Then, with a very steady hand, I started applying the color. It was nerve-wracking. I put on thin coats, letting each dry. It looked a bit bumpy at first.
After the color coat cured, I added the clear coat. The scratch was still visible, but it was filled. The white line was gone. I did a bit of very light wet sanding a week later, followed by some polishing. It wasn’t perfect. You could still tell if you looked closely. But from a normal distance, it looked worlds better. That DIY fix saved me hundreds of dollars and a lot of stress.
What This Means for You: When to DIY and When to Call a Pro
So, when should you grab your supplies and when is it time to hand over the keys?
DIY vs. Professional Repair: A Quick Look
| Scratch Type | DIY Feasibility | Professional Recommendation |
|---|---|---|
| Very Light Haze/Scuffs (Clear Coat) | High (Toothpaste, mild polish) | Low |
| Deeper Clear Coat Scratches | Medium (Rubbing compound, polish) | Low to Medium (if perfect finish needed) |
| Scratches into Color Coat | Medium (Touch-up paint) | Medium (For seamless results) |
| Scratches into Primer/Metal | Low (For rust prevention only) | High (For a factory finish) |
When DIY is a Good Idea
If the scratch is only in the clear coat, you can usually fix it yourself. These are the shallowest marks. You can feel them with your fingernail, but it doesn’t snag badly. Using rubbing compounds, polishing compounds, or specialized scratch remover kits can make these disappear or become very hard to see.
Touch-up paint for color coat scratches is also a common DIY fix. It won’t be invisible. But it will protect the paint and make the scratch much less obvious. This is a great way to save money if you’re okay with a less-than-perfect result.
When to Call a Professional
If the scratch is deep enough to reveal primer (often white or gray) or bare metal, it’s a different story. These scratches need more than just a simple fix. They require proper priming, painting, and clear coating to prevent rust and achieve a good look.
Also, consider professional help if the scratch is very long, wide, or on a highly visible or curved area. Getting a perfect, seamless finish on those can be very difficult for beginners.
If you value a factory-perfect finish above all else, or if the scratch is very severe, a professional detailer or body shop is your best bet. They have the tools, experience, and controlled environment to do the job right.
Preventing Future Scratches
Once you’ve fixed those scratches, you’ll want to keep your car looking good. Prevention is always better than cure, right?
Regular washing with proper techniques is key. Always use car wash soap, not dish soap. Use the two-bucket method: one bucket for soapy water, one for rinsing your wash mitt. This prevents you from rubbing dirt back onto the paint.
Dry your car with clean microfiber towels. Never use old t-shirts or bath towels. They can be abrasive.
When parking, try to avoid tight spots. Be mindful of shopping carts and car doors. If you use an automatic car wash, choose one with soft cloth washes, not brushes. Even then, some minor scratching can occur over time.
Consider ceramic coatings or paint protection films (PPF). These offer a tough layer of defense against minor scratches and chips. They can be an investment, but they protect your car’s finish.
Scratch Prevention Tips
- Wash Correctly: Use pH-neutral car soap and the two-bucket method.
- Dry Gently: Use clean, soft microfiber drying towels.
- Park Smart: Avoid tight spaces and areas with high traffic.
- Be Wary of Auto Washes: Opt for touchless or soft-cloth washes.
- Consider Protection: Ceramic coatings or paint protection film add a shield.
- Road Debris: Drive carefully to avoid stones and sand kicked up by other vehicles.
Quick Fixes & Tips
Here are a few extra tips to make your scratch removal easier and more successful.
Work in Shade: Never work on your car’s paint in direct sunlight. The heat can cause products to dry too quickly. It can also make the paint surface uneven and harder to work with.
Cleanliness is Crucial: I can’t stress this enough. Always start with a clean car. Then, ensure your tools (towels, applicators) are also clean. A single speck of dirt can cause a new scratch.
Test First: Always test any product you use in a small, hidden area of your car first. This lets you see how it reacts with your paint. It helps you gauge how much pressure to use.
Use Light Pressure: You don’t need to use brute force. The abrasives in the products do the work. Too much pressure can cause more damage or create swirl marks.
Patience is Key: Scratch removal, especially with touch-up paint, takes time. Don’t rush the drying or curing steps. Building up layers slowly is better than one thick, messy layer.
Know When to Stop: If you’ve tried a method and it’s not working, or if you’re making it worse, it’s okay to stop. Sometimes, calling a pro is the smartest move.
Seal the Deal: After you’ve fixed the scratch, apply a coat of wax or sealant. This protects the newly repaired area and the surrounding paint. It also makes your car look great.
Frequently Asked Questions About Removing Car Scratches
Can toothpaste really remove car scratches?
Can toothpaste really remove car scratches?
Yes, but only very minor scuffs or surface haze. White, non-gel toothpaste contains mild abrasives that can lightly buff out the most superficial scratches in the clear coat. It won’t work for deeper scratches.
How do I know if a scratch is too deep to fix myself?
How do I know if a scratch is too deep to fix myself?
The best way is the fingernail test. If your fingernail doesn’t catch in the scratch, it’s likely just in the clear coat and can be fixed. If your nail snags, it has gone deeper, possibly into the color coat, primer, or even metal, and may require professional attention for a perfect finish.
What’s the difference between rubbing compound and polishing compound?
What’s the difference between rubbing compound and polishing compound?
Rubbing compound has coarser abrasives. It removes more material to level out deeper imperfections in the clear coat. Polishing compound has finer abrasives. It refines the finish, removes haze left by rubbing compound, and restores gloss.
How long does touch-up paint need to dry before I can polish it?
How long does touch-up paint need to dry before I can polish it?
It’s best to let touch-up paint cure for at least 24 hours. For best results and to avoid damaging the new paint, waiting several days to a week before wet sanding or polishing is recommended. Always check the specific product’s instructions.
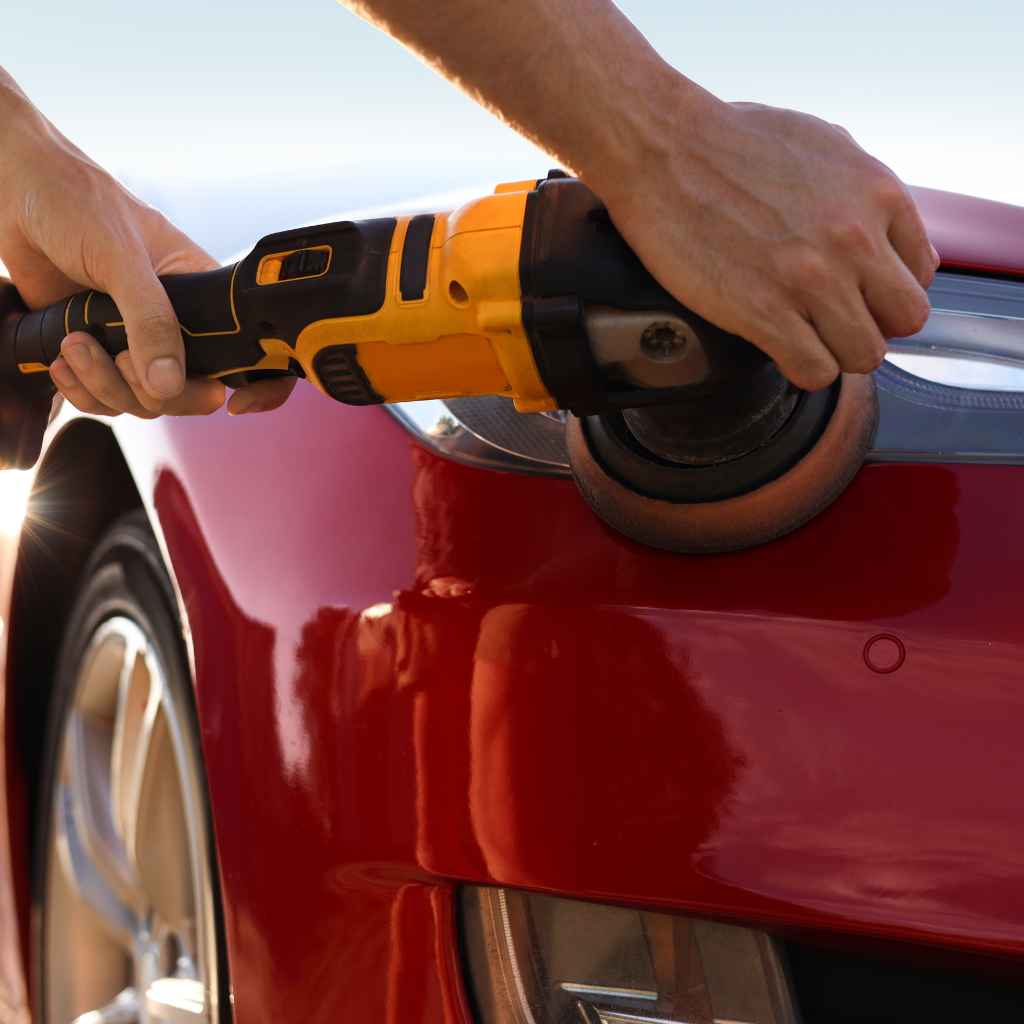
Can I use a power polisher for scratch removal?
Can I use a power polisher for scratch removal?
Yes, power polishers (like orbital or rotary polishers) can be very effective, especially for larger areas or deeper scratches. However, they require practice and skill. Using too much pressure or the wrong pad can easily burn through the paint or create holograms. For beginners, hand application is often safer.
Will fixing scratches increase my car’s value?
Will fixing scratches increase my car’s value?
A car with a clean, scratch-free finish generally commands a higher resale value. DIY fixes can significantly improve appearance and thus perceived value, especially for minor to moderate scratches. Deep scratches, if left unaddressed, can lead to rust and deter buyers, lowering value.
Conclusion: Taking on Scratches with Confidence
Seeing a scratch on your car doesn’t have to mean instant panic or a costly repair. With the right knowledge and a few simple tools, many common paint imperfections are within your reach to fix. From the quick toothpaste trick for faint scuffs to the careful application of touch-up paint for deeper marks, DIY methods can truly work.
Remember to assess the scratch depth, choose your method wisely, and always work clean and patiently. You might just surprise yourself with the results. Happy detailing!